Secure Boot, as the name suggests, this security feature safeguards the system boot process from any malicious threats. As the Secure Boot feature is mandatory for the degradation/installation of Windows 11, users have also complained about seeing this “Secure Boot State Unsupported” while trying to upgrade to Windows 11. Go through the recommended solutions to fix the problem manually.
NOTE –
If you are facing this problem while installing Windows 11, you can easily bypass the Secure Boot and TPM check. This way, you won’t have to worry about the Secure Boot State at all.
Fix 1 – Check the System Information
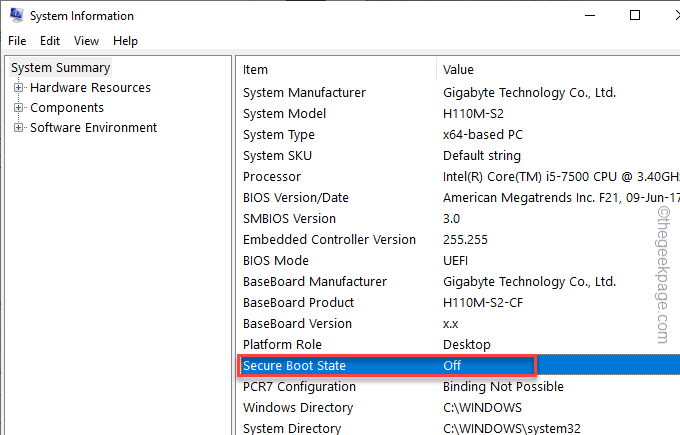
You can view the current state of the Secure Boot from the System Information page.
1. There is a quick way to open the Run box. You can easily do it by pressing the Windows key+R keys.
2. Then, write this term there and hit Enter.
msinfo32
3. When you land on the System Information page, make sure to select the “System Summary” tab, if it isn’t automatically selected.
4. Then, scroll down slowly and take a look at the value of “Secure Boot State“.
If it says “Off” then, the Secure Boot is in the disabled condition. You can re-enable it from the BIOS following the steps mentioned in Fix 3.
Otherwise, if you see the “Unsupported” condition, then your BIOS is in Legacy mode and you have to manually convert the BIOS mode (Fix 4).
Fix 2 – Test the TPM support
Besides Secure Boot, TPM is also a mandatory feature for your system to function properly.
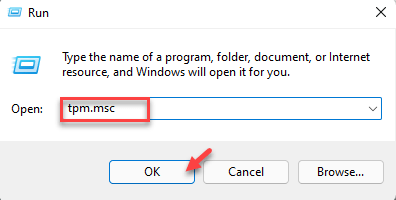
1. You have to open the Run. So, press the Win key+R keys together.
2. Then, type this there and hit Enter.
tpm.msc
If you see the “Compatible TPM cannot be found” message, TPM is either disabled or the system doesn’t have a proper TPM module installed.
In case, the TPM module is disabled on your system, you can enable the TPM chip from BIOS.
Fix 3 – Enable Secure Boot from BIOS
You can easily enable the Secure Boot feature from the BIOS settings.
1. Restart your computer.
2. When the manufacturer’s logo appears, quickly press and hold the “Delete“* key to open the bios setup on your computer.
*NOTE– The actual key to open the BIOS settings can differ from manufacturer to manufacturer. These are the variety of keys –
Esc, F1, F2, F10, F11, F12 or Delete
Pressing the allocated key will bring up the BIOS screen on your computer.

3. In the BIOS setup window, go to the “Boot” tab using the arrow key.
4. Now, go down to select “Secure Boot” and then press Enter.
5. Now, choose “Enabled” from the drop-down and then hit Enter to enable the Secure Boot on your computer.
6. Now, press the particular key that is associated with the “Save & Exit” option.
[In our case, it is the “F10” key.]
After saving this. you will automatically boot back into Windows.
Fix 4 – Change the BIOS Mode
Another thing you can do is to change the BIOS mode from Legacy mode.
You should know the BIOS mode of your computer. If it is set to Legacy, you have to alter it to UEFI mode. You can do it from the BIOS settings.
1. Close everything and shut down your computer.
2. Then, start it up.
3. As soon as the computer screen shows up the manufacturer’s logo, press the designated key to open the BIOS page.
Usually, this key is Delete, F2, F10, or F12. Notice carefully on the screen.

4. Once you have opened the BIOS page, go to the “Boot Options” tab.
5. Here, use your keyboard to go to the “Legacy Support” option and set it to “UEFI“. However, you can also set this option to “Disabled” mode also.
6. Now, set the “Secure Boot” mode to the “Enabled” state.
Then, just save and exit the system. Your computer should automatically restart.
You won’t face any trouble regarding Secure Boot anymore.
Fix 5 – Check and convert MBR to GPT
Check whether the volume is of MBR or Master Boot Record partition style and you have to convert it to the GPT style.
NOTE –
If you have Windows version 1703 or later, you don’t have to worry. Windows has this MBR2GPT tool that can convert MBR style to GPT without losing any data.
But, if you have an older PC, this conversion will wipe out all the data you have on the volume. So, in that case, backup that data somewhere safe and then convert following this method.
Step 1 – Identify the partition style
1. You can press the ⊞ Win key+X keys together.
2. Later, just tap “Disk Management” to access it.
3. Once Disk Management opens up, you will see all your drive partitions and external devices connected to the system.
4. Now, just right-tap the hard disk drive and tap “Properties“.
5. In the partition window, go to the “Volumes” section.
6. Now, just check whether the drive is of MBR or GPT partition style.
Step 2 – Conver to GPT
Now, follow these steps to convert the partition to the GPT style.
You have to reboot the computer in the Recovery Mode.
1. You can use the Windows key+I combination to open Settings quickly.
2. Then, tap the “System” menu.
3. After that, click on “Recovery” to open that setting.
4. Now, find the Advanced startup option on the right-hand pane.
5. Then, tap “Restart now” and the system will boot into the Advanced Startup mode.
6. Just, tap “Troubleshoot” to proceed to the next step.
7. Next, just click “Advanced options” to navigate to the next page of settings.
8. On the next page, you will see multiple options.
9. Tap the “Command Prompt” to open the terminal.
10. After this, write down this code and hit Enter to start
mbr2gpt /convert
This process of conversion, depending on the size of the drive, may vary. So, wait patiently until this is done.
Your problem should be solved.


