Some Windows users have recently complained of seeing the following error message at system boot, “SMART Failure Predicted on Hard Disk” with the name and ID of the hard drive. Though the users can proceed to system boot, there’s a chance the hard drive may fail. So, you should adhere to these solutions and find a fix for the issue. There are many possible causes that may have caused this problem, including overheating, shock, non-defragmented drive, etc.
Workarounds –
1. Force-restart the system. You can do it by press-holding the power key for a few seconds. If this is a glitch, a system reboot may fix it.
2. The first thing to boot into the system is by pressing the F1 key. This way, you can carry on to the system drive.
If you can get to your system, don’t forget to create a backup of the affected drive. In case, you don’t which drive is causing this issue, follow the next steps.
Force-boot into Safe Mode –
If you can’t boot into Windows normally due to the Smart Failure error message, again and again, you can use these steps to get there –
1. Shut down the system.
2. Then, power it ON. When the screen starts to show the manufacturer’s logo, force-shutdown the system by pressing down the power key.
3. Next, start up the machine once more.
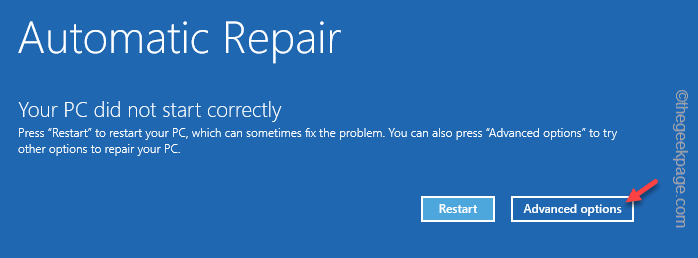
Repeat this start-force shutdown-start operation or two-three times more and let the system restart it will go to the Recovery Environment.
4. Once it boots up in RE mode, tap “Advanced options“.
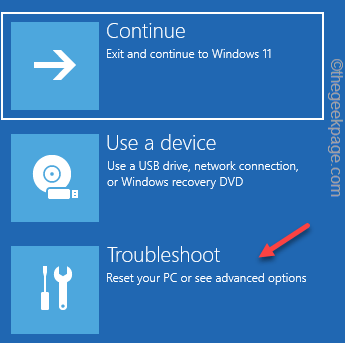
5. Next, click on the “Troubleshoot” menu.
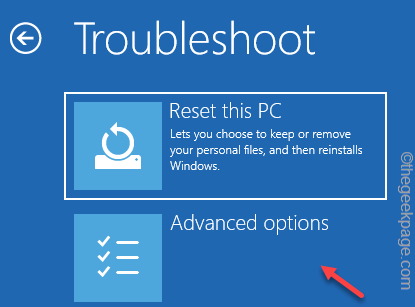
7. On the Advanced options page, tap “Startup Settings” to open the complete list of options.
8. Now, just click “Restart” to restart the system.
9. Your system restarts after this. You may see various startup settings on the next screen.
10. Here, press the F4 to use the “Enable Safe Mode” option.
This way, you can easily reach Safe Mode.
How to specify the affected drive
If you are using a single SSD or HDD, you can skip this step. But, if the affected system has multiple HDDs or SSDs, you can follow these steps to identify the affected drive.
1. Note down the HDD ID number which shows up with the Smart Failure error message.
2. Now, boot your computer in normal mode or Safe Mode.
3. When you reach the desktop screen, right-tap the Windows icon and tap “Disk Management” to open that.
4. Now, you will notice all the drives on the Disk Management page.
5. Right-tap the first hard disk/SSD and tap “Properties“.
6. Here, if you go to the “General” tab, you can see the name of the disk there.
If this wasn’t the disk, try to check other disks as well.
This way, you can identify the epicenter of the issue.
Fix 1 – Copy the data
S.M.A.R.T error is a sign that your hard drive is failing. So, without wasting any more time, you should copy the data from the affected drive to another HDD.
1. Switch off the system. Make sure to detach it from the power source.
2. Then, carefully remove the cabinet and unplug the HDD from the HDD enclosure.
3. Now, you can put the HDD into a USB HDD Enclosure and plug it into another machine, or, if you have a PC, connect the HDD to the motherboard directly using one of the empty slots.
4. Now, copy the data from the affected drive to a fresh, good drive.
This way, even if the hard disk gets corrupted, you’ll have the backup to save your skin.
Fix 2 – Defragment the drive
Defragmenting the drive where you have faced this problem should help you resolve the problem.
You can do this in normal mode. But, if the system doesn’t boot up properly, you can boot into Safe Mode and then retry the fixes.
1. Open File Explorer. You can easily get there by pressing the Win key and the E keys together.
2. Now, head on to “This PC“.
3. Next, right-tap any partition of the affected drive and click “Properties“.
4. Now, visit the “Tools” section.
5. Here, you will see the Optimize and defragment drive section. Just tap “Optimize” to optimize the drive.
This will open the Optimize Drives window.
6. There, select the drive and tap “Optimize” to defragment the drive.
After this, close all the windows and restart the system. You won’t see the Smart Failure error message again.
Fix 3 – Check and fix errors in the drive
If a sector is bad or corrupt, you can run the drive-checking tool to scan and repair the drive.
1. You have to open the File Explorer window and go straight to “This PC” on the left-hand tab.
2. Now, right-trap the drive and tap “Properties“.
3. If you go to “Tools“, you will find the Error checking tab.
4. There, tap “Check” to start scanning the drive.
Let Windows scan the drive.
When it is complete, reboot the system.
You won’t face the issue again.
Fix 4 – Test the system files with SFC code
This can be the fault of the system file which you can solve with the SFC scan. The System File Checker scan can take care of any faults in the system files.
1. You can click on the “Search” option and begin to type “command“.
2. When you see the “Command Prompt“, right-tap it and tap “Run as administrator“.
3. Now, input the SFC command to run the SFC scan consecutively.
sfc /scannow
You can track the progression of the scan from the “Verification 5% complete” message. Wait till the scan progression reaches 100% complete level.
In the end, you will notice the following message –
Windows Resource Protection found corrupt files and successfully repaired them.
Close the CMD window. Then, you must restart your computer.
You won’t see the error message again.


