Secure Boot feature has become with Windows 11, while it should have been for all the past iterations of the OS. Secure Boot protects the bootloaders from any outside interferences like malware infections, corrupt bootloaders, etc. But some users have complained about Windows 11 isn’t booting up the issue after enabling the Secure Boot feature. Just follow these easy solutions to fix the issue very quickly and boot your computer normally.
Workarounds –
1. Disconnect all the external hard drives connected to the system. This will remove any disputes and help the device to boot correctly.
2. Just restart the system once. Check if it is working or not.
Fix 1 – Check the partition style
You can check whether the partition style is GPT or MBR. If it is an MBR partition, you have to convert it to the GPT one.
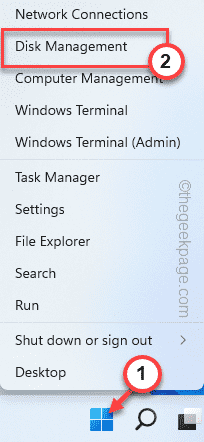
1. You can press the ⊞ Win key+X keys together.
2. Later, just tap “Disk Management” to access it.
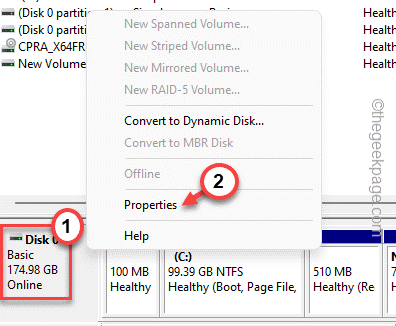
3. Once the Disk Management opens up, you will see all your drive partitions and external devices connected to the system.
4. Now, just right-tap the hard disk drive and tap “Properties“.
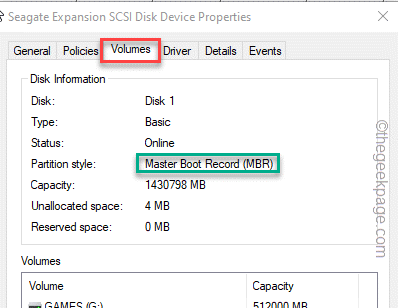
5. In the partition window, go to the “Volumes” section.
6. Now, just check whether the drive is of MBR or GPT partition style.
If the partition style is GPT, you can boot the system normally and install Windows 11 on your system. It should just work out normally.
If the partition style is of MBR type, you have to convert it to GPT style before you install Windows 11.
Steps to convert MBR to GPT style
You can easily convert your MBR partition to GPT.
NOTE – Converting the drive to GPT does require cleaning it up, which means formatting the drive, and wiping out all the data from the drive. You should create a backup of the files on the drive before you proceed.
STEP 1 – BOOT FROM CD/DVD
1. Close everything and switch off the system. Now, switch ON the system.
2. Now, plug in the Windows 11 installation disk/ bootable USB drive in your system.
3. Now, just restart the computer.
4. When your system is starting back up, keep pressing the boot key* to access the BIOS setup.
*This boot key usually depends upon the manufacturer and it varies one from another. So, carefully notice which key is allotted to your system. It can be any one of these keys –
F2, Del, F12, F1, F9, F2, Esc

5. Once the BIOS page opens up, advance to the “Boot” tab.
6. In this section, you can actually see the current booting order for your system.
Now, if you are using a bootable USB drive, just select the “Removable devices” option and hit Enter to directly boot using the device.
Otherwise, if you are using a DVD for the installation, you have to select the “CD-ROM Drive” and hit the Enter button.
Your computer will boot up using the Windows 11 bootable drive.
STEP 2 – CONVERT THE PARTITION
Now, you can easily convert the MBR partition to GPT.
1. Once the Windows Setup screen loads up, feel free to choose the language and time, and keyboard as you want.
2. Otherwise, just tap “Next” to proceed.
2. Once you are in the main installation page, on the installation page, just press the Shift+F10 keys together to open the terminal.
3. Once the terminal opens up, type these codes one-by-one and press the Enter key to access the Diskpart tool and enlist the drives on your system.
diskpart
list disk
4. Now, you have to select the disk where you are trying to install it. To do that, execute this code*.
select disk drive number
Replace the “drive number” with the number that you have noted before.
Example – The disk is “Disk 0“. So, the code is –
select disk 0
5. Finally, it is time to wipe out the drive. Now, just execute this code –
clean
This will empty the drive completely.
6. Finally, you can convert this disk into GPT style. Just input this code in the terminal and hit Enter.
convert GPT
7. This conversion process may take a while. Once it is done, just type “exit” in the terminal and hit Enter.
This will leave you from the Diskpart. Close the terminal manually.
8. Now, tap “Continue” to exit and continue to Windows 11.
Close the Windows 11 installation setup window. This will directly restart the system and boot the Windows 11 normally. You won’t face any further issues with the system.
Fix 2 – Check whether Secure boot is enabled
There is a chance that Secure boot is still disabled on the system. You can check it from here.
1. Just close all the windows and restart the system.
2. When the manufacturer’s logo appears, quickly press and hold the “Delete” key to open the bios setup on your computer. This BIOS key may be different for your system.
Pressing the allocated key will bring up the BIOS screen on your computer.

3. Once the BIOS setup window opens up, go to the “Boot” section using the arrow key.
4. Use the arrow key again and select the “Secure Boot” item and then press Enter.
5. Simply, make it sure to select the “Enabled” option and hit Enter.
7. After that, just press the particular key that is associated with “Save & Exit” option.
This will restart the system. Now, test if this works out for you.


