Is the printer connected to your system showing the error message ‘Printer is in error state’? Is this occuring everytime you are trying to send your files to the printer? This article is a comprehensive guide of how to fix the pritner is in error state problem. Simply just enacct these fixes on your computer to solve the problem easily.
Workarounds –
1. Check the connection cable to the printer and the power socket. Test it out again.
2. If your printer is connected to your computer using a WiFi, try restarting the Wifi and reconnecting to it again.
Fix 1 – Make sure the printer is in Online mode
You have to know if the printer is actually online or not.
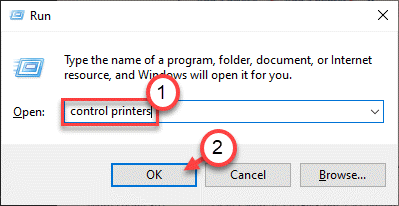
1. First of all, just right-click on the Windows key and click on “Run“.
2. Type “control printers” and hit Enter.

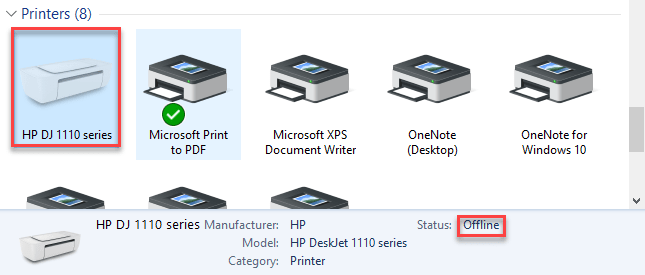
3. Here you will see all of your printer device.
4. Select the printer you want to check. Then, check the “Status” of the printer on the status bar of the Control Panel. It wil show the Priter status as ‘Offline‘.

5. Now, right-click on the printer and click on “Use Pritner Online” to use it.
Once the printer is in Online mode, it will show “Ready” in the status bar.
Close the Control Panel window. Try to print something.
This should stop the error state message for the printer.
Fix 2 – Enable legacy plug and play detection
You have to configure the plug and play detection settings to ‘Legacy’ mode.
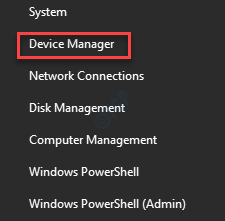
1. First of all, right-click on the Windows icon and click on “Device Manager“.

2. Once the Device Manager opens up, right click on the “Ports (COM & LPT)” and click on “Properties“.

3. Go to the “Port settings” tab*.
4. Here, click on the radio button beside the option “Use any interrupt assigned to the port” settings.

5. Then, tick mark the option “Enable legacy Plug an Play detection” settings.
6. Finally, click on “OK” to save the settings.

[
NOTE –
Upon opening the Properties screen, if you see that there is no ‘Port settings’ tab, do this –
1. Just expand the “Ports (COM & LPT)“.
2. Then, right-click on the “Printer Port” and click on “Propertties“.

Here, you will find the “Port settings” section.
]
After this, close the Device Manager screen and restart your computer. After restaring, try to print something and check if it is still shows the Error State message.
Fix 3 – Start stop the spooler
Start stope the spooler on your computer to fix this issue.
1. Type “cmd” in the search box.
2. Then, just right-click on the “Command Prompt” and click on “Run as administrator“.

3. Once the Command Prompt appears, type these two commands and hit Enter.
net stop spooler
net start spooler

Close the Command Prompt window. Then, try to print something and check if this works.
Fix 4 – Run the printer troubleshooter
1. Press the Windows button and the ‘S’ key and write “Troubleshoot“.
2. Then, hit ‘Enter‘.

3. After that, scroll down and click on the “Additional Troubleshooters“.

4. Now, click on the “Printer” to run this troubleshooter.
5. After hightlighting it, just click on the “Run the troubleshooter“.

6. Here, you can click on “Advanced” option.

5. Just, check the box “Apply repairs automatically“.
6. To go to the next step, click on “Next“.

7. Here you will notice a list of printers. Select your printer.
8. Then, again click on “Next“.

9. After that, click on “Apply this fix“.

Once you have troubleshooted the printer issue, close it.
Check if this fix your problems. Try to print anything and check it out.
Fix 5 – Remove the printer
You can remove the printer from your computer to fix the issue.
At first, unplug the printer cable from your printer.
2. Then, press the Windows key+R to launch Run,
3. Type “control printers” and hit Enter.

The Device and Printers window will be opened.
4. Then, in the list of the printers, right-click on the problematic printer, click on “Remove Device“.

5. Now, click on “Yes” to confirm the removal of the device.

This will remove the device from your computer.
6. After this. press the Windows key+R keys together.
7. Write down “devmgmt.msc” in the Run terminal and click on “OK“.

8. Once the Device Manager window opens up, expand the “Print queue” section.
9. After that, right-click on the printer and click on “Uninstall device“.

10. Again, click on “Uninstall” to confirm the uninstallation process.

Then, close the Device Manager window.
Once you have confirmed the removal of the printer, close the Control Panel screen.
Now, just restart your computer once. As your computer boots up, it will install the default printer driver for your computer.
If it still doesn’t install the driver.
Fix 6 – Set the spooler service to autotmatic
You have to set the spooler service to automatic settings.
1. First of all, write “Services” in the search box.
2. After that, simply press the Enter key once to access the Services utility.

3. You will see all the services on your computer.
4. Scroll down through the list and then double click on the “Print Spooler” service once you have noticed it.

5. Just set up the ‘Startup type:’ to the “Automatic” setting.
6. Here, click on “Start” to start the service.

7. At last, save everying by clicking on “Apply” and “OK“.

Close the Services screen. Try printing something and check further.
Your problem should be solved.