Sometimes Windows might not detect the second monitor that you are trying to set up because of driver or hardware related issues. There are several methods that you can try out to find and fix this issue of yours.
Before going on to try out the software solutions, let’s make sure that you have all the hardware checks well covered.
Hardware Checks
Before modifying the system settings, please try out the following hardware troubleshooting steps to fix your issue:
1. Make sure your external display is connected to a power source and that it is powered on. You can look for the small power indicating light at the bottom part of the screen if there is one.
2. Try restarting your machine to establish the connection.
3. Make sure the correct input is enabled (refer to device manual if required).
4. Make sure the cable is connected properly between your computer and your external display.
5. Disconnect the signal cable connection from both the ends and wait for a minute before connecting it again.
6. Try using a different cable to make sure the problem is not with the cable.
7. Display port and HDMI cable could come in different versions. Make sure to use the correct cable.
8. Try using different ports to make sure issue is not with the ports.
9. Connect the external display to another computer to rule out the possibility of the external display being faulty.
10. Get a working monitor and connect it to your computer to make sure your graphics card is error free.
11. If there are other peripherals connected to your system, like printers, cameras, USB drives etc., disconnect them all to make sure they are not causing any conflicts.
If the hardware checks are all in place and your problem is still not gone, please try out the methods listed below one by one.
Method 1: Force Detect Second Display From Settings App
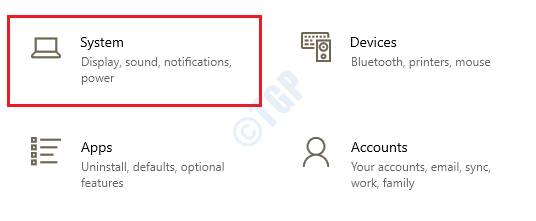
1. Open windows Settings app by pressing the WIN + I keys together. Click on System tab.
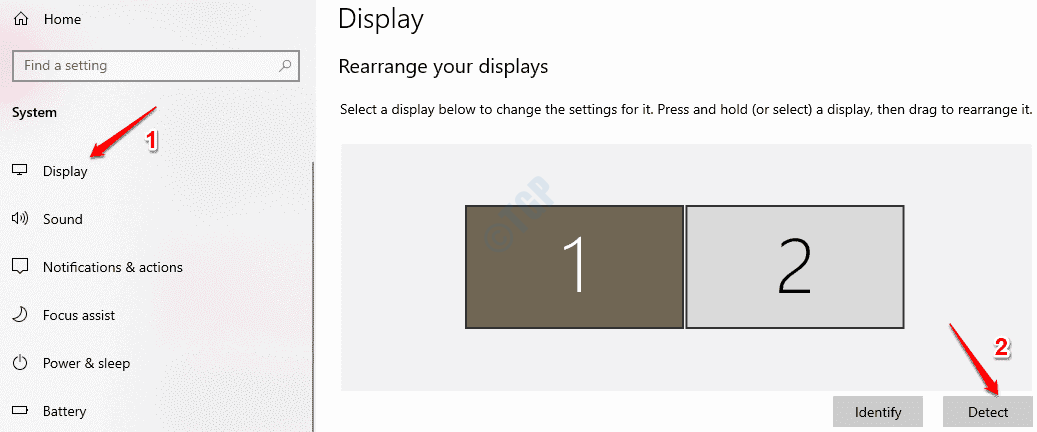
2. Now in the left window pane, click on Display option and in the right window pane, click on the Detect button. This will force Windows to detect any additional monitors that are connected to your system.
Method 2: Connect External Wireless Display
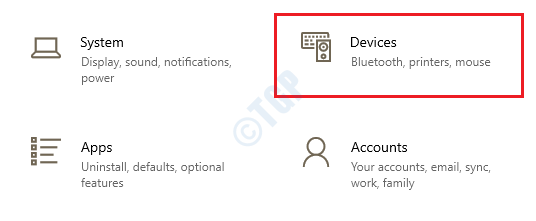
1. Press WIN + I keys together and open windows Settings app. Click on Devices tab.
2. In the left window pane, click on the option Bluetooth & other devices and in the right window pane, click on Add Bluetooth or other device.
3. When the Add a device window opens up, click on Wireless display or dock option.
4. Refer to your wireless display’s device manual to turn it on and to make it discoverable by other devices.
5. Once the device is discoverable, select it from the list of available devices and follow on screen instructions.
Method 3: Update Display Adapter Through Device Manager
Outdated graphics card driver can always cause issues related to displays. Please follow the steps below to successfully update your display adapter.
1. Press WIN + R keys together and bring up the Run window. Type in devmgmt.msc and hit Enter key.
2. Expand the Display adapters section and then right click on your display adapter listing. As next, click on Update driver option.
3. In the next window that launches, click on the option Search automatically for updated driver software.
Please wait while the driver updates to the latest version available. Once done, check if your issue is resolved.
Method 4: Roll Back Display Adapter Through Device Manager
If no new updates were found in the previous method, your issue could be because of an unstable graphics card version that is installed in your machine. Rolling back this update could very well fix your issue.
1. Open Run dialog box by pressing the keys WIN + R together. Once it opens up, type in devmgmt.msc and hit Enter key.
2. Just like in the previous method, expand Display adapters section and right click on your Display driver. Now click on Properties option.
3. Click on Driver tab and then click on Roll Back Driver button. If there are no roll backs possible, you won’t be able to click on this button.
Follow on-screen instructions to successfully roll back your display driver to a previous version. Check if your issue is gone once the process finishes.
Method 5: Reinstall Your Graphics Card Driver
If the above two methods did not work for you, then you could try uninstalling your graphics card driver and reinstalling it.
1. Press WIN + R keys together. When Run window opens, type in devmgmt.msc and press Enter key.
2. Expand the Display adapters section and then right click on your Graphics card driver. Now click on the option Uninstall device.
Once the uninstallation is complete, restart your machine. When the machine restarts, Windows will install all the missing drivers automatically. Check if your issue is resolved or not.


