The Settings app is a present-day substitute for the regular Control Panel that allows you to configure the different features and functions of Windows. From updating Windows, changing privacy or time and date settings to changing themes, editing accounts, or making changes to sounds, devices and more, this app covers almost all the aspects of Windows in one place.
Along with many new configuration options for Windows 10, that are yet not available in the Settings app. e Settings app also allows you to configure previous options that were offered by the Control Panel. Best of all, Windows 10 keeps adding more options in the Settings app with each update, thus, making it more advanced and useful over the period. While the Control Panel still features some of the useful tools and options that are yet not available in the Settings app, Microsoft wants to shift the focus completely to the Settings app in Windows 10 over the period.
Having said that, Microsoft introduced a way to reset the Settings app from the Windows 10 2004 version. So, if at any time, your Settings app stops working you can reset the Settings app on your Windows 10 and continue using it. Let’s see how.
Method 1: By Resetting the Settings App Through App Settings
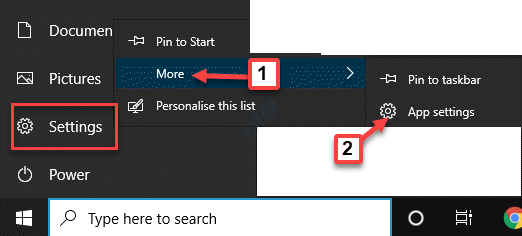
Step 1: Go to Start, click on it and right-click on the gear icon (Settings).
Select More and then App settings.

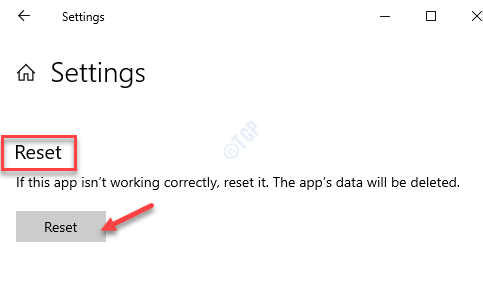
Step 2: It will open the advanced options page for the Settings app.
Scroll down and under the Reset section, press the Reset button.

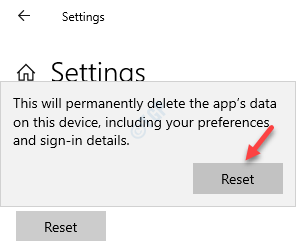
Step 3: Confirm the action, by pressing the Reset button again on the prompt.
Your system will now restart and the Settings app will be reset. You should now be able to open the Settings app normally.

*Note – If you do not find the App settings option in the Start menu as shown in the Step 1 above, you can then open the Settings app by following the below steps:
Step 1: Go to the Start menu and type Settings in the Windows search bar.

Step 2: Right-click on the result (Settings) and select App settings.

This should open the advanced options page of the Settings app and then you can proceed to Reset the app as shown above.
Method 2: By Resetting the Settings App Through Windows PowerShell
Step 1: Press the Win + R keys together on your keyboard to launch the Run command window.
Step 2: In the Run command search box, type Powershell and press Ctrl + Shift + Enter keys together to open the PowerShell Windows in admin mode.

Step 3: In the PowerShell (admin) window, run the below command and hit Enter:
Get-AppxPackage *windows.immersivecontrolpanel* | Reset-AppxPackage.

Now, exit Windows PowerShell and restart your PC. Your Settings app should be working now.
Method 3: By Reinstalling and Re-registering the Settings App in Command Prompt
The above Powershell method works for systems running on Windows 10 version 20175 and above. However, if you are running an older version, you can use the Command Prompt in admin mode to reinstall and re-register the Settings app. Let’s see how:
Step 1: Go to Start, right-click on it and click on Run in the menu.

Step 2: This will open the Run command box.
Now, type cmd in the search field and press the Ctrl + Shift + Enter hotkeys to launch the Command Prompt in elevated mode.

Step 3: Copy and paste the below command in the elevated Command Prompt window and press Enter:
PowerShell -ExecutionPolicy Unrestricted -Command "& {$manifest = (Get-AppxPackage *immersivecontrolpanel*).InstallLocation + '\AppxManifest.xml' ; Add-AppxPackage -DisableDevelopmentMode -Register $manifest}"

Once the process is over, close the Command Prompt window and reboot your PC for the changes to be effective. You should be able to use the Settings app normally now.
Method 4: By Running an SFC Scan
Sometimes, the errors you see can be due to corrupt system files. You can repair the corrupt system files by running the System File Checker scan that helps identify and repair any damaged files, thus, fixing your issue. Here’s how:
Step 1: Press the Win + X shortcut keys and select Run from the menu to open Run command.

Step 2: In the search box, write cmd and press the Ctrl + Shift + Enter keys together on your keyboard to launch the Command Prompt with admin rights.

Step 3: In the Command Prompt (admin) window, run the below command and hit Enter:
sfc /scannow

Step 4: The process takes a while to complete, so wait patiently till it’s over.
It will look up for any corrupt system files and once identified, will automatically repair them on the spot.
Once the process is over, you will see a success message. Exit Command Prompt and restart your PC.
The Settings app on your Windows 10 PC should be working fine now.
Method 5: Try Other Ways to Access the Settings App
If you are unable to access the Settings app through the Start menu or by typing in the Windows search bar, you can find alternative ways to access the app. For instance, you can use the shortcut key – Win + I to launch the Settings app, or through the Action Center.
Step 1: Go to the Taskbar and click on the Action Center icon on its extreme right side.

Step 2: Click on the All Settings tile in it to launch the Settings app.

Check for Any Updates
A lot of times the the Settings app error could be just because you missed installing any latest Windows Updates. This can create issues with many of the features and functions of the Windows 10. So, make sure you check for any updates and if available, download and install them.
Step 1: Press the Win + I keys together on your keyboard to launch the Settings app.
Step 2: In the Settings window, click on the Update & Security option.

Step 3: Next, you are taken directly to the Windows Update page.
Now, go to the right side of the window and click on the Check for updates button.

Step 4: Windows will now start looking for any latest updates.
If available, it will list all the updates. Click on the Download button to start downloading the update.
Step 5: Once the download is complete, Windows will automatically install the udpate/s.
Now, restart your PC and try opening the Settings app. It should work fine.
Method 7: By Creating a New Windows User
When none of the above method works, this is the time when you should try creating a new user account and transfer your files to it. However, since, the Settings app is not working you will be unable to use it to create a new user account and hence, you would have to create one using the Command Prompt and then the Control Panel. Let’s see how.
Step 1: Go to Start and type Command Prompt in the Windows search bar.

Step 2: Right-click on the result and select Run as administrator to launch the Command Prompt in elevated mode.

Step 3: In the elevated Command Prompt window, type the below command and hit Enter:
net user newusername newpassword /add

*Note: The above command is a format. Simply replace the newusername field with your preferred new user name and the newpassword field with your chosen new password.
Once you see the success message, you know that the new user account has been created.
Step 4: Now, right-click on Start and select Run to open the Run command.

Step 5: In the Run command, type control.exe in the search field and press OK to open the Control Panel window.

Step 6: In the Control Panel window, go to the upper right side and next to the View by section, select Large icons from the drop-down.
Next, select User Accounts from the list.

Step 7: In the User Accounts window, go to the right side and click on Manage another account.

Step 8: Next, in the Manage Accounts window, select the new user account you just created.

Step 9: In the Change an Account window, on the left side of the pane, click on Change the account type.

Step 10: In the next window, select Administrator and press the Change Account Type button below to save the changes.
The new user account you created is now the administrator account.

Step 11: Sign out of the current account and sign in to the new user account. You can now open the Settings app and use it normally.
Step 12: You should now transfer all files from the old user account to new administrator account.
For that, press the Win + E keys together on your keyboard to open the File Explorer window.
Step 13: In the File Explorer window, click on the View tab at the top, click to expand the Show/hide option and check the box next to Hidden items.

Step 14: Now, follow the below path to navigate to your old user account:
C:/Users/old account name
*Note – Here, replace the highlighted part with the actual old user account name.
Once you double-click on the old user name, you would see a prompt asking for permission to continue.
Press the Continue button to proceed.
Type the account password when it asks you to.
Now, copy all the files and folders from the old user account.

Step 15: Now, navigate to the new user account using the below format:
C:/Users/newusername
*Note – Replace the highlighted part with the new user name you created.
Step 18: Double-click to open the username folder.
Press Continue in the confirmation prompt to proceed.
Step 19: Enter the password when prompted.
Step 20: Here, paste all the files and folders you just copied from the old user name account.
Step 21: When you see a prompt asking you, if you want to merge the files from the old user account to the new user account, press Yes to confirm.