Sometimes, editing the registry settings for a certain reason can be risky and in such cases, editing the group policy settings is a much safer bet. While the Registry settings cannot be reverted to the original state sometimes, the group policy settings can be reverted easily. The group policy editor is a management console by Microsoft that helps you configure and edit the group policies. It allows you to edit the settings for the user and the computer for a local computer or a computer on a network. This can be used to make changes to different aspects of the Operating System.
However, the Group Policy Editor does not come built-in with the Windows 10 Home versions and is available only in the Windows 10 Pro version. The Windows 10 Home version also misses a few other thing like the network management efficiency and the remote desktop. Be it the Windows XP, Windows 7, 8, 0r the Windows 10, the home versions of all of these do not come with the Group Policy Editor. Therefore, when you try to open the group policy editor on any of these Windows versions, you will see a gpedit.msc not found error.
This is indeed a major disadvantage of the Home versions as the group policy editor is important for managing the local computer’s settings. However, there are ways you can enable the Gpedit.msc in the Windows 10 Home edition.
Method 1: Enable the GPEdit.msc in Windows 10 Home using GPEdit Installer
You can also install the GPEdit.msc file using the installer for the Windows 10 Home edition since, it does not come built-in with this version.
Step 1: Click on the below link to download the zip folder for the installer:
Gpedit installer for windows 10 home
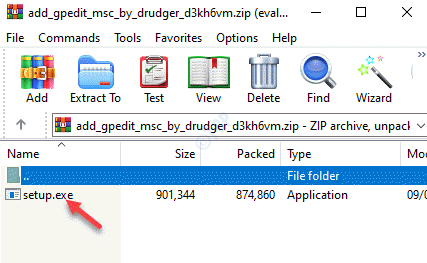
Step 2: Once downloaded, open the zip folder and run the set up file in it to install the Group Policy Editor.

Step 3: Once downloaded, run the gpedit.msc command using the Run command to open the Group Policy Editor.

You can now open the Group Policy Editor and edit the settings.
Method 2: Enable the GPEdit.msc in Windows 10 Home using PowerShell script
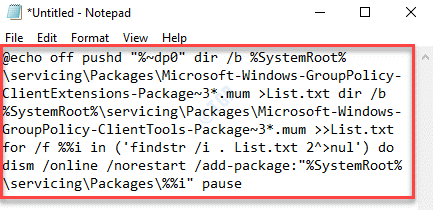
Step 1: Open Notepad, and copy and paste the below text on the Notepad:
@echo off pushd "%~dp0" dir /b %SystemRoot%\servicing\Packages\Microsoft-Windows-GroupPolicy-ClientExtensions-Package~3*.mum >List.txt dir /b %SystemRoot%\servicing\Packages\Microsoft-Windows-GroupPolicy-ClientTools-Package~3*.mum >>List.txt for /f %%i in ('findstr /i . List.txt 2^>nul') do dism /online /norestart /add-package:"%SystemRoot%\servicing\Packages\%%i" pause

Step 2: Now, go to the File tab on the upper left side of the Notepad and click on Save As.

Step 3: In the Save As window, select the location on the left where you want to save the file and then go to the File name field.
Name the file as per your wish and add .bat extension in the end.
For instance, we named the file as GPEdit Installer.bat. You can name it anything that’s convenient for you followed with .bat.

*Note – Make sure that the Save As type field is set to Text Documents (.txt).
Click on Save to save the changes.
Step 4: Now, go to the location where you saved the .bat file.
Right-click on it and select Run as administrator.

Step 5: The script will start running in the elevated PowerShell or Command Prompt.
The installation process takes a couple of minutes, so wait patiently till its over.

*Note – Alternatively, you can download the below zip folder we created here (by clicking the below link) and run the file as administrator to install the GPEdit.msc file:
Step 6: Once installed, open the zip file and drag the .bat file to the desktop.
Now, right-click on it and select as Run as administrator.
This will start running the script in PowerShell in admin mode.
Wait till the installation is over.

Step 7: Now, press the Win + X keys together on your keyboard and select Run to launch the Run command box.

Step 8: Type gpedit.msc in the search field and hit Enter.

This will open the Group Policy Editor window.
Method 3: Download Group Policy Editor for Windows 10 – Policy Plus
If you are unable to install the Group Policy Editor for some reason or if you want an alternative, you can use the Policy Plus app (3rd party app). It’s very similar to the Group Policy Editor, but the best part is, it comes with search field that helps you to policies.
Step 1: Click on the below GitHub link and download the Policy Plus:
https://github.com/Fleex255/PolicyPlus
Step 2: Once downloaded, you can straight away run the application.
It does not require any installation.