The changes that you have made with your Microsoft Outlook client can sometimes become very problematic. So, in that case, if the user usually wants to start with a clean slate. This is only possible if you reset Microsoft Outlook to the default settings. In this article, we have provided a step-by-step guide on resetting Microsoft Outlook to default settings.
Fix 1 – Delete particular Outlook-related values
You just have to delete some particular Outlook-related values.
NOTE – This process involves the usage of Registry Editor to modify the system registry. Though these steps are tried and tested on several systems, you should prepare a backup for the system registry.
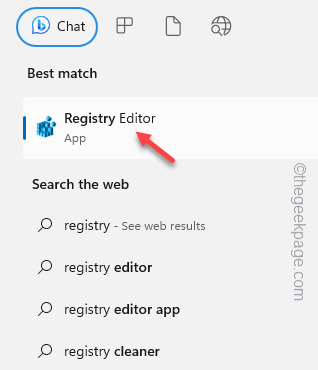
Step 1 – Directly type “regedit” in the search box.
Step 2 – Then, tap “Registry Editor” to open that.
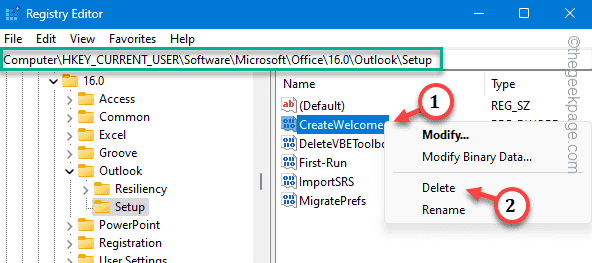
Step 3 – Next, you have to go to this point –
Computer/HKEY_CURRENT_USER/Software/Microsoft/Office/16.0/Outlook/Setup
[
NOTE – The folder called “16” signifies the version of the Office application installed on your system. It may change depending on the version of the Office app you are using.
]
Step 4 – On the right-hand pane, you will see several values.
Step 5 – Look right-click the “CreateWelcome” value and tap “Delete“.
Step 6 – Registry Editor will send a warning message. So, tap “Yes” to delete the value.
Step 7 – Now, on the same part of the screen, look for the “First-Run” value.
Step 8 – Right-click the same value and select “Delete“.
Step 9 – Another warning message will pop up. So, tap “Yes“.
Exit the Registry Editor page. Restart the system after doing this edit.
You can now open Outlook and test it.
Fix 2 – Reset the Outlook profile
Reset the Outlook profile on your computer and build a new profile using your email credentials. Don’t worry. You won’t lose any data.
Step 1 – Open the Outlook client.
Step 2 – Then, click on the “File” menu. Then, click “Account settings“.
Step 3 – Choose “Manage Profiles” to manage the profiles.
Step 4 – Then, click “Show profiles“.
Step 5 – After this, click “Remove” to remove the profile from your computer.
Step 6 – Now, click “Add” to add a new profile in its place.
Step 7 – Name this profile anything you prefer.
Step 8 – Click “OK“.
Step 9 – Input your name and email credentials and set up your email account.
This process will take just a few minutes. Complete the whole procedure following the steps on your screen.
Step 10 – Coming back to the main Mail page, select your new profile and choose “Always use this profile“.
Step 11 – Next, set the drop-down option to “Outlook” and tap “OK” to save the change.
Once you have done this, Outlook will open up using your profile.
Fix 3 – Reset the View in Outlook
If you don’t want to completely reset the Outlook client or delete your mail profile, you can just reset the modified view in Outlook to the default one.
Step 1 – Go to the “View” tab on Outlook.
Step 2 – There you will find an option “View settings“.
Step 3 – Just tap the “Reset Current View” option to reset the current view of MS Outlook.
This will remove all the modifiers that you had placed in Outlook view settings to the default Outlook experience.
This won’t reset Outlook.
Hope this has helped you resolve the matter.


