Microsoft first introduced the Action Center feature with the release of Windows 8 and later versions. This feature allows windows users to get to access other features like battery mode, accessibility, airplane mode, etc. very easily and quickly. It also allows to add many other features by editing this action center. But sometimes, users might add many other stuff which are not needed and mess up the action center. In order to get the original action center settings back, they might have to reset it on their system. Many of the Windows users are not aware of resetting the notification and action center on their system. Therefore, we have come up with 2 ways how you can reset the action center on your windows 11 system. Please continue to read to know more.
How to Reset Action Center in Windows 11 using Registry Editor
Sometimes because of some obvious reasons, the edit button of the action center gets missing and you have no clue what to do next. So, making a slight changes in the registry file as explained below, you can get the edit icon in Action Center back.
NOTE: Please keep a backup of your registry file because if something goes wrong, you can revert back the registry file anytime later as it can cause huge damage to the system.
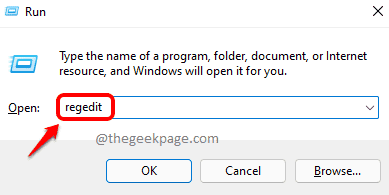
Step 1: Press Windows + R keys together on your keyboard to open Run dialog box.
Step 2: Type regedit in the run box and hit the Enter key.
Step 3: Click Yes on the UAC prompt to continue.

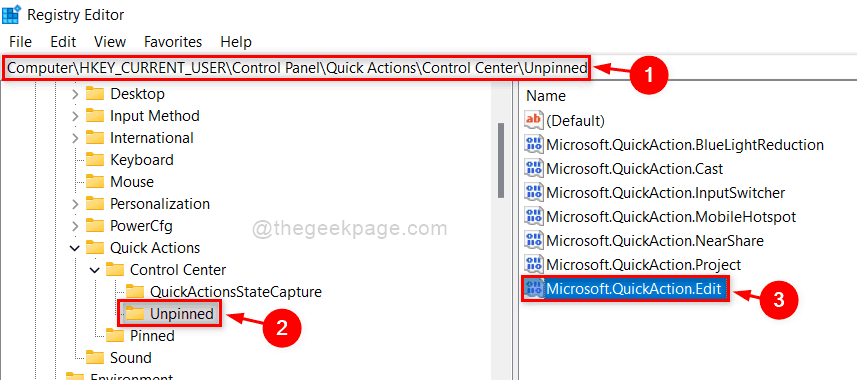
Step 4: Copy and paste the following path in the empty and clear address bar and press the Enter key to reach Unpinned registry key.
HKEY_CURRENT_USER\Control Panel\Quick Actions\Control Center\Unpinned
Step 5: Click on Unpinned registry key on the left side of the Registry Editor.
Step 6: Then, Select Microsoft.QuickAction.Edit on the right side of the window.

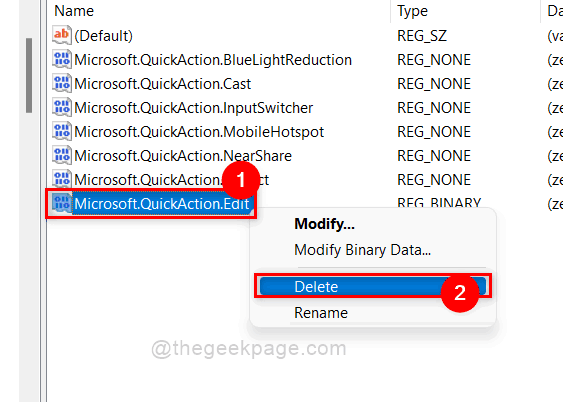
Step 7: Then, Right click on Microsoft.QuickAction.Edit binary value and click Delete from the context menu as shown in the below image.

Step 8: Click Yes to confirm to delete the selected binary value in the registry editor.

Step 9: Then, Close the Registry Editor window and restart your system once.
Step 10: Now check if your Action center in the taskbar allows you to edit it by pressing Windows key + A keys together on your keyboard.
That’s it guys!
How to Reset Action Center in Windows 11 using a Batch File
Step 1: Press windows key on your keyboard and type notepad.
Step 2: Click Notepad application from the search results as shown in the below image.

Step 3: Copy and Paste the following lines given below in the Notepad application just opened.
REG DELETE "HKCU\Control Panel\Quick Actions" /F

taskkill /f /im explorer.exe

start explorer.exe
Step 4: To save this notepad file as a Batch File, Press CTRL + SHIFT + S keys together on your keyboard.
Step 5: In the Save-As window, Select the saving location (For Eg: Desktop) and then, Name the Batch file as ActionCenterReset.cmd.
Step 6: Then, Select All files as Save-as-type and Finally, Click Save button to save this Batch file.

Step 7: Now, Go to Desktop by pressing Windows + D keys together.
Step 8: Locate the Batch file created just now and right click on it.
Step 9: Click Run as administrator from the context menu as shown in the below screenshot.

Step 10: Click Yes on the UAC prompt to continue executing the batch file as admin.

Step 11: Once the Batch file is executed, the windows explorer will get started and the Action Center settings will be reset.
That’s it.
I hope this article was useful and informative.
Please let us know in the comments section below.
Thank you for reading!