After installing the latest update on Windows 10, some users have recently complained about seeing an unknown locale (qaa-latn) language on their keyboard section. In this article, we will show you how to remove this unknown locale (qaa-latn) language from your computer. This problem is usually caused by the Keyman software. Just follow these easy solutions to fix the problem quickly.
Fix 1 – Using Powershell
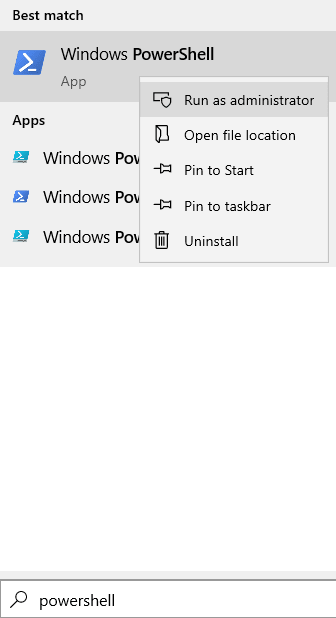
1 -Search Powershell in search box of Windows system
2 -Now, right click on the icon of Powershell and click run as administrator.

3 -Now, run the commands given below one by one and hit enter each time to execute the command
Get-WinUserLanguageList
Set-WinUserLanguageList en-US, fa
Just confirm by pressing Y
Y
4 – Now, close the powershell window and check again
Fix 2 – Add & remove QAA-LATN language
If nothing so far has worked for you, try adding and removing the Qaa-Latn language.
1. Open the Settings window.
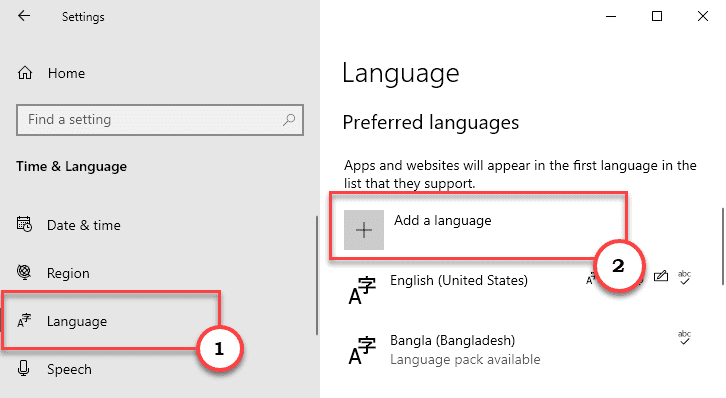
2. Then, click on “Time & Language” settings.

3. On the left-hand side, just click on “Language” settings.
4. Then, on the right-hand side, hit the “Add a language” option.

5. Now, type “qaa-latn” in the search box.
6. Click on “Private use (qaa-latn)” in the search results.
7. Then, click on “Next” to proceed further.

8. Then, click on “Install” to install the language on your computer.

After installing the language, close the Settings window and reboot your computer.
9. After rebooting the device, open the Settings app.
11. Then, click on the “Time & Language” settings to access it.

12. Next, just click on “Language” settings.
4. Now, on the right-hand side, select the “Private use (qaa-Latn)“. Simply, tap on the “Options“.

5. Now, in the ‘Keyboards’ settings, you will find the ‘qaa-latn’ keyboard.
6. Select the keyboard. Click on “Remove” to remove the keyboard from your computer*.

7. Then, click on ‘Confirm’ to confirm the removal process.
Once you have removed the keyboard, close the Settings screen.
Restart your computer.
[
*NOTE –
If the ‘Remove’ button is greyed out on your Settings screen, follow these steps –
1. In the ‘Time & Language’ section, select the “Language“.
2. Then, tap on the “Private use (qaa-Latn)“. Simply, tap on the “Options“.

3. Next, click on “Add a keyboard“.
4. Then, select the “German (QWERTZ)” keyboard.

Close the settings window.
5. After that, again open up the ‘Language Settings’ in the Settings.
6. Then, on the right-hand side, select the “Private use (qaa-Latn)“. Just, tap on the “Remove“.

Now, confirm the removal process. Reboot your computer and check if this solves your problem.
If this doesn’t solve your problem, try removing the other language from your device (except the default language).
Fix 3 – Remove the qaa-latn using PowerShell
You can remove the qaa-latn using the PowerShell commands.
Step 1 – Execute PowerShell commands
1. First of all, right-click on the Windows icon.
2. Then, click on “Windows PowerShell (Admin)“.

3. When the Windows PowerShell opens up in administrative mode, copy-paste these commands one-by-one and hit Enter.
$LanguageList = Get-WinUserLanguageList
$LanguageList.Add("qaa-latn")
Set-WinUserLanguageList $LanguageList -Force

After executing these three commands, close the PowerShell window
Step 2 – Remove the Qaa-latn language
1. Press the Windows key+I keys together.
2. Then, click on “Time & Language” settings.

3. On the left-hand side, just click on “Language” settings.
4. Now, on the right-hand side, select the “Private use (qaa-Latn)“. Just, tap on the “Remove“.

Close the Settings window. This will solve your problem with the Qaa-Latn language in the language bar.
Case 2 – For Windows 11 users
1 – Press Windows key and I key together to open settings.
2 -Click on Time & Language from left menu.
3 -Now, Choose Language & region from right side.
4- Juts remove QAA-LATN from the list
Fix 4 – Remove the Qaa-latn language pack
Remove the Qaa-latn language package from your computer.
1. Press the Windows key+Q keys together.
2. Type “cmd” in the search box. Then, right-click on the “Command Prompt” and click on “Run as administrator“.

3. After that, type this c0mmand in the terminal and hit Enter.
lpksetup.exe /u qaa-latn

After executing this command, close the Command Prompt window. Restart the computer.
Check if this has solved the issue or not.
Fix 5 – Uninstall Keyman app
Keyman on your system may cause this problem. Just uninstall it.
1. Press the Windows key+I keys together.
2. Then, click on the “Apps” to access it.

3. Then, on the left-hand pane, click on the “Apps & Features“.
4. On the right-hand side, type “Keyman” in the search box.

5. In the search results, click on “Keyman” to select the app.
6. Then, click on “Uninstall“. Finally, click on “Uninstall” to confirm the process.

Now, follow the on-screen instructions to complete the process. Restart your computer once.
You won’t see the ‘qaa-latn‘ language in the language bar again.
]
Fix 6 – Remove the registry keys
Altering the registry should fix the problem.
1. Press the Windows key+R keys together.
2. In the Run panel, write down “regedit” and click on “OK“.

NOTE –
Any unaccounted changes in the Registry Editor may lead to an unstable system. We request you to make a backup of the registry on your computer.
Once you have opened the Registry Editor, click on “File“. Then click on “Export” to make a new backup on your computer.

3. In the Registry Editor screen, click on “Edit” on the menu bar.
4. Then, click on “Find“.

5. Now, type “Keyboard” in the ‘Find’ box.
6. Then, click on “Find Next” to perform the search for the key.

7. Check if this key is related to the ‘Qaa-Latn’ language. (Check the value data )
8. Now, right-click on the particular key and click on “Delete” to remove the key.
[
NOTE –
Be careful while deleting keyboard keys. If you delete any key associated with a wrong keyboard, the keyboard may stop working on your computer or any other new problem may occur.
]

8. Press the F3 key once to go to the next ‘keyboard’ key.
This way, delete all the corrupted keyboard keys.
After deleting the particular keyboard keys from your computer, close the Registry Editor.
Restart your computer just for once. Then, check if the issues still persist.