The Remote Desktop Connection or RDC is not completely bug-proof. There are so many settings that can affect the remote desktop connection. While connecting to your remote desktop systems, this error message may appear “Remote Desktop cannot verify the remote computer’s identity“. Generally, a time-date dispute between the host machine and remote device creates this type of scenario.
Fix 1 – Set the time and date settings
You must check the date and time settings on your computer. The date and time must be aligned with the location of the device.
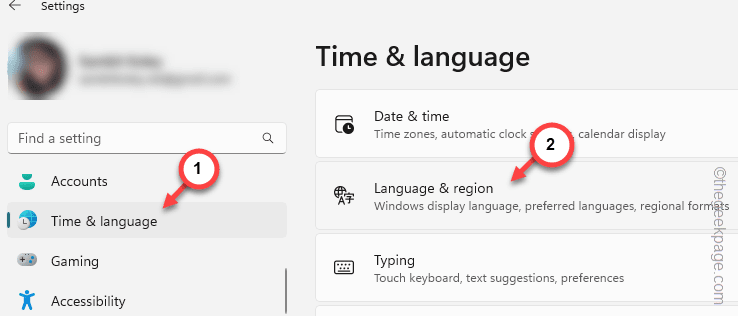
Step 1 – Go to your system Settings. The shortcut to this is to Win+I keys together.
Step 2 – So, click the “Time & language” tab.
Step 3 – You must open the “Date & time” settings for further modifications.
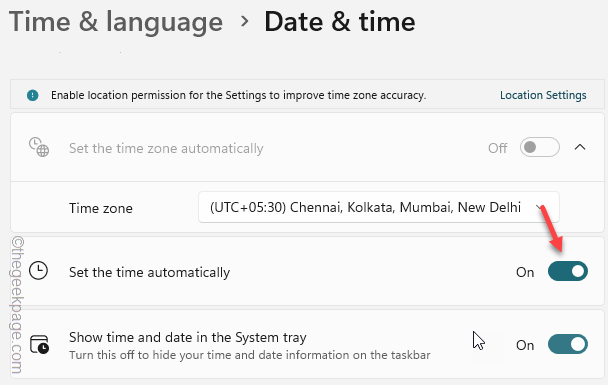
Step 4 – Next, turn on the “Set the time automatically” on the right-hand pane.
After switching to automatic date and time settings, retry connecting to those remote computers.
Alternative Solution –
You can use the terminal to check and synchronize the time settings using a few specific commands.
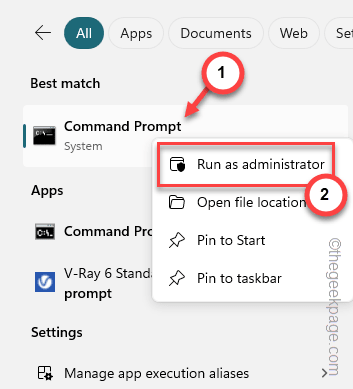
Step 1 – You must start by typing “cmd“.
Step 2 – Next, right-tap that “Command Prompt” in there and tap “Run as administrator“.
Step 3 – Next, copy-paste this code in there and hit Enter to fetch the time on the remote device.
net time \\remote-computer-IP-address
[Don’t forget to replace the “remote-computer-IP-address” with the actual IP address of the remote system.]
Step 4 – If you feel any discrepancies in the time varaible, you must use this codes to restart the time service.
net stop w32time & net start w32time & w32tm /resync
After this, quit the CMD terminal.
Fix 2 – Use the IP address
A common mistake seen among the RDC users is the usage of improper device name. Like, while establishig a connection to the remote device, you must use the IP address, not the device name.
Example – Suppose you are trying to connect a PC named “Sambit-PC“, with the public IP address 123.234.234.1, you have to use the IP address to establish a successful connection.
Fix 3 – Check the DNS server discoverability
The DNS settings on the host device (the device that you are using to start the RDP) must be set correctly.
Step 1 – Open the terminal with administrative privileges.
Step 2 – From the elevated terminal, run this code to check the connection to the DNS server.
nslookup server_name DNSServername
[You must change the “server_name” and “DNSServername” with the proper credentials in the code. ]
If this lookup command doesn’t fetch any meaningful response from the DNS server, you may have to correctly configure the DNS server connection.
NOTE – Additionally, if the remote device has multiple network adapters, you need to declare the correct network adapter. It is possible that the connection is not setting up through the right network adapter.
Fix 4 – Turn off the real-time protection
Disable the real-time protection feature in the antivirus. It can block your access to the remote system.
Step 1 – Open the Windows Security. You can do this using the search box.
Step 2 – When the front page of the Windows Security loads up, go to the “Virus & threat protection” settings.
Step 3 – Scroll a little bit down and open the “Manage settings” in the Virus & threat protection settings pane.
Step 4 – On the following page, switch the “Real-time protection” to “Off” mode.
This way, Windows won’t block your connection to the remote machine or vice-versa.
Fix 5 – Change the RDP layer settings
You must set the same level of RDP Layer security settings through group policy on the host and remote device.
Step 1 – Simply, hit the Windows and R buttons together.
Step 2 – Next, type this in the box and click “OK“.
gpedit.msc
Step 3 – You must follow this route to reach the main Security policy –
Computer Configuration > Administrative Templates > Windows Components > Remote Desktop Services > Remote Desktop Session Host > Security
Step 4 – On the right-hand pane, find the “Require use of specific security layer for remote connections” policy.
Step 5 – Next, double-tap it to open that policy.
Step 6 – You must set the policy to “Enabled” mode.
Step 7 – There will be the ‘Security Layer:’ mode and choose to set that as “RDP” mode.
Step 8 – Save these modifications using the “Apply” and “OK” buttons.
Quit the Local Group Policy page. A system restart should enact the policy on the device.
NOTE – You must set the Security Layer settings on both the host and remote devices. So, repeat the same steps on the other devices as well.
Fix 6 – Opt for private network profile
If the WiFi or Ethernet you are connected to is set to the Public mode, switching to the private mode may help establishing connection to the remote device.
Step 1 – If you tap the Win+I buttons together, Settings should open up.
Step 2 – After this, go to the “Network & Internet” tab in there.
Step 3 – You can see which network you are using on the right pane. So, open the “Ethernet” or “WiFi“, whichever network you are using.
Step 4 – Toggle the network type to “Private” mode.
After changing the network type, quit the Settings and try connecting to the remote computer using Remote Desktop connection once more.
Check if this works.


