Generally, it has been noticed that the PDF file sizes are larger due to various factors like the content, images, and so on. Due to its large size, issues are faced when you require to upload them on certain websites or attach them in emails. What you require at this time is to reduce the size of the PDF file without any comprise on the quality of the PDF file.
If you are in such a situation where you are not able to upload a file or attach it to an email due to its large size, read this article. In this article, you will find methods that will help you to reduce the PDF file size without any drop in quality.
Method 1 – Use Microsoft Word
One of the methods is to decrease the size of the PDF file while converting it to PDF from MS Word.
1. Open your MS Word document that needs to be converted.
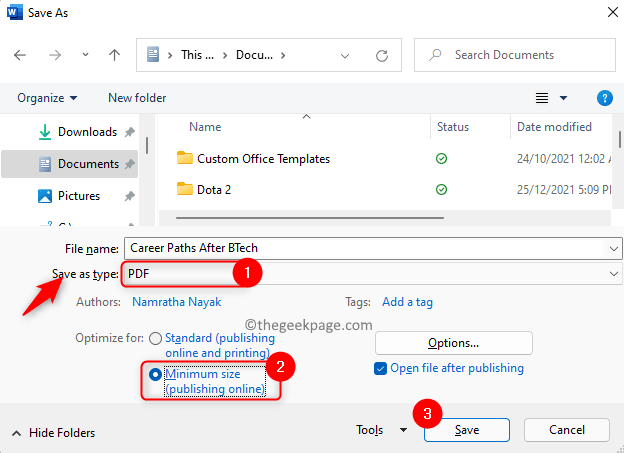
2. Now tap the Fn + F12 key on your keyboard.
3. In the Save As window, click on the drop-down menu next to Save as type and choose the option PDF.
4. Give a name for the file.
5. Select the option Minimum size (publishing online) next to Optimize for.
6. Click on Save to convert the file into a reduced-size PDF.
Method 2 – Use Adobe Acrobat to Reduce File Size
If you already have a PDF file and want to reduce the size without compromising on the quality, then you can do so using the Adobe Acrobat Pro DC Reader (latest version available).
1. Launch Adobe Acrobat Reader.
2. Press Ctrl + O and choose the PDF file to be opened.
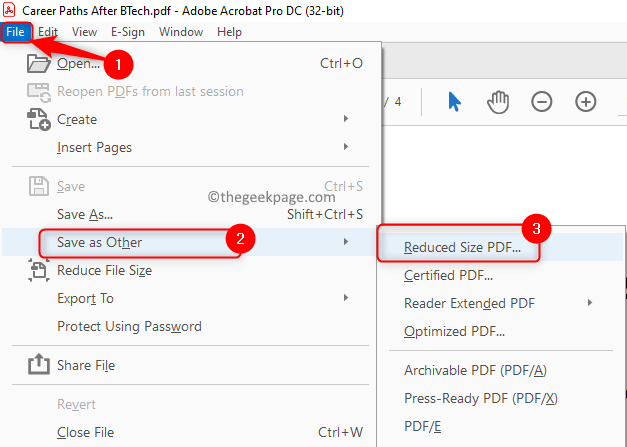
3. Once the file is opened, click on the File menu.
4. Select the option Save as Other. In the submenu that opens, click on Reduced Size PDF…
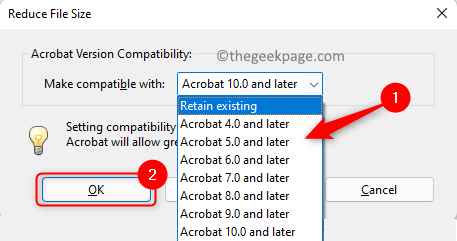
5. You will see the Reduce File Size window. Here, use the dropdown in the Acrobat Version Compatibility to select the compatibility needs for the file with the Adobe version as needed.
Note: If you set the compatibility to the latest versions of Adobe Acrobat, it will reduce the size to a greater level.
6. Click on OK to set the compatibility version.
7. In the Save As window, select a location and type a name for the file.
8. Next, click on the Save button.
9. At the bottom right, a black box is displayed with the message Reducing PDF Size.
Now you can check and see that the PDF files size has been reduced without any reduction in the quality.
Method 3 – Compress Using Adobe Acrobat PDF Optimizer
Adobe Acrobat Pro DC has an inbuilt PDF Optimizer that can be used to reduce the size of the PDF file with customizations. Here you can look at specific items in the file that are having an effect on the size of the file.
1. Launch Adobe Acrobat Pro DC.
2. Press Ctrl + O and go to the location of the file to open it.
3. Go to the File menu.
4. Select Save as Other. Click on the Optimized PDF… option in the submenu that opens.
5. In the PDF Optimizer window, at the top right corner click on the Audit space usage… button.
6. You will see a window, that details the space usage by different elements in the file.
7. Click on OK.
8. Click on the options on the left side of the PDF Optimizer window, to view the details. Here changes can be done to reduce the PDF file size.
Method 4 – Try Using Any Third-Party Software
The steps to reduce the file size have been explained using the 4dots Free PDF Compress software. If you know any other PDF Compressor applications they can be used. Else, follow the instructions below to compress the PDF file.
1. Click on this link to go to the download site for 4dots Free PDF Compress.
2. Download and install the software on your computer.
3. Open the 4dots PDF Compress app.
4. Tap on the button Add File(s) at the top.
5. Go to the location and choose the PDF file to open it.
6. Now the file details can be seen in a tabular format on the main app window. You can see the Filename, Size, Date of File Creation, and Full File Path details of the selected file.
7. At the bottom, check the box next to Compress Images.
8. Use the slider associated with Image Quality to change the value.
9. Now at the top, click on the Compress button.
10. Click on OK in the window with the message Operation completed successfully.
11. A Result window opens showing a comparison of the file size before and after compression.
12. Click on OK to complete the process.
Method 5 – Make Use of Tools Available Online
In case you don’t have Adobe Acrobat or don’t want to use it or any other software, then check for tools that are available online to compress PDF files. The file just needs to be selected and uploaded and the compression will happen without much effort from you. Once the compression is done, the file can be downloaded and saved on your system. The most well-known online tools are Smallpdf and Best PDF Compressor. We have detailed the steps using Smallpdf below.
1. Click on the link to open the Smallpdf page.
2. Move down the page and locate the section Most Popular PDF Tools.
3. Here, select Compress PDF.
4. Click on CHOOSE FILES and locate the file on your computer that needs to be compressed.
5. Once your file is uploaded, you can either select Basic Compression or Strong Compression. To use Strong Compression you need to have a paid subscription.
6. We will choose Basic Compression to get a medium file size with high quality.
7. Click on Compress to start the process.
8. Once the compression completes, click on the Download button to save this file on your PC and use it.
Thanks for reading.
We hope this article has been informative enough in helping you to reduce the PDF file size without losing the quality. Comment and let us know the method preferred by you.


