Looking to reduce the size of your Word Document? In most cases, File size is not an issue as they don’t take up much of your memory when compared to games, videos, and other large files. However, if you are uploading a word document online, sending it over email you must reduce its size.
This article teaches you how to reduce the size of a Microsoft Word Document. There are various techniques to minimize the size of the document. Compressing images is the most popular way to minimize the size of word Files. You can also cope with huge documents in other ways, such as saving media and Word files in other formats, deleting any auto-recovery versions, and limiting the use of specific features.
1. Converting the Document into.docx Format
The newer versions of Word Documents save in DOCX Formats instead of DOC format because DOCX file type compresses the contents of the document like a ZIP file, which makes your document smaller. The one and only reason we need to use DOC is if you require backward compatibility with older processing programs. So, While saving your document, Make sure you select the.docx format to save it.
2. Compress Pictures/Images
1. Select the picture you want to compress in your document. The Picture Format tab becomes available once select it.
2. In the Picture Format tab, select Compress Pictures.

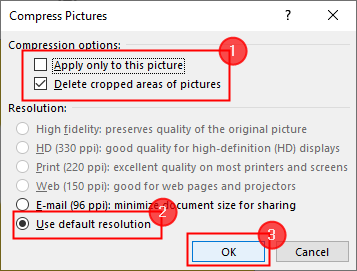
3. Once the Compression tab appears, follow the steps below and finally click OK.
- Tick the box against Delete cropped areas of the Picture.
- Tick the radio button against UseDefault Resolution.

By setting these values, the additional space is removed and the resolution is fixed for all of the pictures used in the document.
3. Saving Pictures to Lower Resolution
1.Click on File > Options.

2. Click on Advanced > Image Size and Quality.

Under this section, Tick the box against Discard Editing Data and set the default resolution to 150ppi.
4. Do not embed fonts
Embedded Fonts will allow people to read or print your document with the fonts you used to write, even when their system does not support them. This will increase the size of your document as well.
1.Open File > Options > Save.

2. Scroll down to select Preserve fidelity when saving this document. Under this section, do not tick the box against Embed fonts in the file.

5. Insert pictures instead of copying & Pasting
Inserting the picture into the document instead of copying helps in reducing the size of the document. When you copy, the image may lose compression, may bring in other data also, and may change the file type. To insert the picture follow
1.Click on Insert > Pictures.

2. Select the picture you want to insert and click on Insert or You can simply double-click on the Picture to insert it.

NOTE: You can simply edit your images in another editor before saving them on your system and use them in your work accordingly. This also helps in reducing the size of the document.
6. Auto-Recovery Versions
1.Click on File > Options.

2. Click on Save > Save Documents
- If you want to delete the Auto Recovery Information uncheck the box beside it. By this action, we cannot recover the document whenever needed.
- So, You can simply increase the time instead. You can change it from 10 minutes to 20 minutes.

7. Turning off Thumbnails
1.Click File > Info > Properties ( Advanced)

2. Under the Summary tab, uncheck the Save Thumbnails box and Press OK.

8. Stop/Convert Embed Objects
If you include objects such as Excel Worksheets into your Documents, the size increases. Maximum stop this embedding if you want to reduce the size.
9. Removing hidden info from the document
1. Click File > Info > Check for Issues.

2. click on Inspect.


10. Instead of manual formatting apply styles
In a Word Document, the more manual or direct formatting you apply, the larger it will become. This is a huge problem when dealing with big papers. To reduce file size and automate formatting, use styles as much as possible.
For example, Consider utilizing a style instead of 14 points, bold, and blue to create a header.
To use a style simply select the text and apply any style you want from Styles Group present on the home tab.

To modify the style you are using, simply right-click on Styles

11. Save a copy of the document
Lastly, you can save a copy of the word document in RTF ( Rich Text Format ) or PDF Format and you can also copy the entire text and paste it into a brand new document.
