Windows 11 has lots of user interface enhancements compared to Windows 10. One such great enhancement is the introduction of the quick settings panel. The quick settings panel is located at the right end of the taskbar. It has all the quick settings that you might need. So, right from the taskbar, with just a single click, you can access all your favorite quick action settings.
By default, Windows 11 quick settings panel is loaded with settings like WiFi, Bluetooth, Airplane Mode, Battery Saver, etc. Some of these quick settings might not be needed by you and some other settings that you need might not be present in the quick settings panel. Fortunately, you can easily edit the quick settings panel to remove the settings that you do not want and to add the settings that you do want with some very simple steps.
Read on, to learn how you can quickly customize the quick settings panel in Windows 11.
How to Remove a Quick Setting from the Quick Settings Panel
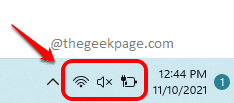
Step 1: On the very right end of the taskbar, click on the quick settings icon set containing the WiFi icon, speaker icon, and battery icon.
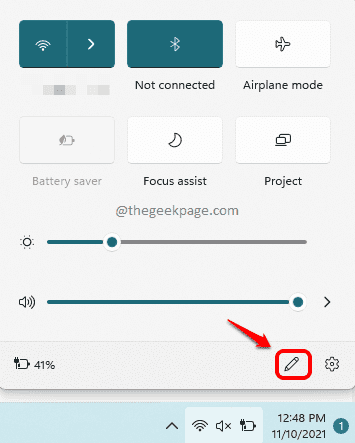
Step 2: In the quick settings panel, click on the Pencil icon to edit the panel.
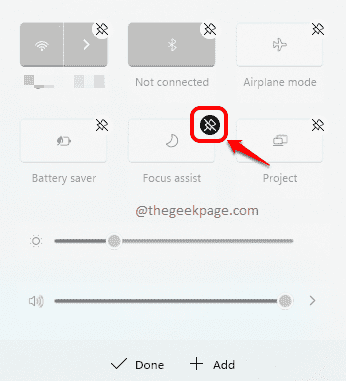
Step 3: Now to remove a quick setting, click on the unpin icon associated with it.
In the example below, unpin icon associated with Focus assist is clicked to remove it.
You can remove multiple quick settings at this step.
Step 4: Once you are done with removing the unwanted quick settings, click on the Done button as shown below. That’s it.
How to Add a Quick Setting to the Quick Settings Panel
Step 1: On the very right end of the taskbar, click on the quick settings short panel as shown in the screenshot below.
Step 2: As next, click on the Pencil icon to edit the quick settings panel.
Step 3: If you would like to add a new quick setting, click on the Add button first and then click on the quick setting that you want to add, from the list that expands out.
In the example below, the quick setting Night light is added.
You can add multiple quick settings to the panel at this step.
Step 4: Once you are done, click on the Done button.
That’s it. If you look at your quick settings panel now, you can see that your unwanted quick settings are removed and the needed ones are added.
Hope you found the article useful.


