If you ever try to open a file irrespective of its format on your system, you will see this error message – “File System Error (-805305975)” on your screen. Though this problem can occur to any type of file, it is mainly seen in the case of photos, music files. This problem can occur due to multiple reasons starting from corrupted system files, software problems to even bugs with the Photos app.
Fix 1 – Make sure Windows is updated
Windows regularly send patches and fixes to address this kind of issue.
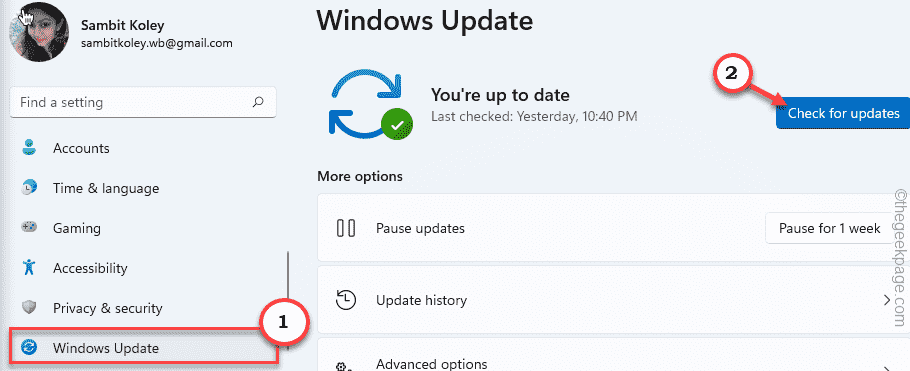
1. At first, press the Windows key+I keys together to open Settings.
2. Now, tap on “Windows Update“.
3. On the right-hand pane, tap on “Check for updates“.

If there are any pending updates, let Windows download and install it. Reboot your computer.
Now, try to open the file once again.
Fix 2 – Reset the Photos app
If you are experiencing this issue with an image file, try resetting the Photos app first.
1. At first, open the Settings by pressing the Windows key+I keys together.
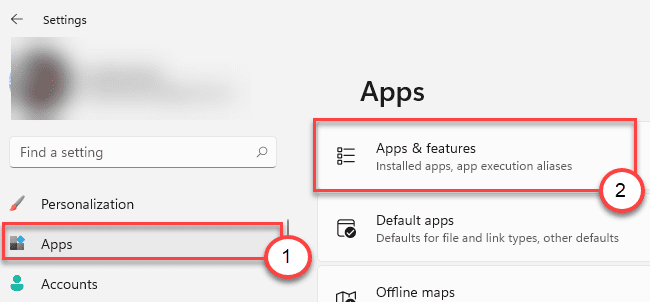
2. Then, tap on the “Apps” on the left-hand side.
3. Next, click on the “Apps & features” on the right-hand side.

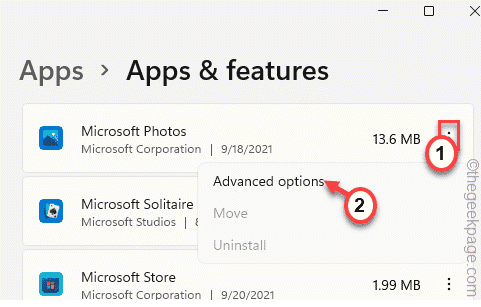
4. Now, check for the “Microsoft Photos” in the list of apps.
5. Then, click on the three-dot menu and click on the “Advanced options” to access it.

6. Now, here you will notice two options in the ‘Reset’ section.
Repair
Reset
7. Now, click on “Repair” to repair the application.
Once the repair process is done, try to open the image file again.

8. If you are still seeing the error message, tap on “Reset“.
9. Then, confirm the action with a tap on “Reset“.

After that, close the Settings page.
Open the image file again. It will open without the error.
Fix 3 – Repair disk errors
If the problem is occurring due to a defective disk, try running a disk checking operation.
1. At first, click on the Windows icon and type “cmd“.
2. Then, right-click on the “Command Prompt” and click on “Run as administrator“.

3. Once the terminal appears, type this disk checking operation and hit Enter.
After executing the command, type “Y” and hit Enter to run the disk scanning tool while your computer restarts next time.
chkdsk C: /r /f

Now, close the Command Prompt and restart your system.
The disk checking operation will commence as soon as the system reboots. Check if this works.
Alternative Way –
There is another way you can perform a disk repair, using File Explorer.
1. At first, open the File Explorer.
2. Then, tap on the “This PC“.
3. Here, right-click on the system drive and tap on “Properties“.

4. Now, click on the “Tools” tab.
5. Here, tap on “Check” in the ‘Error checking’ section.

6. Then, tap on “Scan drive” to repair the drive on your system.

This way, Windows will scan for defects and repair the drive. Once you have done this, try to access the image file once again.
Fix 4 – Repair in Clean boot mode
The clean boot mode is a good way to identify the interfering application on your system.
1. At first, press the Windows key+R keys together.
2. Then, type this command and hit the Enter key.
msconfig

3. In the System Configuration window, click on the “General tab.
4. Here, tap on the “Selective startup” option and then check the “Load startup items” option.

5. After that, tap on the “Services” section.
6. Here, you have to check the “Hide all Microsoft services” option.
7. Then, tap on the “Disable all” option to disable all the third-party apps.

You have just removed all the third-party apps from interfering.
8. After that, click on the “Startup” tab.
9. Now, tap on the “Open Task Manager“.

Task Manager will open up.
10. All the services that are set to autostart with the system are listed here.
11. Simply, right-click on the service one by one and tap on “Disable” to disable all unnecessary apps from starting up.

Now, close the Task Manager and return to the System Configuration window.
12. Don’t forget to tap on “Apply” and then on “OK“.

You will notice a prompt has appeared to restart your machine.
13. Just, click on “Restart” to reboot your system immediately.

Once your system restarts, try to open the file. If the file successfully opens, then a third-party application is the reason you are facing this issue.
You have to uninstall the app from your system.
1. At first, press the Windows key+R keys together.
2. Then, type “appwiz.cpl” and hit Enter.

3. Now, locate the app from the list. Then, right-click on the app and tap on “Uninstall“.

After that, restart the system and try to access the file again.
Fix 5 – Uninstall and reinstall the Photos app
If you are facing this issue trying to open an image file, you have to uninstall and reinstall the Photos app.
1. At first, search for “powershell“.
2. Then right-click on the “Windows PowerShell” and click on “Run as administrator“.

3. Just, copy-paste this command in the Powershell terminal, and then hit Enter.
Get-AppxPackage *photo* | Remove-AppxPackage

This will uninstall the Photos app from your system. After that, close the PowerShell window.
You have to restart your computer once.
1. Open the Store on your computer.
2. Then, you have to search for “Photos“.
3. After that, tap on “Microsoft Photos“.

3. Now in the Settings window, click on “Get” to install Photos on your computer.

4. You will see the Photos app is installed.

Once you are done, close the Store app and try to access the file again.
Fix 6 – Run a DISM & SFC scan
Running the SFC and DISM scan should work.
1. At first, right-click on the Windows key and tap on the “cmd“.
2. Then, type “cmd” and press Ctrl+Shift+Enter keys together.

3. Now, copy-paste this command and hit Enter.
DISM.exe /Online /Cleanup-image /Restorehealth

Windows will run a DISM check.
4. Once you have done, paste this command and hit Enter to run an SFC scan.
sfc /scannow

After successfully running two scans, close the Command Prompt. Restart your computer.
Try to access the file again.
Your problem should be solved.