Windows 11 has the Quick Access feature present in the File Explorer that provides a list of the regularly browsed folders and recently accessed files. This list keeps changing over time as you access the different files and folders on your PC. Recently, there have been reports by users that they are not able to see their recently accessed files in the File Explorer’s Quick Access. There can be varied reasons for the recent files section not showing up in the File Explorer’s Quick Access area.
Are you facing the issue where the recent files section in Quick Access is missing or Quick Access is not showing the recently accessed files? Then you have landed on the right page. Here, we have curated some solutions that can help you get back the recent files in Quick Access.
Fix 1 – Make Sure that Jump List is Turned On
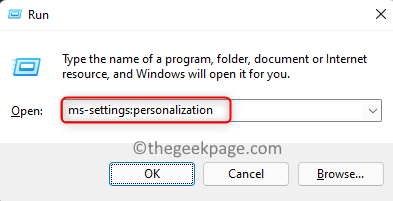
1. Just press and hold the Windows and R key combination to open the Run dialog.
2. Type in ms-settings:personalization and hit Enter to go to the Personalization Settings.
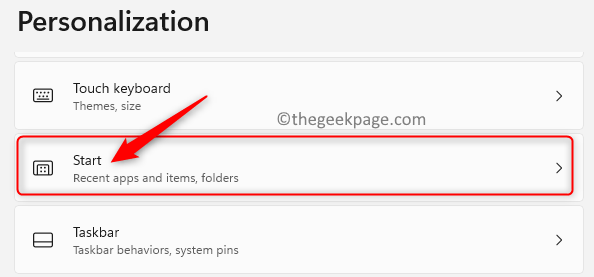
3. Scroll down and select the option Start.
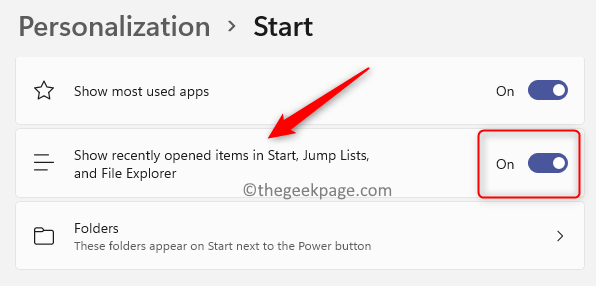
4. Turn on the toggle next to the option Show recently opened items in Start, Jump Lists, and File Explorer.
5. Close the Settings app.
6. Now, open any file on your system and you should be able to see it in the Quick Access’s Recent files section.
Fix 2 – Turn on the Recent Files Feature in Folder Options
1. Open the File Explorer using the Windows + E key combination.
2. In the left pane of your File Explorer, you will see Quick Access.
3. Right-click on it and select Show more options.
4. In the small menu, choose Options to open Folder Options.
5. Now, make sure to be in the tab General.
6. Make sure that the box next to Show recently used files in the Quick Access is checked in the Privacy section at the bottom.
7. Click on Apply and then on OK to get the changes into effect.
8. Check if your recent files are visible in the Quick Access area after trying to open any file.
Fix 3 – Clear File Explorer History
1. Press Windows + E to open the File Explorer.
2. Click on the three horizontal dots at the top next to the View menu.
3. In the menu that appears, select Options to open Folder Options.
4. In the Privacy section, click on the Clear button next to Clear File Explorer history.
5. Click on OK to close the Folder Options.
6. Check if the problem with Quick Access not displaying the recent files is fixed.
Fix 4 – Disable and Re-enable Quick Access
1. Tap the Windows key and type Folder Options in the Windows search bar.
2. Click on File Explorer Options in the search result that appears to open Folder Options.
3. Under the General tab, set the value of the option ‘Open File Explorer to’ to This PC using the dropdown.
4. Click on Apply and then on OK.
5. Open Folder Options using Steps 1 and 2 above.
6. Now, change ‘Open File Explorer to’ to Quick Access using the dropdown.
7. Click on Apply and then OK. Now, Quick Access will be re-enabled when you open File Explorer.
8. Try opening any file and check if you can see the recently accessed files in Quick Access.
Fix 5 – Reset Folder Options to Default
1. Open the File Explorer (Windows + E).
2. Go to Folder Options as mentioned in the above fixes.
3. In the Folder Options window, make sure to select the General tab.
4. Click on the Restore Defaults button at the bottom.
5. Next, click on Apply and then on OK to confirm the changes in the Folder options.
6. Check if the issue with recent files not showing in Quick Access is resolved.
Fix 6 – Create a New Local User Account
1. Press Windows + R to open the Run dialog.
2. Type ms-settings:family-group and hit Enter to open the Family & other users page in the Account Settings.
3. Here, in the Other users section, click on the Add account button to Add other users.
4. In the Microsoft Account window, click on I don’t have this person’s sign-in information.
5. Now, click on Add a user without a Microsoft Account in the Create Account window.
6. In the Create a user for this PC window, give a username for the new user and type a password. Click on Next.
7. Once the new user is created, you will see the new user account below the Other users section.
8. Click on the user name of the newly created user to expand it.
9. Then, click on the Change account type button associated with Account options.
10. In the Change account type window that pops up, set the Account type to Administrator using the dropdown.
11. Click on OK.
12. Now, log in with the new user account and check if you are able to see the recent files section in Quick Access.
Thanks for reading.
We hope this article has been informative in fixing the Quick Access to show the recent files section on your Windows 11 PC. Please let us know in the comments section the fix that helped you in resolving this issue.


