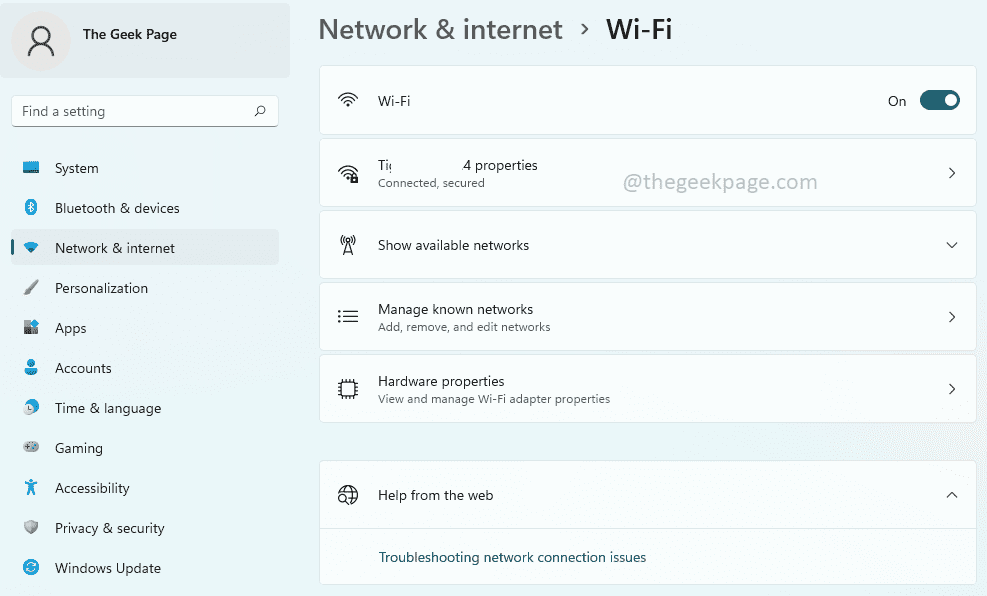
Windows WiFi Settings window provides many WiFi settings options to its users. Some of the settings available in the WiFi Settings window are as follows.
- Turn the WiFi On or Off
- View and edit the properties of the current network
- Show the available networks
- Manage the known networks
- View and manage the Wi-Fi adapter properties
- Troubleshoot network connection issues
The WiFi Settings window is thus one major window as it has all the major WiFi configuration options available. If you are working on a network-related project or if you are a student who is doing some research on the WiFi management settings, or for some other reason if you are someone who needs to open the WiFi Settings window very frequently, you might be delighted to know there are way many options open for you to open the WiFi settings window.
In this article, we have detailed 9 different methods using which you can open the WiFi Settings window in your Windows 11. From the methods listed in this article, pick your favourite and do share it with us once you do! Enjoy!
Method 1: Through Settings Application
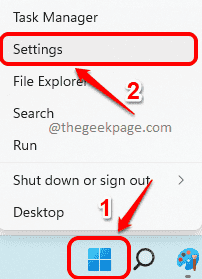
Step 1: Right click on the Windows Start Menu icon and click on the Settings option to launch the Settings application.
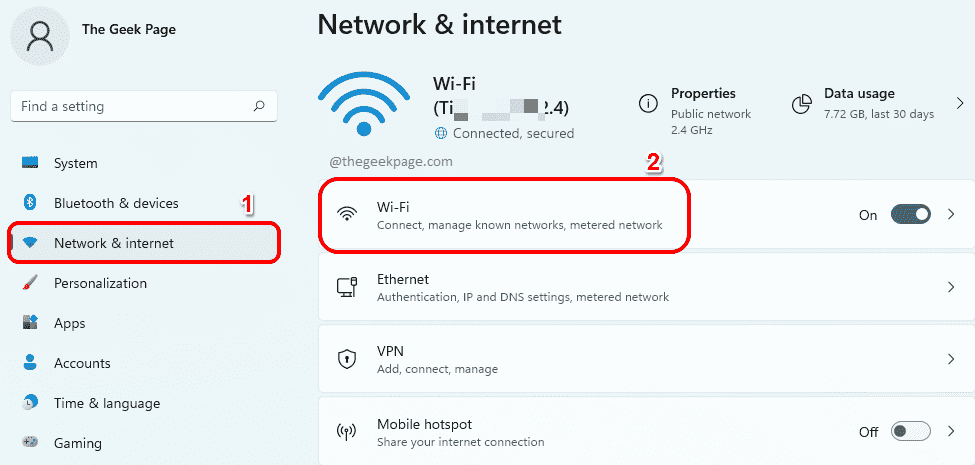
Step 2: On the left pane of the Settings window, click on Network & internet tile and on the right side of the window, click on the Wi-Fi tile.
That’s it. The Wi-Fi Settings window would now be open before you, all smiles.
Method 2: Through Quick Settings Panel Wi-Fi Icon
At the bottom right corner of your taskbar, click on the quick settings panel icon comprising of the Wi-Fi icon, Speaker icon and Battery icon.
As next, right click on the Wi-Fi icon in the quick settings panel and then click on the Go to Settings option to launch the Wi-Fi Settings window with no delay.
Method 3: Through Windows Search
Step 1: On the taskbar, hit the Search icon.
Step 2: Now on the Search bar, type in wifi settings and click on the Wi-Fi settings option from the Best match section. This would instantly launch the Wi-Fi settings window for you.
Method 4: Through Quick Settings Panel More Wi-Fi Settings
Step 1: Firstly, click on the quick settings panel icon located at the bottom right corner of your taskbar. The quick settings panel icon is comprised of the Speaker icon, Wi-Fi icon and Battery icon.
As next, click on the right arrow icon associated with the Wi-Fi icon.
Step 2: Now, under the list of the available Wi-Fi networks, click on the link that says More Wi-Fi settings.
Method 5: Through Command Prompt
Step 1: Press the keys WIN + R to launch the Run window. When it does, type in cmd and hit the Enter key.
Step 2: When the Command Prompt opens up, copy and paste the following command and hit the Enter key to instantly launch the Wi-Fi settings window in your Windows 11.
start ms-settings:network-wifi
Method 6: Through Windows PowerShell
Step 1: Once again, bring up the Run window by pressing the Win + R keys at the same time.
Type in powershell and hit the Enter key to launch Windows PowerShell.
Step 2: In the PowerShell window, copy and paste the following command and then hit the Enter key to launch the Wi-Fi Settings window instantly.
start ms-settings:network-wifi
Method 7: Through Run Window
This is one very easy method. Just press the Win + R keys simultaneously to open the Run dialog box. In the Run command box, copy and paste the following command and hit the OK button. This would straight away take you to the Wifi Settings window. Enjoy!
ms-settings:network-wifi
Method 8: By Creating a Desktop Shortcut
Step 1: Press the keys WIN + D to instantly bring up the Desktop.
Now, right click on an empty space on the Desktop. Click on the New option from the right click context menu and then click on the Shortcut option.
Step 2: As next, in the Create Shortcut window, on the Type the location of the item field, copy and paste the following location.
ms-settings:network-wifi
Once done, hit the Next button at the bottom.
Step 3: Finally, give a name to your shortcut and hit the Finish button.
In the example below, we have named our shortcut as WiFi Settings Window.
Step 4: That’s it. If you go to the Desktop now, you can see your brand new shortcut, all ready to take charge. Double click on it every single time you want to launch the Wi-Fi Settings window.
Method 9: By Assigning a Hotkey Combo
Step 1: Create a Desktop shortcut for the Wi-Fi Settings window as detailed in Method 8.
As next, right click on the desktop shortcut and click on the Properties option.
Step 2: Now on the shortcut properties window, click on the Web Document tab first.
Then click on the text field associated with the Shortcut key option. Simply press any key that you want to be assigned to your shortcut. CTRL + ALT keys will be automatically added before the key you assign.
For example, if you want to assign the key W to your shortcut, then the hotkey combination for the WiFi Settings window would be CTRL + ALT + W.
That’s it. Go ahead and try pressing the keys CTRL + ALT + W together to bring up the WiFi Settings window every time you are in a hurry to change your WiFi settings.
Please tell us in the comments section which method is your favourite. Our personal favourite is Method 9, as it lets us open our most frequently used window with the mere press of some buttons.
We hope you found the article useful.


