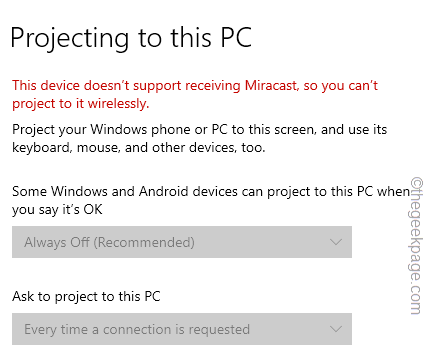
You can easily project your screen to another computer or extend your current display to another external display using the built-in projection function on your Windows devices. But, sometimes you may see this entire “Projecting to this PC” function greyed out, making it impossible to project the PC on another screen.
NOTE –
Open the Projection settings in this way –
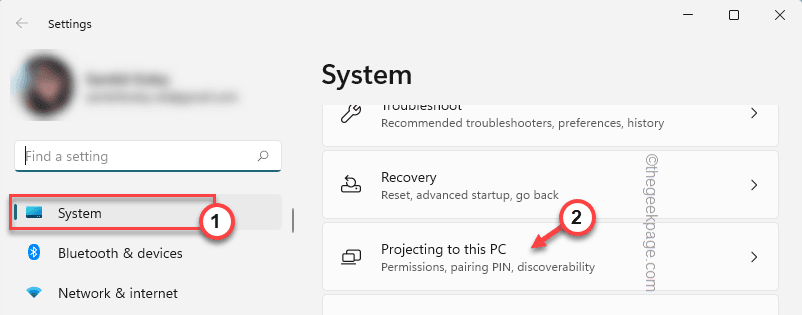
Settings > System > Projecting to this PC
Once you reach this place, check whether you can see a message like this – “This device doesn’t support receiving Miracast, so you can’t project to it wirelessly“. You can’t project normally from the system. You’ll need an external casting device (like Chromecast) to project to the PC.
Fix 1 – Install the wireless display
The wireless display facility is available as an optional feature for the users. You can install this feature directly from settings.
1. Open Windows Settings using the Win key+I keys together.
2. When you reach the Settings page, click on “System” settings.
3. On the right-hand pane, click on “Projecting to this PC” to explore it.
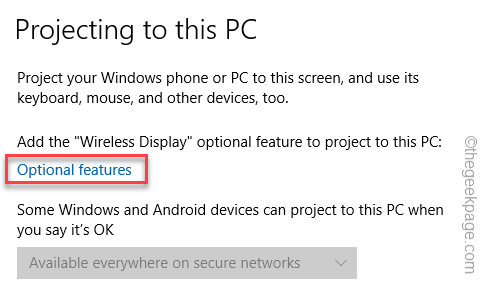
4. Under the ‘Add the “Wireless Display” optional feature to project to this PC:’ option, click “Optional features“.
5. This shall directly lead you to the main Optional features page.
6. You will a list of features on your screen. Search for the “wireless” using the search box.
7. In the search result, tick the “Wireless display” and click “Next“.
8. Just, tap “Install“.
Windows will now download the Wireless Display package for your system and install it. So, wait patiently until that is done.
Once the feature is installed, you can tweak the ‘Projecting to this PC’ setting again. You may restart your device once.
NOTE –
If you can’t find the Wireless Display package, try to install it directly.
1. Open the Settings page again.
2. Now, go to the “Apps” setting. Next, on the right-hand pane, click on “Optional features“.
3. Now, on the Optional features page, you’ll see the option ‘Add an optional feature’.
4. Here, tap the “View features” option to view all the features.
5. Now, search for “wireless” in the search box to filter out the result.
6. Then, select “Wireless Display” from the search results and tap “Next“.
7. Finally, click on “Install” to start the installation.
Hope this resolves the issue.
Fix 2 – Using the Registry Editor tool
There is a value that enables or disables the projection function on your computer.
1. At first, press the Win key+R keys together.
2. After that, type “regedit” and click “OK” to open the Registry Editor.
NOTE – Projection can be controlled with a simple value on your registry. Any wrong changes in the registry may cause irreversible damage. So, create a registry backup before you proceed further.
a. At first, click on the “File” from the menu bar.
b. Later, tap “Export” to make a new registry backup.

Name this backup anything you prefer and store it somewhere safe.
3. Reach this location in the Registry Editor –
HKEY_LOCAL_MACHINE\SOFTWARE\Policies\Microsoft\Windows\Connect
4. Upon reaching that location, on the right-hand pane, look for the “AllowProjectionToPC“.
[
NOTE –
If you can’t see the “Connect” key on the Registry Editor, do this –
1. Open the Registry Editor and reach this place –
HKEY_LOCAL_MACHINE\SOFTWARE\Policies\Microsoft\Windows\
2. Then, right-click the “Windows” key and select “New>” and “Key” to create a new key.
3. Name this new key “Connect“.
4. Make sure that you have selected the “Connect” key from the left-hand pane.
5. Then, right-tap the space and click “New>” and “DWORD (32-bit) Value“.
6. Name it “AllowProjectionToPC“.
You may now follow the rest of the instructions.
]
5. Next, double-tap the value to edit it.
6. Then, make sure to empty the ‘Value data:’ box.
7. Finally, click “OK” to save the changes.
After that, close the Registry Editor page. Next, restart your PC after this.
Then, try to tweak the projection settings just like before. Test if this works out.
Fix 3 – Tweak the Local Group Policy
If you have a Windows 11 Pro or Enterprise edition, you can use the Group Policy settings to tweak the Projection settings.
1. Just, press the Win key and type “gpedit“.
2. Next, click on the “Local Group Policy Editor” in the elevated search results.
3. When you see the Local Group Policy page opens up on your screen, expand the left-hand pane following this way –
Computer Configuration\Administrative Templates\Windows Components\Connect
4. Upon reaching this location, look in the right-hand section and you can find several projection-related policies.
5. Simply, double-tap the “Don’t allow this PC to be projected to” policy to edit it.
6. Next, configure the policy to “Disabled“.
7. After this, tap “Apply” and “OK“.
After applying this policy to your system, make sure to restart your system.
Fix 4 – Check for the Wireless display support
Your WiFi adapter needs to have WiFi-Direct for the projector to function properly.
1. You have to open the CMD terminal. So, click the Win key once and write “cmd“.
2. Then, right-click the “Command Prompt” and tap “Run as administrator“.
3. In the Command Prompt screen, type this code and just hit Enter.
netsh wlan show drivers
This shows the complete information about the network driver. So, scroll down to the end of the list.
4. Just take a look at the “Wireless Display Supported:” option. If it says “No“, that means the WiFi Direct is not supported and you can’t project anything to this system.
Usually, all the latest computers and laptops are equipped with WiFI-Direct supported drivers. You can even use an external network adapter that supports projection.
Fix 5 – Uninstall the current network driver
Uninstalling and reinstalling the current network adapter may reset the projection settings accessible.
1. You can find the network driver in the Device Manager.
2. To open that, simply right-click on the Windows icon in the middle of the taskbar. Then, tap “Device Manager“.
3. On to the Device Manager page, expand the “Network adapters“.
4. Now, right-click the network adapter that you are currently using and click “Uninstall device“.
5. Further, click on “Uninstall” in the prompt to complete the uninstallation process.
As you have uninstalled the network adapter, you’ll be disconnected from the network. But, don’t worry. Just, restart your computer.
Once you have restarted the device, you should be reconnected to the network. But in case the network driver is still not installed on your device, follow these instructions –
1. Open the Device Manager.
2. Then, click on the “Action” on the menu bar and tap “Scan for hardware changes“.
This forces Windows to scan all the device drivers and the missing network driver gets installed in that process.
Finally, test whether you can change the ‘Projecting to this PC’ settings or not. Your problem should be resolved.


