Printing documents in Windows is very easy and there are so many paths available to do it. But, what if you see the “Port in use. Please wait.” error message? Don’t worry. Usually, if you are using an office printer connected to many machines at once, it is normal. So, in that case, we recommend just waiting for a few minutes and retry the process all over again. If the error message still shows up, follow these easy instructions to fix this printer port problem.
Fix 1 – Disconnect and reconnect the printer
Before you jump on to the software-based solutions, we recommend disconnecting and reconnecting the printer.
1. Check whether any printing operation is still in motion.
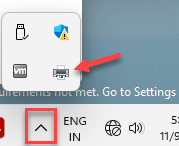
2. Just click on the small upward arrow icon on the taskbar to see the hidden icons. Click that once and check whether you can see any printer icons. Tap that icon.
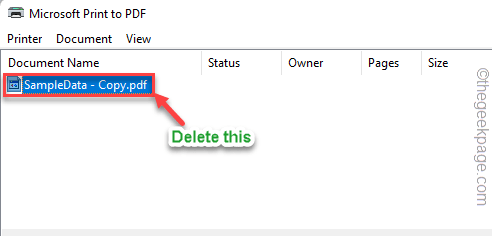
3. Now, if there are any printing jobs for the printer, you may see them on the Printer page.
4. If there are pending printer operations, select these tasks one by one and tap “Delete” to delete all of them.
5. After this, close everything.
6. Then, turn off the printer and plug it off from your computer.
7. Next, turn on the printer once again and connect it to the PC.
Try to print a test document using the printer. Check if this works.
Fix 2 – Check the printer port
Check whether the printer is using the correct port.
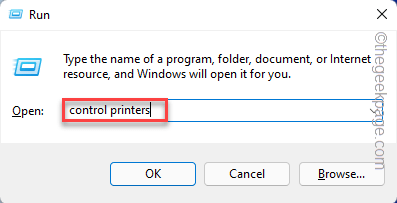
1. Right-click the Windows icon and tap “Run“.
2. Then, type or copy-paste this and hit Enter.
control printers
3. When the list of printers loads up, find out the printer you are using.
4. Then, right-tap that printer and tap “Printer properties“.
5. On the Printer properties, reach the “Ports” section.
6. Now, carefully check whether the checked “Port” matches the printer “Description“. Otherwise, check the port that matches the printer description.
7. After that, tap “Apply” and “OK” to save the change.
Now, try to print the document again.
Fix 3 – Run the Printer troubleshooter
Try running the printer troubleshooter to troubleshoot this printer port issue.
1. Press the Windows key and the I keys together.
2. This will open Settings. Go to the “System” settings.
3. After that, click “Troubleshoot” to open that as well.
4. On the right-hand side of the window, tap “Other troubleshooters“.
5. You can find all sorts of troubleshooters here. Scroll down and locate the “Printer” troubleshooter.
6. Just tap “Run” to run the troubleshooter.
Patiently wait for Windows to analyze the printer and fix the problem.
Now, try to print something using the printer again.
Fix 4 – Update the USB controllers
You should update the USB controller devices using the Device Manager.
1. Search “device” using the search box.
2. Now, click “Device Manager” in the search result pane.
3. When you appear on the Device Manager page, expand the “Universal Serial Bus Controllers” section.
4. Here, you can see several device drivers present.
5. Now, right-click the first driver and tap “Update driver“.
6. Then, you have to tap “Search automatically for drivers“.
Wait until Windows searches for the latest version of the driver and install it on your computer.
Fix 5 – Uninstall and reinstall the USB
Uninstalling and reinstalling the faulty USB device driver may help you resolve the problem.
1. At first, press the Win key+X keys together.
2. Then, tap the “Device Manager” to access that.
3. Next, expand the option “Universal Serial Bus controllers” device section to view all the listed devices.
Now, look for any device that has a yellow exclamation mark or a downward arrow. This is the corrupted device.
4. So, right-click that device driver and tap “Uninstall device” from the context menu to uninstall the driver.
5. Now, tap “Uninstall” to uninstall the driver from your computer.
After that, close the Device Manager. Now, restarting the device will reinstall this uninstalled driver. So, restart our computer.
Fix 6 – Clear the printer spool
Clearing the printer spool files should make the printer work again.
1. You can’t clean the printer spool files without stopping the Spooler service.
2. So, hit the Windows key from your keyboard and type “cmd“.
3. You have to right-tap the “Command Prompt” and tap on “Run as administrator“.
4. With just one command you can stop the spooler service. Paste this and hit the Enter button.
net stop spooler
Minimize the Command Prompt terminal page. You will need this later.
5. Open the File Explorer and go straight to this –
6. Navigate to this section –
C:\Windows\system32\spool\PRINTERS
7. You may see a permission-related prompt on your screen. Click on the “Continue” button.
8. Once you are inside the folder, select all the files and folders at once.
9. Then, click the ‘Delete‘ icon on the menu bar.
After this, close the File Explorer page.
9. Go back to the terminal again.
10. Then, write these words and hit Enter.
net start spooler
After this, close the Command Prompt screen. Now, try to print the document.
You won’t face the printer port issue again.
Fix 7 – Remove the printer
Remove the printer from your computer.
1. At first, press the Win key+R keys together.
2. Then, type this in the box and hit Enter to find the list of printers.
ms-settings:printer
3. Now, in the list of printers, identify the printer you are using.
4. Then, select it.
5. Click “Remove” to remove the printer from the system.
Just, follow the on-screen steps to uninstall the printer.
6. Now, go to the printer manufacturer’s website and search for the latest printer driver for your printer.
7. If you can find the latest driver, download the printer driver and install it.
8. Now, connect the printer to your device.
Windows will automatically recognize the latest driver and enlist the printer.
Try printing the document once again.


