While playing a program on Netflix some users might have experienced audio or video out of sync problems. It might be because of using out dated software, TV or mobile setting changes, or Netflix app setting changes, etc. In this article, there are a few methods to solve the issue. But first, try restarting the app and the device. Most of the time just a restart will help. Else unplug and plug the cables of the device and also power off and power on your devices. If all these does not work then try with the below solutions.
Basic Fixes
- Try connecting to a different network like mobile data or a wi-fi network. Else check by clicking on forget the network option and then add it again.
- If there are any ad blockers for Netflix on your browser disable them.
- Try using different browsers for playing Netflix if you are using it in the browser.
- Check by pausing the video, forwarding, rewinding, etc, and then check if the issue is solved.
- Use a headphone and check if the issue resolves or use different cables and ports and try it.
If none of the basic workarounds works then try the below solution.
Method 1: Change The Audio Settings
Step 1: Open the Netflix app and play some movies or tv show
Step 2: Click on the screen
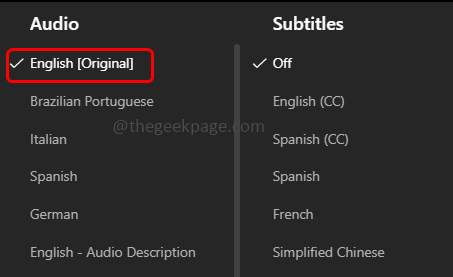
Step 3: Scroll down and choose audio and subtitles
Step 4: Change the audio to English
Step 5: Then play the program and check if the Netflix audio is working fine
Step 6: If the issue is not solved, try to set the audio to 2.0 and check if the issue is solved.
Method 2: Disable HD Streaming
Step 1: Open the Netflix app
Step 2: Click on the profile at the top right corner
Step 3: Choose account from the list
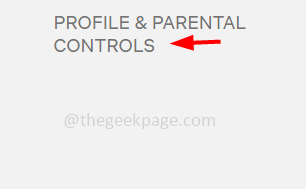
Step 4: In the opened window scroll down and select profile and parental controls (you can see it easily when you open the app in browser)
Step 5: Select the profile that you want to edit then click on playback settings
Step 6: Under data usage per screen choose medium by clicking on the radio button beside it
Step 7: Click on save button to save the changes that you made
Step 8: Also check by setting the system’s screen resolution to 720 DPI
Step 9: Close and re-open the Netflix app and then check if the audio issue is solved.
Method 3: Netflix Users On Smartphones
Keep The Device Up To Date
Note: Here the steps are regarding android phone settings. The navigation changes according to the phone
Step 1: First of all take a backup of your phones data
Step 2: Connect to the internet or Wi-fi network
Step 3: Open the settings (gear icon)
Step 4: Click on system
Step 5: Then select system updates
Step 6: If there are any latest updates download and install them
Step 7: Once updated restart your device and then check if the issue is solved.
Re-install The Netflix App
Step 1: Open the phone settings (gear icon)
Step 2: Click on apps & notifications
Step 3: Click on see all apps and then search for Netflix app
Step 4: Select storage & cache
Step 5: Choose clear cache and in the pop up click on ok
Step 6: Then click on clear storage and in the pop up click on ok
Step 7: Later go back on the screen click on uninstall and confirm it
Step 8: Restart the phone and then re-install the Netflix app from the play store
Step 9: After installation check if the issue is solved.
Method 4: Netflix Users On Windows
Update Windows System
Step 1: Open windows settings using Windows + I keys together
Step 2: Click on update & security
Step 3: On the right side click on check for updates button
Step 4: If there are any updates it will be installed
Update The Drivers
Step 1: Open the run prompt using Windows + R keys together
Step 2: Type devmgmt.msc in the run prompt and hit enter. This will open the device manager window
Step 3: Expand the network adapters by clicking on the arrow mark beside it
Step 4: Right click on the adapter that you want to update
Step 5: Then click on update driver
Step 6: Click on search automatically for drivers
Step 7: Once done restart the system and then if the audio issues is solved.
Disable Autoplay In Hardware And Sound Devices
Step 1: Open windows settings using Windows + I keys together
Step 2: Click on devices
Step 3: From the left, click on autoplay
Step 4: On the right side, disable the Use Autoplay for All Media and Devices option by clicking on the toggle bar below it (blue color should disappear)
Step 5: Restart the system and see if the problem is solved.
Disable Fast Startup of the System
Step 1: Press Windows + X keys together
Step 2: From the appeared list click on Power options
Step 3: On the right side click on additional power settings
Step 4: Select Choose What the Power Buttons Do
Step 5: Then click on Change Settings That Are Currently Unavailable
Step 6: Uncheck turn on fast startup option by clicking on the checkbox beside it (tick mark should not be present)
Step 7: Now click on save changes button to save the changes made
Step 8: Shut down the system (do not restart)
Step 9: On the system and check if the issue is resolved.
Disable Allow Applications To Take Exclusive Control of This Device Option
Step 1: Right click on the speaker icon which is at the bottom right corner of the window
Step 2: From the list click on sounds
Step 3: Go to the playback tab
Step 4: Double click on the sound device that you use
Step 5: Go to the advanced tab
Step 6: In the default format section, select 24-bit, 192000 Hz (Studio Quality) from the dropdown
Step 7: Uncheck Allow Applications to Take Exclusive Control of This Device by clicking on the checkbox beside it (tick mark should not be present)
Step 8: Click on Apply and then OK to save the changes. Then check if the problem is solved.
Let Windows Decide What’s Best for the Computer
Step 1: Open the run prompt using Windows + R keys together
Step 2: Type sysdm.cpl in the run prompt and hit enter. This will open the system properties window
Step 3: Go to the advanced tab
Step 4: Click on Settings button from the performance section
Step 5: In the visual effects tab select Let Windows Decide What’s Best for My Computer by clicking on the radio button beside it. Now the issue would have been solved.
Method 5: Netflix Users On TV
Enable Lip Sync/Audio Output Delay In Samsung TV
Step 1: Click on the Settings on your TV
Step 2: Select Sound from the settings list
Step 3: Click on expert settings
Step 4: And set a value to Digital Output Delay. Try to adjust the value and check if the issue is solved.
Disable Dolby Digital Settings On Apple TV
Step 1: Open the settings and click on audio & video
Step 2: Disable the digital dolby option and check if the audio sync issue is solved
Disable Match Frame Rate
Step 1: Open the settings and click on audio & video
Step 2: Choose match content
Step 3: Disable the Match Frame Rate and check if everything works as expected.
Change The Output
Step 1: Open the settings and click on audio & video
Step 2: Select HDMI Output & change it to YCbCr.
Change and Calibrate the Display Mode
Step 1: Open the settings and click on audio & video
Step 2: Select Format and set the Dolby Vision to 24Hz
Step 3: Click on the wireless audio sync
Step 4: If the issue still persists the go back to audio and video screen then select calibrate
Step 5: Then follow the onscreen instructions to complete the process and then check if the issue is solved.
Adjust Settings In Roku TV – Disable The Volume Mode
Step 1: Play some show from the Netflix
Step 2: Press the asterisk symbol (*) from the remote
Step 3: Select sound settings
Step 4: Click on the volume mode and turn it off. Now check if everything works fine.
Edit The Dolby Digital Audio Settings
Step 1: Open the settings of your device
Step 2: Select audio
Step 3: Choose HDMI and set it to PCM. Now check if the issue resolves.
That’s it! I hope this article is helpful. Let us know which method you applied to get it done. Thank you!!


