Is your printer constantly printing this same line “Get/eSCL/ScannerStatus HTTP/1.1 Host: localhost” again and again on the fresh printer page? It seems the printer scanner you are using sending a get request to retrieve the scanner status using the eSCL request. This usually happens in the printer connected to your system using USB.
Fix 1 – Use another port
Using another port should satisfy the get request from the Scanner device.
Step 1 – Just switch Off the printer and disconnect it from the power source.
Step 2 – Then, connect the printer to another USB port on your computer.
Step 3 – Now, turn ON the printer. Let Windows recognize it.
Then, try to print a normal, one-page document to test this out. You won’t get the “Get/eSCL/ScannerStatus HTTP/1.1 Host: localhost” error.
Fix 2 – Disable the AirPrinting feature
If you use the AirPrint feature alongside the USB, disabling it should help you fix it.
NOTE – Actual steps may differ from printer to printer. But, this AirPrint option is usually available under the printer network configuration tab.
Step 1 – You have to disable the AirPrint feature on your computer.
Step 2 – Open the IP address of the printer you have.
Step 3 – This usually opens up the Printer configuration. Here, you have to open the Network Configuration.
Step 4 – Here you will find the option to edit the Printer Network protocols.
Step 5 – Just disable the AirPrint feature and save the changes.
Now, restart the printer manually using the power switch. You won’t get the eSCL error again.
Fix 3 – Disable the printer status notification
Disable the printer status notification and test.
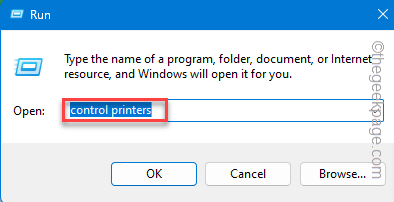
Step 1 – Write ⊞ Win+R.
Step 2 – Then, write this in the bank box and hit Enter.
control printers
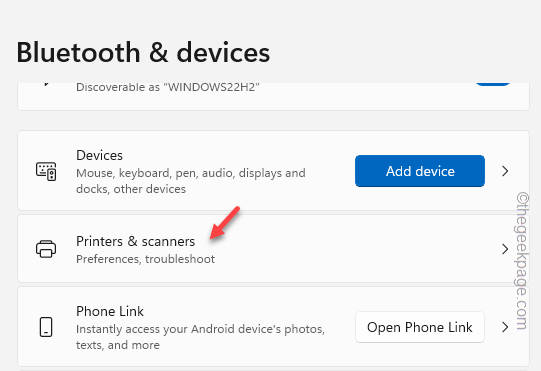
Step 4 – Tap “Printers & scanners” on the right-hand side of Settings.
Step 5 – Now, click the printer you are using to open its settings.
Step 6 – Finally, go all way down and tap “More devices and printers settings” to open it.
Step 7 – When you see the entire list of printers, right-click the printer you are using and tap “Printer properties“.
Step 8 – When the particular printer properties open up, go to “Device Settings“.
Step 9 – There, expand the “Installable Options” tab. Then, make sure to disable “Printer status notification“.
Save the changes for the printer.
Go ahead and try to print something. Print a diagnostics page and test.
Fix 4 – Uncheck the information notifications for printers
Actually, when local printers are showing the notifications, this incurs the eSCL error.
Step 1 – Type “printer” after pressing the Windows key.
Step 2 – Then, tap “Printers & scanners” to open that.
Step 3 – Then, scroll down to the end on the right-hand pane. Tap “Print server properties“.
Step 4 – Make sure to head on to the “Advanced” tab.
Step 5 – Then, make sure to uncheck these two options –
Show informational notifications for local printers

Show informational notifications for network printers
Step 6 – Save the settings. Tap “Apply” and “OK“.
Try to print a test page now and test. You won’t see the “Get/eSCL/ScannerStatus HTTP/1.1 Host: localhost” error message in the printer page.
Fix 5 – Automate the Print Spooler service
Step 1 – You have to get access to Print Spooler. So, write “services“.
Step 2 – Next, click “Services” to open that.
Step 3 – When you reach Services, look for “Print Spooler“.
Step 4 – Then, right-tap that and click “Properties“.
Step 5 – Just switch the ‘Startup type:‘ to “Automatic“.
Step 6 – Tap “Apply” and “OK“.
Start the printer and print a random test page.
Fix 6 – Remove the printer and reconnect
Remove the printer from your computer and reconnect the same and test.
[NOTE – If your printer supports the WiFi printing facility or the facility to print wirelessly, you can just remove and reconnect it to your computer. Then, set it to the default printer and unplug the USB. Use the WIFI connection to print. You won’t see the eCLS error message again. ]
Step 1 – Just type “printers” in the search box.
Step 2 – Then, click “Printers & scanners” to open the printer settings.
Step 3 – Next, tap the printer to open that.
Step 4 – On the printer page, tap “Remove” to remove the printer from your computer.
Step 5 – It will send a warning message. Just tap “Yes” to confirm the removal.
Step 6 – Once you are back at the main Printers page, tap “Add device“.
Now, just unplug the printer USB cable once from the system and reconnect it. Windows automatically registers the new printer.
Step 7 – Then, open the newly installed printer.
Step 8 – On the same page, tap “Set as default” to set the printer as the default printer.
Now, if your printer has the support for wireless printing, you can unplug the printer USB cable (not the power cable that connects the printer to the power outlet) and continue to print via WiFi from a mobile, laptop, and everything else.
You won’t see the eSCL get a request for the printer again.


