Network-connected printers are very useful to work with as many parallel users can access the printer and print without worrying about any wired connection. But, sometimes while using the printer you may see this ‘Printer cannot be contacted over the Network’ error message while troubleshooting the printer. If you are seeing this error, you can solve this issue on your own enacting these solutions.
Initial Workarounds–
1. If you are using the printer with an Ethernet connection, try to use it over a WiFi connection or vice-versa.
2. Check the network connection.
3. Try to print something from any device on the network. Check if the issue is device-specific or universal.
Fix 1 – Check certain services are enabled
Check whether certain services are enabled or not.
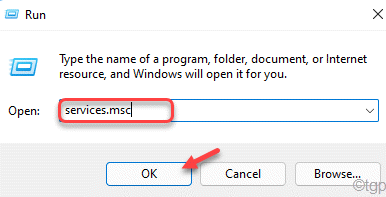
1. At first, press the Windows key+R keys together.
2. Then, type “services.msc” and click on “OK“.

This will open up the Services.
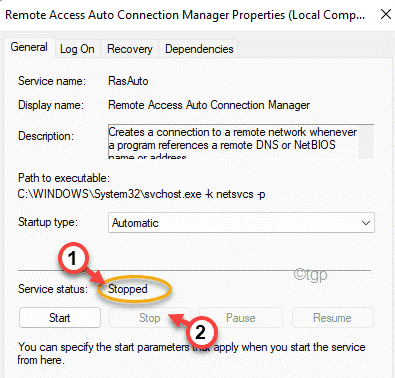
3. In the Services window, double-click on the “Remote Access Auto Connection Manager” service to access it.

4. If you notice any of this service is showing ‘Running‘, right-click on the service and click on “Stop” to stop the service immediately.
If the service is already showing ‘Stopped‘, proceed to next step.

5. Set the ‘Startup type:’ of the service to “Automatic” mode.
6. Now, tap on “Start” to start the service.

6. Repeat the same thing for these services also.
Remote Access Connection Manager
Secure Socket Tunneling Protocol Service
Routing and Remote Access

After that, minimize the Services window.
Nw, while doing this operation on these services you may see this error message –
Windows could not start the service on Local Computer. Error 1079: The account specified for this service differs from the account specified for other services running in the same process.
If that is the case, you have to manually fix the service.
1. In the Services window, locate the service where you are facing this problem.
2. Then, double click on that service to open its properties.

3. In the properties window, go to the “Log on” tab.
4. Here, tap on “Browse” to open it up.

5. Now, you have to click on “Advanced” to access additional settings.

6. Now, tap on the “Find Now” option to find out all the user groups associated with this service.
7. Now, select your account name from the list. (In this case, it is ‘Sambit koley
8. Finally, tap on “OK” to save the settings.

9. Again, click on “OK” to save the changes.

10. Now, type your account password in the “Password” box. Same way, type the password again in the “Confirm Password” box.
11. Then, tap on “Apply” and click on “OK“.

This will save the settings on your computer.
Your printer should work just fine.
Fix 2 – Configure a Static IP for the printer
Your router sets a particular IP address for your computer. If the printer is misconfigured to another IP address, you won’t be able to contact the printer over the network.
1. At first, press the Windows key+R keys.
2. Then type “control printers” and click on “OK“.

3. When the Device & Printers window appears, you will find the list of the printers.
4. Now, right-click on the printer and tap on “Printer Properties“.

5. In the printer properties window, go to the “Ports” tab.
6. Now, scroll down through the list of ports. Here you will find a port entry that resembles an IP address (like 10.120.120.13).
Note down that IP address.

7. Now, open a browser window and put that IP address and hit Enter.
You will be at the printer settings page.
8. Here, you have to put your printer name and password. Then, tap on “OK” to proceed further.
9. Now, here try to locate the “IP Configuration” settings.
10. Inside this setting, you will find the “TCP/IP” or “IP Address Configuration“.
Set this setting to “Manual” or “Static” (whichever option you will find).
11. Now, set the static IP address you want to use in the following box and finally click on “Apply” to apply the modifications.
This way, configuring the Printer to a static or manual IP should fix the network issue of the printer.
Fix 3 – Remove the printer and add it
Some users have solved the issue simply by removing the printer once and adding it to your computer once again.
1. At first, press the Windows key+R keys together.
2. In the Run terminal, copy-paste this in this box and hit Enter.
control printers

3. When the Devices & Printers opens up, right-click on the printer you are facing the problem with and click on “Remove device“.

4. If you see any confirmation prompt, tap on “Yes” to remove the printer device.

This will remove the printer device from your computer.
5. Now, just detach the USB cable that is connecting the printer and your computer. (or detach the printer from the Ethernet connection or WiFi.)
6. Then, a plugin that same USB cable to your computer to connect your printer (or, connect the printer to your computer using WiFi or Ethernet).
Now, wait for a while as Windows will load the default printer driver for the printer on your computer. You will see the printer again in the list of ‘Printers’.
If you can’t see your printer, you can do this –
1. Again, open the Run terminal.
2. In the Run terminal, copy-paste this in this box and tap on “OK“.
control printers

3. Here, just click on the “Add a printer” option.

4. Now, Window will detect the connected printer.
5. Select the printer and click on “Next“.

Follow the on-screen instructions to complete the printer setup on your computer.
Now, try to print a page using the printer. Check if this solves the issue.