Microsoft OneDrive cloud storage service is widely used by many Windows users to sync their data across multiple devices. By default, Microsoft OneDrive folder is in the C drive of your system. However, sometimes, you might want to move this folder to some other drive to improve system performance by freeing up some space in your C drive. If you have tried everything and hasn’t yet succeeded in successfully moving the OneDrive folder to another location, this article is for you.
Step 1: Click on the OneDrive icon that’s at the right side of the taskbar.
Read: OneDrive Icon missing from Taskbar
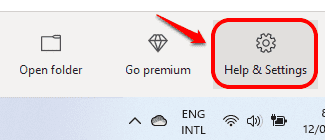
Step 2: As next, click on the icon Help & Settings.
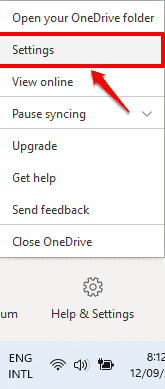
Step 3: From the menu that expands out, click on Settings option.
Step 4: This will open up Microsoft OneDrive settings Window. Click on the link that says Unlink this PC.

Step 5: When the following confirmation window comes up, click on the Unlink account button. You will now see the OneDrive login screen. Close it.
Step 6: Now launch File Explorer by clicking on the File Explorer icon in the taskbar.
Step 7: Now you have to navigate to your OneDrive folder. Usually the OneDrive folder is present at the location:
C:\Users\%username%
Just copy and paste the path given below in the address bar of file explorer.
Step 8: Now right click on the OneDrive folder and click on the Cut icon, or simply press the keys CTRL+X together after selecting the folder.
Step 9: As next, navigate to the new folder where you want to move your OneDrive folder to. Paste the folder there by pressing the keys CTRL+V together.
Step 10: Now, click on the OneDrive icon again from the taskbar. This time, OneDrive icon will show as disconnected.
Step 11: Click on the Sign in button next.
Step 12: Enter your Microsoft email id, click on Sign in button.
Step 13: Now enter password and hit Sign in button.
Step 14: When the following window opens up, showing your old OneDrive folder location, click on the link that says Change location.
Step 15: Navigate to your target folder, click on Select folder button.
Step 16: Now a new confirmation window like the one shown below will pop up. Click on Use this folder button.
Step 17: You will now be back to the folder selection window. You can see that the new location you selected has been updated. Click on Next button.
Step 18: Follow the remaining steps as per your preference, mostly just by clicking the Next button. Finally, click on the button Open my OneDrive folder when you see the following window.
Step 19: You can now see your OneDrive folder in the new location, you can also see that your files inside the folder have a green tick mark against them under the Status column, indicating that they are synced with your OneDrive account.
Please tell us in your comments whether this method worked for you or not.

