While printing a series of documents with your printer you may notice ‘Printer busy or error’ message has appeared from out of the blue. The main problem you are going to face with this error message is that this error is going to hamper the printing process. Just follow these simple instructions to tackle this printer issue in minutes.
Fix- 1 Empty the printer queue
Follow these easy instructions to clear your printing queue.
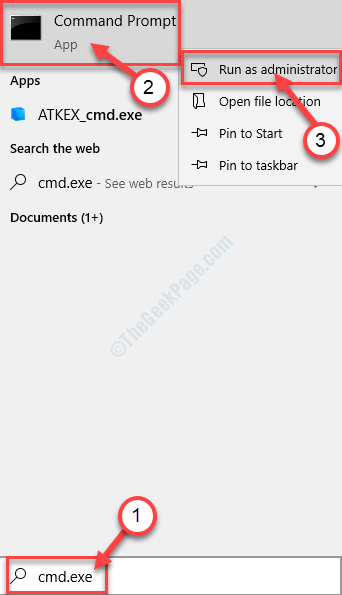
1. You need to access the search box by pressing Windows key+S. Type “cmd” there.
2. Thereafter, simply right-click on the “Command Prompt” from the search result. Then, click on the “Run as administrator“.

3. When the Command Prompt window appears on your screen, write or copy-paste this command in the terminal and then hit Enter.
net stop spooler

4. Now it is time to get rid of the corrupted printer queue. To do so, execute this code in the CMD window.
del %systemroot%System32spoolprinters* /Q

5. Simply start the spooler service again. To do so, type this command and then press the ‘Enter‘ key from your keyboard.
net start spooler

Once you have done clearing the printing queue, close the Command Prompt window.
Fix-2 Uninstall your printer device and then re-install it-
Lion’s share amount of printing issues solves automatically when you uninstall and re-install the same thereafter.
1. At first, simply press the Windows key+X keys together.
2. Then, click on the “Device Manager” to access it.

3. When the Device Manager window opens up, a simple click on the “Print queues” section and it will be expanded.
3. Then, a right-click on the problematic printer device, followed by a click on “Uninstall device“.
(As you can see for this device, the printer device is “HP DJ 1110 series“)

4. Simply click on “Uninstall” to verify the continuation of the uninstallation process.

Once the printer driver is uninstalled from your computer, close the Device Manager window.
Now, follow these methods-
Method-1 Restart your system-
A simple restart will reinstall the uninstalled printer driver.
Method-2 Manually reinstall the driver-
In case restarting your system didn’t work out. Scanning your system for hardware change may solve the issue-
1. Open the Device Manager by pressing the Windows key+X together and followed by a click on the “Device Manager“.

2. When you see that the Device Manager window has opened, just click on the “Action” from the menu bar.
3. Then a simple click on “Scan for hardware changes“.

You will see the printer driver again.
Method-3 Use ‘Add a printer‘ option-
1. Press the Start key from your keyboard and begin to write “Printers & Scanners“.
2. Then, you have to click on the “Printers & Scanners“.

3. In the Settings window, on the left-hand side, check if you can see your printer in the list of installed devices.
4. Check the list of ‘Printers & scanners‘ installed on your computer.
5. In case if you can’t see the printer in that list, click on the “Add a printer or scanner” option to add it.

Windows will now scan for possible printer devices.
6. In a moment, you will see the printer device has appeared in the Settings window.

Test this fix by printing something with your printer.
Fix- 3 Remove Printer spooler
Spooler service operates multiple users’ access to the printing device. Sometimes this may cause this issue.
1. You need to access the Run window simply by pressing the Windows key along with the ‘R‘ key.
2. To access the Devices and Printers, type this code and click on “OK“.
control printers

3. In the list of printing devices, find out your printing device.
4. Right-click on it and then click on “printer properties“.

5. Once the Printer Properties window appears, go to the “Advanced” tab.
6. Then, check the option “Print directly to the printer“.

7. Then, click on “Apply“. Similarly, click on “OK“.

Once you have done changing the settings, close the Device and Printer window.
Restart your system.
Again print a document. Your problem will be solved.