You might have come across a situation where an important file gets deleted from your system accidentally. If it is stored in the recycle bin, it can be recovered, if not this file is lost forever.Sometimes, the folder gets moved or accidently renamed and then searching for it becomes difficult especially when the same system is shared by many people. In order to avoid such situation, Windows provides various methods to protect them.
In this article, let us discover various of protecting the files and folders from being deleted.
Method 1: Alter the Security Permission of the File/ Folder
Step 1: Locate the file/ folder that is to be protected, right-click on the file/folder and choose Properties

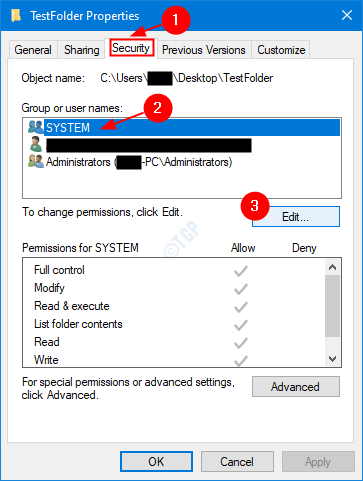
Step 2: In the Properties window that opens,
- Go to the Security tab
- Under Group or Usernames section, click on the Username that you want. For example, let us choose SYSTEM
- Now, Click on the Edit button

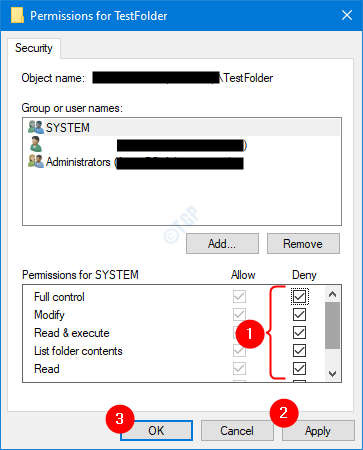
Step 3: In the Permissions window that shows up,
- Tick on all the options under Deny Category as shown below
- Click on Apply
- Click on OK

Step 4: A warning appears as shown below, Click on Yes

With these changes, the User with the Username selected above(SYSTEM in our case), will not be able to delete the file.
Step 5: In case, you want to revert the changes, In the Permissions for TestFolder Window,
- Untick on all the options under Deny Category as shown below
- Click on Apply
- Click on OK

Method 2: Change the Advanced Security Permissions of the File/ Folder
Step 1: Look out for the file/folder that is to be protected, right-click on the file/folder and choose Properties

Step 2: In the Properties window that opens,
- Go to the Security tab
- Under Group or Usernames section, click on the Username that you want. For example, let us choose SYSTEM
- Now, Click on the Advanced button

Step 3:The Advanced Security Settings window opens, click on the Disable inheritance button at the bottom left corner.

Step 4: Block inheritance window shows up. Click on Convert inherited permissions into explicit permissions on this object.

Step 5: In the appearing window,
- Click on the User. This user will not be able to delete the file.As an example, let us choose SYSTEM
- Now, press on Edit button

Step 6: In the Permission Entry window,
- Choose Deny in the Type drop-down
- Click on Show advanced permissions link, to look at more permissions available.

Step 7: From the expanded list of permissions,
- Tick on Delete, Read permissions, Change permissions, Take ownership. If you want, you can choose any other from the list as well.
- Click on OK

Step 7: In the Advanced Security Setting window,
- Click on the Apply button
- You will see a Windows Security Warning as shown below, click on Yes
- Finally, press OK

With these settings in place, if the user with a username SYSTEM tries to delete the file/ folder, the File access denied window will be shown, and the user will be asked to log in as administrator.
Method 3: Hiding the File/Folder
You can choose to hide the file from the view so that accidental deletion can be avoided. To do so:
Step 1: Search for the file/folder that is to be protected, right-click on the file/folder and choose Properties

Step 2: In the properties window that opens,
- Make sure you are in the General tab
- Under the attributes section, click on Hidden
- Now, click on Apply
- Finally, click on OK

Now, this folder will be hidden. By default, the hidden files cannot be viewed in the file explorer. However, with the slightest setting, it can be viewed again. If you want to disable the Hidden Files view, follow the below steps.
1: Open the Run window by holding Windows+r keys from your keyboard at the same time.
2: Enter explorer in the Run window and hit enter

3: In the explorer window that opens , from the top menu options,
- Select the View tab
- Click on Options
- Select Change folder and search options

4: In the Folder Options window that opens,
- Go to the View tab
- Under the Hidden files and folders section, Check the Don’t show hidden files, folders, or drives
- Click on Apply
- Finally, Click on OK

With these two changes, the important files/folders can be hidden and the option to see the hidden files and folders can be disabled.
That’s All. We hope this article has been informative. Thank you for Reading. Kindly comment and let us know which of the above methods helped you.