Snipping tool is an in-built application in Windows 10 that is used to take the screenshot of the screen. Windows also provide a feature to its user to take the screenshot using the keyboard shortcut. By default, When you press the PrtScr button from your keyboard the screenshot of the whole screen is taken. In case you have dual monitors connected, pressing the PrtScr key would take the screenshot of both the screens. If you are interested in taking the screenshot of a portion of the screen instead of the whole screen, just do this trick.
In this article, let us see in detail how to take the screenshot of a particular region of the screen using the PrtScr key.
Steps to be followed :
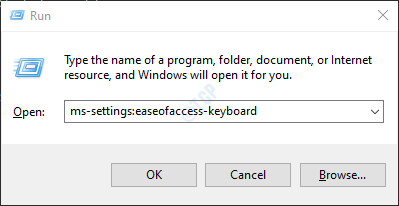
Step 1: Open the Run window in your system. Hold Windows+r keys together.
Step 2: In the window that opens, type the command ms-settings:easeofaccess-keyboard and hit Enter.

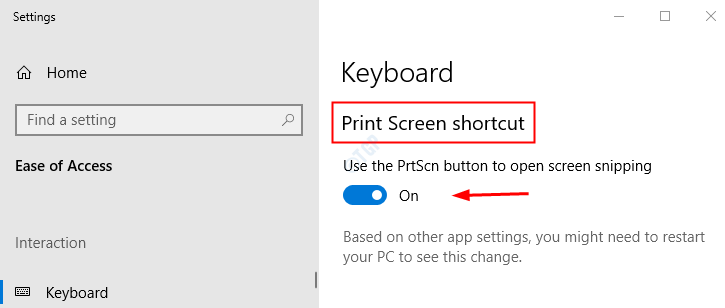
Step 3: In the Settings –> Ease of Access –> Keyboard window that opens, under the Print Screen shortcut section, Toggle the button to Turn ON(the button will now be shown in blue color) Use the PrtScr button to open the screen snipping

Step 4: Restart your System
Step 5: Once the system is up, press the PrtScr button from your keyboard. In the top-middle area of the primary screen, you will be able to see the several options available to take the screenshot.

- Click on the First Rectangle on the left to take the Rectangular snip
- Click on the painting palette like shape (next to the rectangle)for taking a freeform snip
- Click on the Two Rectangles back to back shape for taking the screenshot of the currently active window. Alternatively, click on Alt+PrtScr to achieve the same.
- Click on the enlargened rectangle shape (The last shape, next to the cross mark)for taking a full-screen screenshot.
That’s All. We hope you have found this article useful. Thank you for Reading.