Why does Premiere Pro lock up the second you import a clip, or die at 90% of an export? Usually it is not your hardware. A stuffed media cache is the top suspect (that’s the folder of temporary files Premiere builds for every clip you bring in). Old cache files pile up and that then clash with the new ones. But the cache isn’t the only cause. Phone and camera footage in H.264 or HEVC can also choke the importer. The graphics card can trip in the middle of an export. And the newer AI audio tools lock things up too. Not great for software you pay for every month. So work down the list.
Fix 1 – Clear the Media Cache
1 – Open Premiere Pro.
2 – Click Edit in the menu bar at the top.
3 – Hover over Preferences and click Media Cache.
4 – Click Delete next to Remove Media Cache Files.
5 – Select Delete unused media cache files.
6 – Click OK.
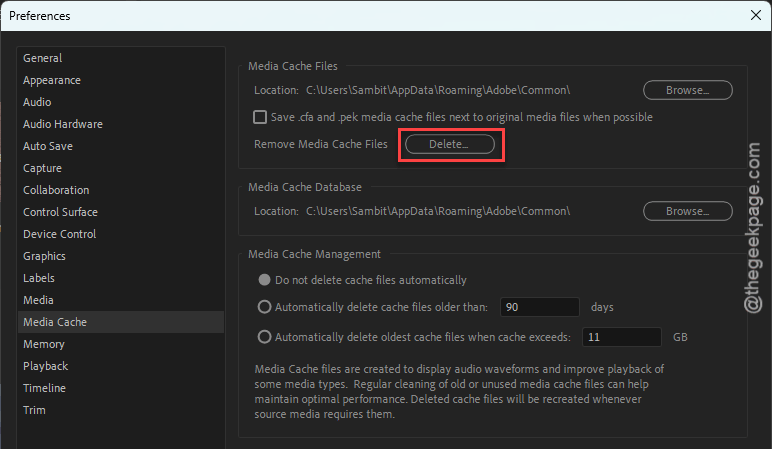
Wait for the dialog to close. Then try your import again.
Still freezing?
1 – Move the cache off your main drive.
2 – In that same Media Cache window, click Browse and pick a folder on an external SSD.
Premiere will build its temporary files there from now on.
Fix 2 – Convert the Footage to ProRes 422
If the freeze only hits with certain clips, look at the format. H.264 and HEVC are the compressed formats most phones and cameras record in. Small files. Hard work for Premiere to read.
ProRes 422 is a format built for editing, and Shutter Encoder is a free converter that makes it.
1 – Open Shutter Encoder and drag your clips into its window.
2 – Under Choose function, select Apple ProRes.
3 – Pick 422 from the small dropdown next to it.
4 – Click Start function and wait for the progress bar to finish.
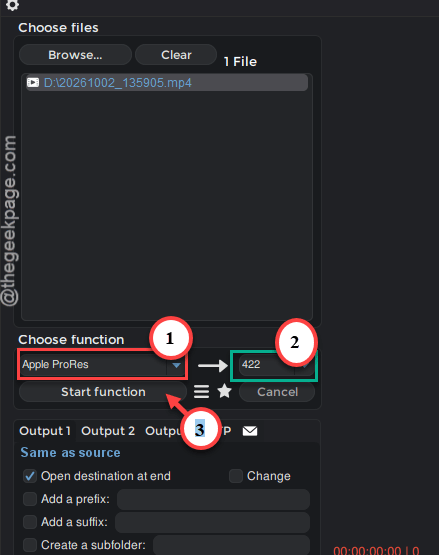
5 – Import the new files into Premiere instead of the originals.
One warning. ProRes files are big (several times the size of the originals, easily). Check that your drive has the room before you convert a whole shoot.
Fix 3 – Move Everything Into a New Project
Quick one. Sometimes the project file itself is the broken part.
1 – You can make a new project. Go this way –
File > New > Project
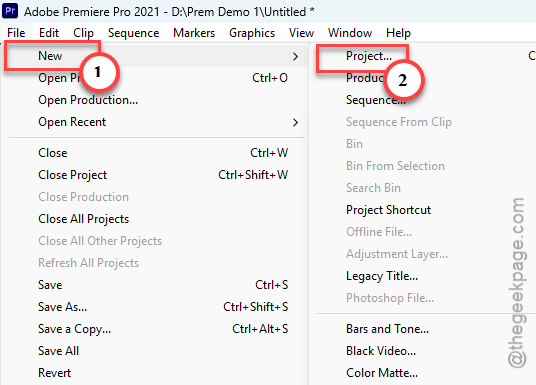
2 – Then click File > Import and pick your old project file.
Premiere pulls your sequences and clips across. Works more often than it should.
Fix 4 – Switch to Software Encoding
Export dying partway through? The graphics card is often behind it.
Hardware encoding uses the card to build your video. Fast, but shaky on some systems. Software encoding uses the processor instead, which is slower and far more dependable.
1 – Click File, then Export, then Media.
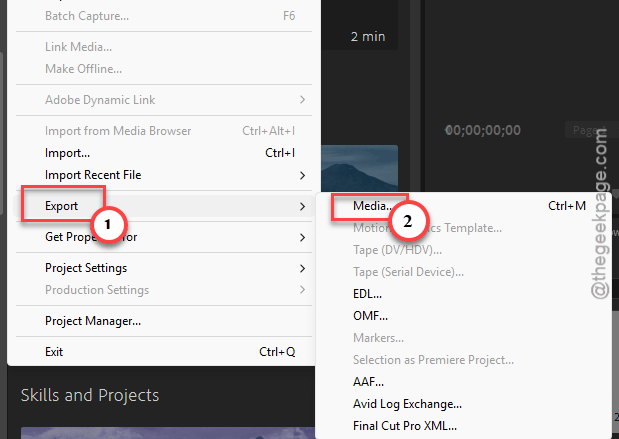
2 – Open the Video tab.
3 – Click More and scroll down to Encoder Settings.
4 – Under Performance, change the dropdown from Hardware Encoding to Software Encoding.
5 – Export again.
It will take longer. But a slow export beats a crashed one.
Fix 5 – Export Through Adobe Media Encoder
Same project, different exit. Media Encoder is Adobe’s separate export app (it comes with Creative Cloud). It renders your video outside Premiere, so a shaky Premiere can’t drag the export down with it.
1 – Click File, then Export.
2 – Select Send to Adobe Media Encoder.
3 – Wait for Media Encoder to open. Your project appears in its queue after a few seconds.
4 – Click the green Play button in the top right corner.
Fix 6 – Turn Off Enhance Speech and Update Your Audio Plugins
Two audio culprits here.
1 – First, the AI audio tools. The new audio tagging can cause lockups.
2 – So turn Enhance Speech off before you export, and process your sound without the AI tagging.
3 – Second, third-party audio plugins. Waves and Clarity plugins are confirmed to cause export crashes in versions 25 and 26.
4 – Open Waves Central, or whichever installer your plugin came with, and update to the latest version.
Then run the export again. If it gets through, you have your answer.
Fix 7 – Close the Creative Cloud Content Manager
This only matters if your timeline has After Effects comps in it. Dynamic Link (the bridge that shows After Effects work inside Premiere) leans on a background helper. And when that helper hangs, Premiere hangs with it.
1 – Press Ctrl + Shift + Esc to open Task Manager.
2 – Find Creative Cloud Content Manager in the list.
3 – Right-click it and select End task.
4 – Go back to Premiere and play your timeline.
Playback should smooth out right away.
Fix 8 – Free Up Drive Space and Give Premiere More RAM
Last, the boring stuff. An export needs room to land. And Premiere needs memory to build it.
Disk space first.
1 – Press Windows + E to open File Explorer.
2 – Click This PC in the left sidebar and look at the free space on your main drive.
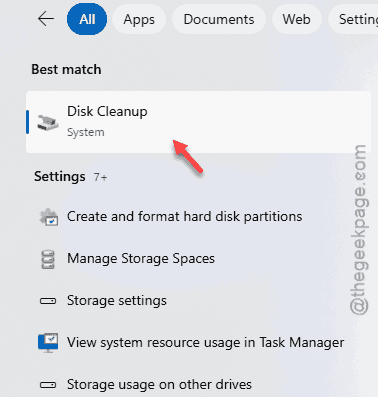
3 – Press the Windows key, type Disk Cleanup, and press Enter.
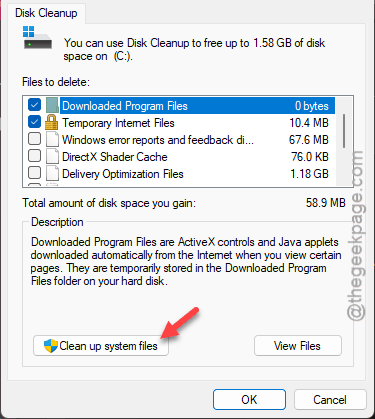
4 – Click Clean up system files.
5 – Tick the items you do not need and click OK.
Now the memory.
6 – In Premiere, click Edit, then Preferences, then Memory.
7 – Lower RAM reserved for other applications to the smallest number it allows. On many PCs that is 3 GB.
8 – Click OK.
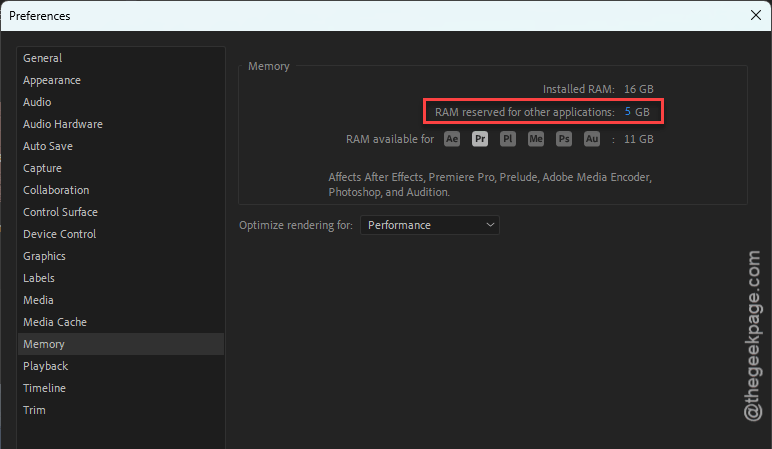
That hands Premiere and the other Adobe apps as much memory as your PC can spare while it renders.
Keep It From Coming Back
- Clear the media cache every few weeks. It won’t empty itself unless you tell it to.
- Leave real breathing room on your export drive. A nearly full drive kills renders. Every time.
- Check for audio plugin updates whenever Premiere gets a big update. Old plugins and new Premiere versions don’t mix.
- Shooting on a phone? Convert to ProRes before you start a big project, not halfway through it.
People Also Ask
Why is Premiere Pro freezing during export?
Most of the time it’s the graphics card choking on hardware encoding. Switch to Software Encoding in the export settings and try again. No luck? Send the job to Adobe Media Encoder instead. Outdated audio plugins and a nearly full drive cause the same freeze, so check those too.
Why is Adobe Premiere Pro stuck on importing files?
A bloated media cache is the usual cause. Clear it under Edit > Preferences > Media Cache. If only some clips hang, the format is the problem. H.264 and HEVC files from phones are hard on Premiere. Convert them to ProRes 422 first, and they will import without the stall.