Adobe PhotoShop shows up “PhotoShop not enough RAM” error message due to the lack of enough physical memory. Usually, when you are running Photoshop along with other memory-eating apps, Photoshop cannot have a sufficient amount of RAM to perform tasks and shows up this error message. So, if you are facing this error message, follow these easy solutions to fix the problem.
Workarounds –
1. Restart the system. Restarting the system closes all the background tasks. So, after restarting the device, launch Adobe PhotoShop and check.
2. Disable or uninstall the antivirus you are using.
Fix 1 – Kill the background task
Check and kill the background tasks running in the background on your system. This will allow more RAM for Photoshop to use.
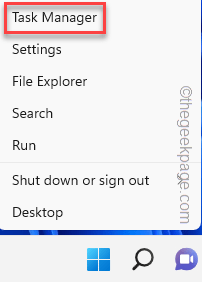
1. Press the Win key and the X keys together.
2. Then, tap “Task Manager” to access it.
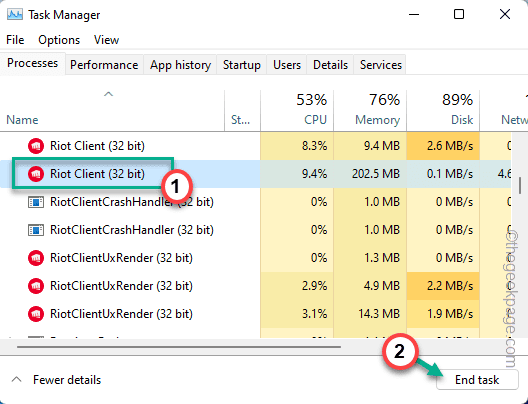
3. When the Task Manager opens up, check if you can find any task that is eating up too much memory.
4. If you can see such process/processes, right-tap that and click “End task“.
Once you have killed the process, there’ll be lots of free memory available for PhotoShop to use. So, launch PhotoShop and test whether this trick has worked.
Fix 2 – Modify the Registry
You have to modify a particular registry value so that Photoshop is allowed to override the physical limit on memory.
Know the amount of RAM you have –
You have to know what amount of RAM your system has. If you already know that, you can skip these steps and go to the main solution.
1. You have to open the Run box. So, press the Win key+R keys together.
2. Then, type this word and click “OK“.
msinfo32
3. Here you can find system information.
4. Just, scroll down through the right-hand pane, and look for the “Installed Physical Memory (RAM)” parameter.
This is the amount of RAM your system has.
For our system, it is 16 GB.
Edit the Registry manually –
1. Pressing the Win key+R keys together will bring up the Run terminal box.
2. Here, type “regedit” and click on “OK” to open the Registry Editor.
regedit
NOTE –
Here you will override the limiter on the physical memory used by the PhotoShop. This will fix the Photoshop issue. But, in some cases, it may also lead to some problems. You should always create a registry backup before you edit the registry. You can create one by following these steps –
a. After opening the Registry Editor, tap on “File” in the menu bar and click on “Export…“.
b. Save this backup in a secure place.

c. Now, carefully save this backup somewhere safe.
In case of any issues, you can just import it.
3. Once you have taken the backup, go this way –
Computer\HKEY_CURRENT_USER\Software\Adobe\Photoshop\
4. If you expand the “Photoshop” key, you may notice a subfolder named only in numbers.
[In our case, it is “90“.]
Select that folder.
5. On the right-hand pane, look for the “OverridePhysicalMemoryMB” value.
7. If there is no such value, you have to manually create one and rename it. Then, right-click on the space and click “New>” and click on “DWORD (32-bit) Value“.
8. Now, you can rename this value as “OverridePhysicalMemoryMB“.
9. Then, double-tap it to modify the value.
10. Before you do anything else, choose the “Hexadecimal” base system.
11. Now, put the value of physical RAM in the ‘Value Data:’ box.
Suppose, the amount of memory that you have noticed is 8 GB, then the value is – 8000.
In our case, the system has 16 GB RAM, which is – 16000.
In my case, it is “16000“.
12. Finally, click on “OK” to complete the process.
After that, close the Registry Editor. Restarting the system should work. Now, relaunch Adobe Photoshop after the system restarts.
Fix 3 – Extend the RAM range
Adobe Photoshop usually uses a limited amount of physical RAM. You can manually change that.
1. Launch Adobe PhotoShop.
2. Once the app loads up, click on the “Edit” on the menu bar.
3. Then, tap “Preferences>” from the drop-down and click on “Performances” from the side menu.
4. On the right-hand pane of the panel, slide the slider to approximately “80%“.
5. Now, click “OK“.
Close and relaunch the Adobe Photoshop and test.
Additional Tips –
Apart from these fixes, you can try all these additional tools.
1. Update Adobe Photoshop to the latest version of the app. If you are using the older version of PhotoShop, this RAM issue may cause the problem.
2. If you are using Photoshop on a device with low RAM, consider using additional physical RAM. Test if this works.


