You press the pen down soft, then hard. Same flat line either way. No thin-to-thick, no fade. The pressure is just… gone.
And your tablet works fine everywhere else. It draws in other apps. It clicks. So it’s not the pen. It’s Photoshop and your pen driver not talking to each other right. Annoying, but fixable.
Why This Happens
Short version: two systems are fighting over your pen.
Windows has its own pen handler called Windows Ink. Your tablet driver (Wacom, Huion, XP-Pen) has an older one called WinTab. Photoshop can read either. But when both try at once? They step on each other. And pressure data is the first thing that drops.
It usually breaks after something changed. A Photoshop update. A driver update. Even a Windows update can do it. One side switches its setting and doesn’t tell the other.
Sometimes the link is fine and Photoshop just forgot to use it. The pressure toggle quietly flips off. No warning. Your brush goes flat and you’re left guessing.
Fix 1 – Turn On Photoshop’s Pen Pressure Buttons
Start here. There are two little buttons in Photoshop that switch pressure on, and they flip off on their own sometimes. Quick to check.
1 – Press B to grab the Brush tool.
2 – Look at the toolbar running across the top. Find the Pen Pressure for Size button. It looks like a pen tip inside a target circle.
3 – Click it so it’s switched on.
4 – Right next to it is the Pen Pressure for Opacity button (a pen tip over a gradient). Click that one on too.
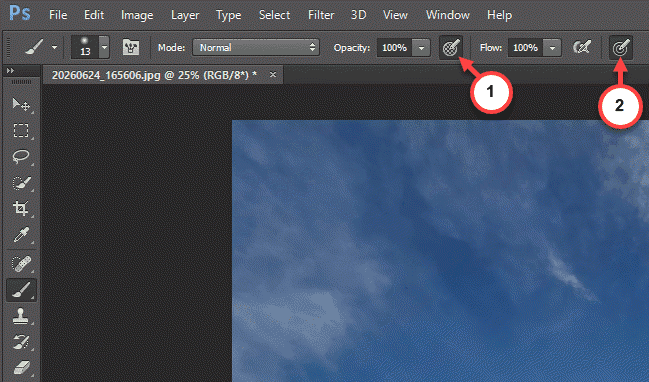
Now test a stroke. If your line goes thin-to-thick again, you’re done. If not, keep going.
Fix 2 – Check Shape Dynamics in the Brush Settings
Photoshop can lose the internal link between your brush and the pen’s pressure. You fix it in the Brush Settings panel.
1 – Press F5 to open the Brush Settings panel.
2 – On the left side, click the words Shape Dynamics. Click the actual text, not just the little checkbox beside it. The checkbox alone won’t open the controls.
3 – Find the Size Jitter section at the top.
4 – Under it, open the Control dropdown and pick Pen Pressure.
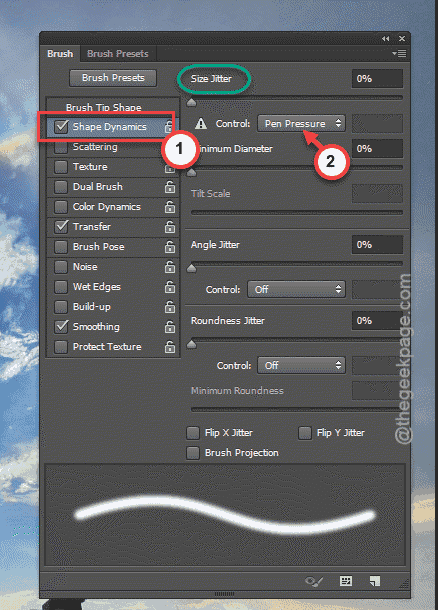
See a small warning triangle pop up next to it? That’s Photoshop telling you the driver still isn’t sending pressure. So that points you to the next two fixes — the real culprit is the WinTab and Windows Ink tug-of-war.
Fix 3 – Force Photoshop to Use WinTab (the Big One)
This is the fix that works for most people. You drop a tiny text file into Photoshop’s settings folder. It tells Photoshop to skip Windows Ink and use your tablet’s own WinTab system instead.
First, turn Windows Ink off in your driver.
1 – Open your tablet’s control panel — Wacom Tablet Properties, the Huion app, or XP-Pen settings.
2 – Select your pen and go to the Calibrate tab.
3 – Uncheck Use Windows Ink.
Now make the config file.
4 – Press Windows + R, type %appdata%, and press Enter. A folder window opens.
5 – Go into Adobe, then your Photoshop version folder, then the Settings folder inside it. The full path looks like Adobe \ Adobe Photoshop [version] \ Adobe Photoshop [version] Settings.
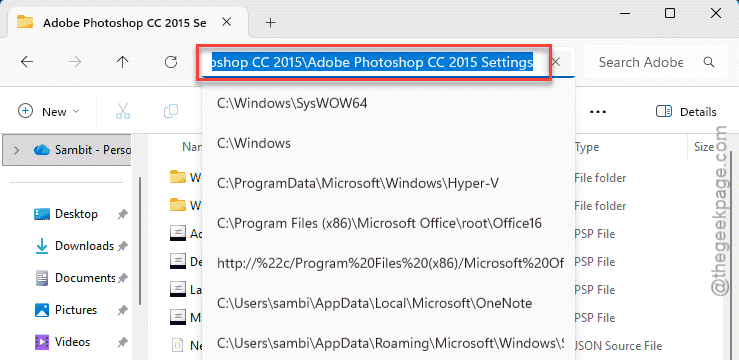
6 – Right-click in the empty space and make a New Text Document.
7 – Open it and type this one line, exactly:
UseSystemStylus 0
8 – Save the file.
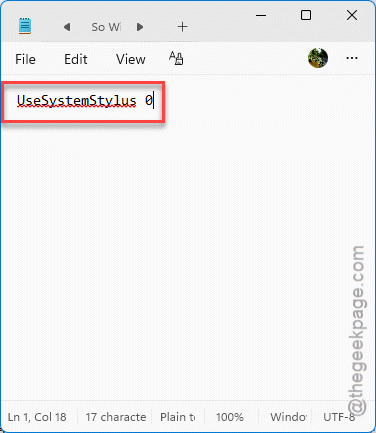
Then rename it to PSUserConfig.txt.
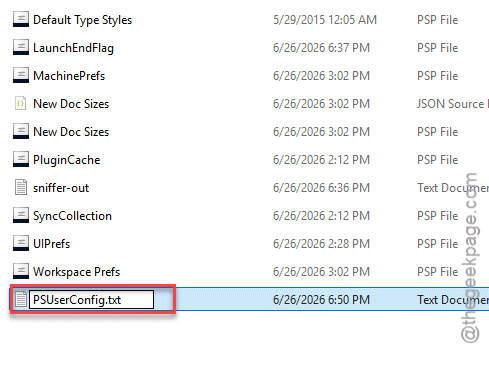
Make sure it doesn’t end up as PSUserConfig.txt.txt — Windows hides extensions, so double-check.
9 – Close Photoshop all the way and open it again.
And that’s the one. Most flat-brush cases clear up right here.
Fix 4 – Or Go the Other Way: Turn Windows Ink On
Don’t want to mess with config files? There’s the opposite route. Some setups want Windows Ink on, not off — newer pens lean on it for modern apps.
1 – Open your tablet’s control panel again (Wacom Tablet Properties, Huion, or XP-Pen).
2 – Select your pen and go to the Calibrate tab.
3 – This time, check the Use Windows Ink box.
4 – Close Photoshop and reopen it.
It’s one or the other. If the WinTab file in Fix 3 didn’t take, delete it and try this instead. Two paths to the same place.
Fix 5 – Restart Your Tablet’s Driver Service
Sometimes the driver just hangs in the background. No error, it’s simply frozen, and that kills pressure with no warning.
1 – Press Windows + R, type services.msc, and press Enter.
2 – Scroll down to your tablet’s service. Wacom users want Wacom Professional Service. Huion has Huion Core Service. XP-Pen lists a Tablet Service.
3 – Right-click it and choose Restart.
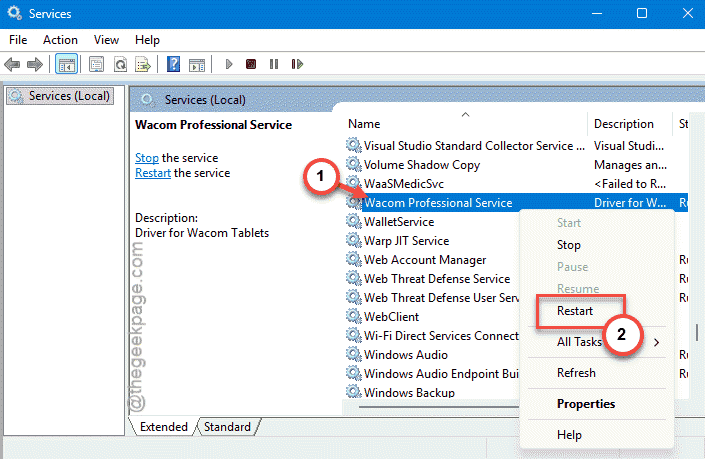
Then jump back into Photoshop and draw a test line.
Fix 6 – Rule Out the Hardware
Still flat after all that? Time to check the physical side.
1 – Unplug the tablet and plug it into a different USB port. A port directly on the back of a desktop beats a front one or a hub.
2 – If that does nothing, uninstall your tablet driver completely.
3 – Grab the latest driver straight from the maker’s website — Wacom, Huion, or XP-Pen — and install a fresh copy.
A clean driver clears out whatever the old one mangled.
How to Prevent This
– Pick one system and stick with it. Either WinTab (the config file) or Windows Ink. Not both. Mixing them is what started this.
– After a Photoshop or driver update, do a quick pressure test before a big session. Updates love to flip these settings back.
– Keep that PSUserConfig.txt file backed up somewhere. Reinstall Photoshop later and you’ll want it again.
– Grab drivers from the maker’s site, not random download pages. Cleaner installs, fewer of these headaches.
People Also Ask
Why is Photoshop not detecting pen pressure?
Usually it’s Windows Ink and your tablet’s WinTab driver clashing. Photoshop ends up reading neither. The reliable fix is to uncheck Use Windows Ink in your tablet settings, then add a PSUserConfig.txt file with the line UseSystemStylus 0 to Photoshop’s settings folder. That forces it to use WinTab.
How do I enable pen pressure in Photoshop?
Grab the Brush tool, then click the two pressure buttons on the top toolbar — one for size, one for opacity. After that, press F5, click Shape Dynamics, and set the Size Jitter control to Pen Pressure. If a warning triangle shows up, your driver isn’t sending pressure and you’ll need the WinTab fix.
How do I disable pen pressure in Photoshop?
Same buttons, reversed. With the Brush tool active, click the Pen Pressure for Size and Pen Pressure for Opacity buttons on the toolbar to switch them off. Your strokes will go to a flat, even line. Handy when you want crisp, uniform marks instead of tapered ones.