Microsoft .NET Framework is used by many Windows applications. But, while installing the .NET Framework on your computer, you might face this message “Installation did not succeed. HRESULT ox0xc8000222” on the setup page. This installation failure is nothing unusual and can be solved following some easy tricks. So, without wasting any more time, enact these fixes and the .NET Framework installation will be done in no time.
Fix 1 – Stop the Windows Update service
The main reason why you are facing this disruption is the windows update services is running on the system.
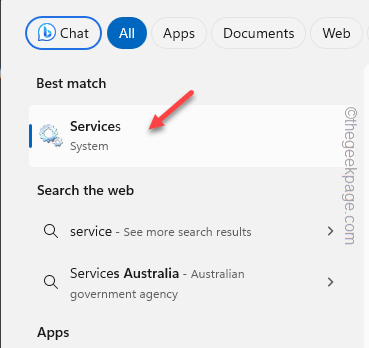
Step 1 – Search “services” after hitting the Win+S keys together.
Step 2 – Next, tap “Services” under the ‘Best match’ to open it up.
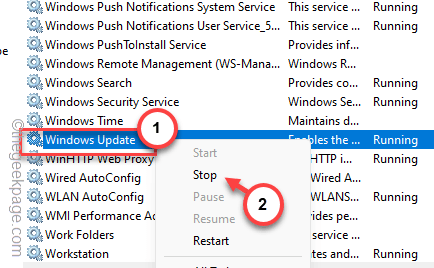
Step 3 – When you are there, scroll all the way to the bottom to find the “Windows Update” service.
Step 4 – Next, right-click that service and tap “Stop“.
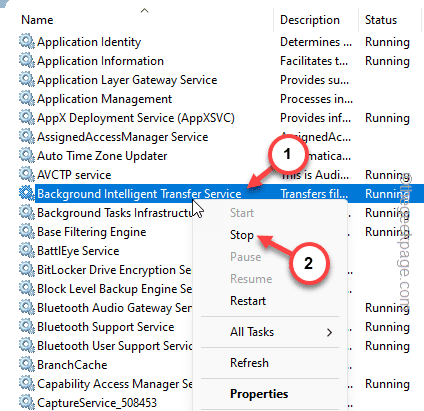
Step 5 – Coming back to the main Services page, find the “Background Intelligence Transfer Service“.
Step 6 – Rigt-click that service and click “Stop” to halt that as well.
After halting these services, quit the Services page.
Step 7 – Now, hit the Windows+R buttons together.
Step 8 – Later, type this and hit Enter.
%windir%
Step 9 – This will take you to the Windows directory. Look for the “SoftwareDistribution” folder.
Step 10 – Right-click that and tap the “Rename” icon from the context menu.
Step 11 – Rename this to “SDold” and hit Enter.
Step 12 – As this is a system folder, Windows will show up a cautionary message. Ignore that and click “Continue“.
This way, you have to change the name of the SoftwareDistribution folder.
After this, run the .NET Framework package installer and complete the setup process. Restart your computer after this and you are good to go!
Fix 2 – Run the .NET installer as an administrator
Another reason of you seeing this ‘HRESULT Error’ is that the absence of proper permission from the administrator.
Step 1 – Go to the location of the installer file.
Step 2 – Next, right-click the .NET Framework installer file and click “Run as administrator” to run the installer as an administrator.
Now go on ahead and follow the rest of the procedure on the setup screen and complete the installation process.
Fix 3 – Install the latest Windows updates
Some of the crucial .NET Framework updates on Windows 11, 10 are delivered through the Windows updates.
Step 1 – Open the Settings page and get to the “Windows Update” tab.
Step 2 – Tap “Check for updates” to check for the latest updates on your system.
Step 3 – Check whether you can find the .NET Framework feature waiting to be downloaded. Tap the “Download and install” button to download and install that.
Let Windows download all the updates and install them on your computer.
Step 4 – After this, tap “Restart now” to complete the system.
After this, try running the .NET Framework installer once more.
Fix 4 – Run the .NET Repair tool
If you have a prior version of .NET Repair tool, download and run the repair tool to fix the problem.
Step 1 – Download the .NET Framework Repair tool.
Step 2 – Tap “Download” to download it.
Step 3 – Run this repair tool on your system.
Let it run and fix the .NET Framework issue.
Step 4 – It will prescribe solutions for your system. So, tap “Next“.
Finally, run the original .NET Framework installer and complete the installation.
You won’t get any “HRESULT Error 0xc8000222” again in the .NET Framework setup.
Fix 5 – Activate the .NET Runtime feature
You can activate the .NET Runtime feature directly on your computer.
Step 1 – Press the Win+R keys at once.
Step 2 – Then, paste this in the empty Run panel and click “OK“.
optionalfeatures
Step 3 – After opening the Windows Features menu, check the correct .NET Framework in the options to activate that on your computer.
Step 4 – Tap “OK“.
After this, Windows will automatically get this feature and install it on your computer. No need to use the standalone installer any more.
You must restart your computer once for the .NET Framework to get activated.


