Hyper-V machines running a guest OS as Windows Server 2012 or Windows 11/10 and connected to a virtual disk, you may notice the “Unexpected failure. Error code: 490 01010004” error message on the Event Viewer page. Usually, this disturbance is caused by the Virtual Disk Service Provider and can be easily fixed with a few simple steps. Following these solutions should help you resolve the problem.
Workarounds –
1. Restart the system. Usually, fault in some services can cause this problem. Restarting the system should fix the issue.
2. If you are using an antivirus, it can cause the issue. You can uninstall it from your system.
Fix 1 – Edit the registry
Editing a certain registry value should fix the problem.
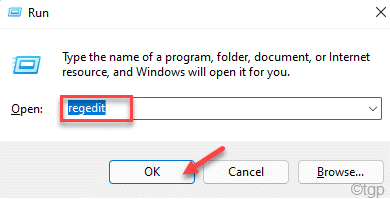
1. If you press the Windows key+R will open up the Run terminal.
2. Then, write this down and click on “OK” to open the Registry Editor.
regedit
NOTE –
You have to modify a DWORD value in the Registry Editor. This should fix your system. But, sometimes, it may also lead to some other incoherent issues. So, if you don’t have a backup of your keys, you can create one by following these steps –
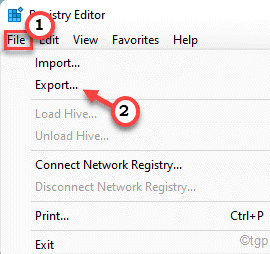
a. After opening the Registry Editor, tap on “File” in the menu bar and then, click on “Export…“.
b. Save this backup in a secure place.

3. Head on to this path after opening the Registry Editor –
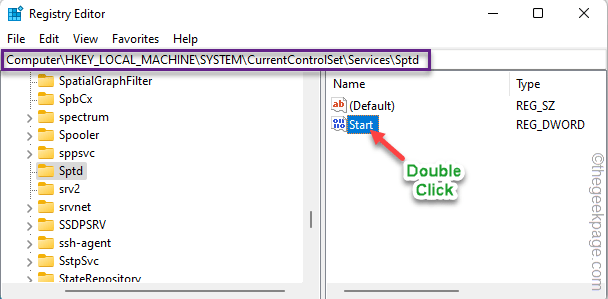
HKEY_LOCAL_MACHINE\System\CurrentControlSet\Services\sptd
4. Once you reach the specified location, if you look on the right-hand pane, you will see the “Start” value.
5. Just double-tap that “Start” value to edit it.
6. You can set the value to “4” in the ‘Value data:’ box.
7. After that, click on “OK” to save the new value.
After altering the Start value, close the Registry Editor screen.
This change won’t take effect until you reboot the device. Only once you have restarted the machine, check whether the Hyper-V guest OS is still showing the same 490@01010004 error code on the Event Viewer page.
Fix 2 – Restart the Virtual Disk service
Every Windows system has a Virtual Disk service. Try restarting that service.
1. If you hit the Win key, the Start menu will open up. So, type “services” in there.
2. Then, click on the “Services” in the search results.
3. Once you have landed on the Services page, scroll down to the bottom portion of the list to find the “Virtual Disk” service.
4. Now, just right-tap this service and tap “Restart” to restart the service.
Once you have restarted the service, check if this works for you.
Fix 3 – Uninstall and reinstall the VD app
Uninstalling the Virtual Disk app (like Daemon Tools, Alcohol 120%, etc.) and reinstalling the latest version should help you resolve the issue.
1. At first, press the Win key+R keys together.
2. Once the little box appears, write and hit Enter.
appwiz.cpl
3. When the Programs & Features page opens up, look for the virtual disk software there.
4. Then, right-click that app and tap “Uninstall“.
5. Once the Uninstaller page opens up, click on the “Uninstall” option.
6. Next, tap “Reboot now” to restart the system.
Once you have uninstalled the software, now you can easily download and install the latest version of the Virtual Disk software on your computer.
This should resolve the system.
Fix 4 – Allow VD serviceinteraction with Desktop
You can allow the Virtual Disk service to interact with the system Desktop.
1. If you right-click the Win icon on your taskbar, you will see a context menu has elevated.
2. Tap “Run” to open the Run box.
3. Then, type this word and hit Enter.
services.msc
4. When you have the access to the Services page, right-tap the “Virtual Disk” service.
5. Then, click on “Properties” to access it.
6. On the Virtual Disk Properties page, go to the “General” section.
7. Then, set the ‘Startup type:’ to “Automatic“.
8. This service should be already running on your system. If that isn’t the case, click “Start” to start the service.
9. On to the next step, visit the “Log On” tab.
10. Now, set the ‘Log on as:’ to “Local System account“.
11. Then, check the “Allow service to interact with desktop“.
12. After that, tap “Apply” and “OK” to save the change.
Next, restart the system and test if this works.
Fix 5 – Kill the VDS trace
Stopping the Virtual Disk service trace may stop the issue once and for all.
1. Just hit the Windows key from your keyboard and start to search for “cmd“.
2. Now, just right-tap the “Command Prompt” and tap on “Run as administrator“.
3. You have to make a new directory named the “VBS” folder. So, copy-paste this code and hit Enter to do so.
md %systemroot%\system32\LogFiles\VDS
4. Next, just paste the code and hit the Enter key on your keyboard to execute the code.
Logman start vds -o %systemroot%\system32\LogFiles\VDS\VdsTrace.etl -ets -p {012F855E-CC34-4da0-895F-07AF2826C03E} 0xffff 0xff
5. Finally, you can stop the vds trace with just a simple code. Execute this command to stop the trace.
Logman stop vds -etsTrace file Vds
After executing all these commands, you can close the Command Prompt.
After that, check whether this fix solves your problem.


