Is your computer showing ‘Status: Pending Download‘ in Windows Update page? If it is then it is a problem for you as Windows Update process is not performing well on your device. But there is no need to worry. There are some simple fixes to solve your issue on your computer and Windows Update will be up and running at no time at all.
Fix 1 – Restart Update service
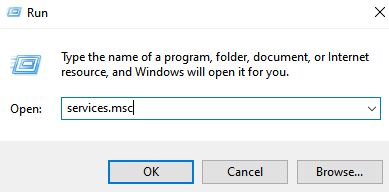
1 – Open RUN box by pressing Windows and R key together from keyboard
2 – Type services.msc in the run box and click OK

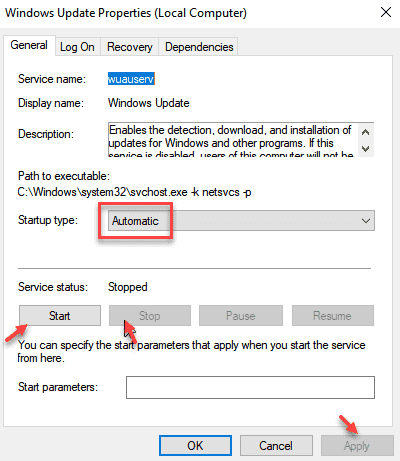
3 – Double click on Windows Update service from the list

4 – Make sure Startup type is Automatic.
5 – Click on Stop to stop the service and click on start to start the service again.
If the service is not running, click on start Only. Make sure it is running and click Apply and OK finally.

Fix 2 – Allow Updates over metered Connection
1 – Open settings by hitting Windows and I key from keyboard.
2 – Click on Update & Security.
3 – Click on Advanced Options.

4 – Turn On Download updates over metered connection.

Fix 3 – Enable Auto updates in Group policy
1 – Open Run by pressing Windows and R key from keyboard.
2 – Write gpedit.msc in it and hit Enter key from keyboard.

3 – Now, Go to Computer Configuration > Administrative Templates > Windows Components by browsing via left menu.
4 – In the right side of Group policy screen, Click on Windows Update.

5 – Now, Click on Configure Automatic Updates.

6 – Now, Choose enabled radio button.
7 – Also, select Auto download and schedule the install from the drop-down.
8 -Click Apply and Reboot PC.

Fix 4 – Restart Your Computer
The very basic fix is to just restart your computer and see if it fixes the issue.
Fix-5 Run Windows Update Troubleshooter-
Running Windows Update Troubleshooter will detect any error with Windows Update process on your computer.
1. Click on the Search box beside the Windows Icon and type “Troubleshoot settings“.
2. In the elevated search results, click on the “Troubleshoot settings“.

3. Click on Additional troubleshooters

Now, on the right side of your Settings window, scroll down to find Get up and running section, click on “Windows Update” and then click on “Run the troubleshooter“.

4. Follow the on screen instructions and let the troubleshooter identify the problem.
Now, click on “Next” in the troubleshooter window.

This process will take some time as Windows will detect any problem with Windows Update.
5. Again click on “Next” to apply the fix.

Once the troubleshooting process is over, close troubleshooter window.
Reboot your computer.
Windows Update issue will be fixed.
Fix-6 Automate services from CMD
There are some services which are necessary for Windows Update process.
1. First, press Windows key+R to launch Run.
2. Then, type “cmd” and press Ctrl+Shift+Enter together.

Command Prompt window will be opened with Administrative rights.
3. Now, copy and paste these commands one by one in Command Prompt window, and press Enter after each command to execute them sequentially.
sc config wuauserv start=auto

sc config cryptSvc start=auto

sc config bits start=auto

sc config trustedinstaller start=auto

These services will be started and configured to start automatically upon system booting.
After executing these commands on your computer, reboot your system.
After rebooting, check Windows Update status.
Fix-7 Rename SoftwareDistribution folder from CMD-
Renaming SoftwareDistribution folder on your computer will fix this issue for sure. Follow these steps minutely-
1. Click on the search box beside Windows icon and then type “cmd“.
2. Then, right click on “Command Prompt” in the elevated search result and choose “Run as administrator“.

Command Prompt with administrative rights will be opened.
3. In Command Prompt window, copy-paste these commands sequentially and hit Enter after each of them to execute these commands sequentially on your computer. These will stop some services temporarily on your computer.
net stop wuauserv
net stop cryptSvc
net stop bits
net stop msiserver

4. Now, again copy-paste these two commands sequentially in Command Prompt window and hit Enter. These commands will rename both of the folders on your computer.
ren C:\Windows\SoftwareDistribution SoftwareDistribution.old
ren C:\Windows\System32\catroot2 catroot2.old

5. Again in Command Prompt window, copy-paste these commands one by one and hit Enter after each of them to execute these commands on your computer.
net start wuauserv
net start cryptSvc
net start bits
net start msiserver

The stopped services will be started again.
Once when all the commands are executed on your computer, close Command Prompt window.
Reboot your computer and after rebooting your computer, further check if it is still showing ‘Pending download‘ or not.
Fix-8 Update Windows Update AutoUpdate Client-
1. Press Windows key+X keys together and then click on “Windows PowerShell (Admin)” to open Powershell window with administrative rights.

2. In PowerShell window, copy-paste or type this command and then hit Enter to update Windows Update AutoUpdate Client.
wuauclt.exe /updatenow

Once you have done it, close PowerShell window.
Reboot your computer and check if Windows Update process is working or not.
Fix-9 Empty SoftwareDistribution folder in Safe Mode-
If renaming the folder didn’t work out for you, you can try emptying it in Safe mode.
You have to boot into Safe Mode first-
1. Press Windows Icon+I to open Settings window.
2. Now, click on “Update and Security“.

3. Now, on the left pane, click on “Recovery“,
4. Then, under “Advanced Startup” section, click on “Restart Now“.

5. In Choose an option window, click on “Troubleshoot“.
6. In Troubleshoot window, click on “Advanced options“.
7. In the Advanced options window, click on the “Startup Settings“.
8. Now, click on “Restart” to restart your computer in safe mode.

9. Now, you will be shown options of Startup Settings. Press 4 to “Enable Safe Mode“.
In Safe Mode, the background of your desktop will be black.
10. Press Windows key+R to launch Run.
11. Now, copy-paste this line in Run window and hit Enter.
C:\Windows\SoftwareDistribution\Download Note– Replace “C:” with the drive letter of your Windows installation drive.

Download folder will be opened in File Explorer window.
12. Now, press Ctrl+A to select all the contents of the folder and then press “Delete” to empty the SoftwareDistribution folder.

Close File Explorer window.
Reboot your computer. It will booted in normal mode.
Check if this works.