While trying to check your System Information by passing a single run command you may see an error message “Windows management files moved or missing” on your screen. This WMI system error occurs due to the absence of essential services like Windows Management Instrumentation (WMI) service. There is nothing to worry about as this problem has some easy resolutions to cover it up at ease.
Fix 1 – Rename Repository folder
Renaming the Repository folder will rebuild the WMI Repository.
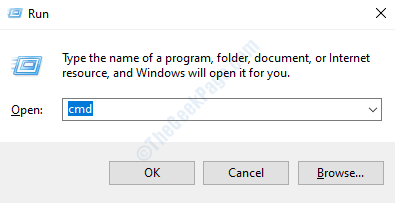
1. Press Windows key+R.
2. Now, type “cmd“. After that, press ‘Ctrl+Shift+Enter‘ keys together.

3. After you have opened the terminal, you need to briefly stop the WMI service. Simply copy this code and paste it in CMD and hit Enter thereafter.
net stop winmgmt
4. Once you see ‘Do you want to continue this operation?‘, click on “Y” to permit the process.

Minimize the terminal.
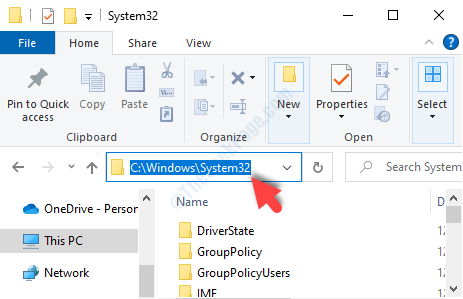
5. Afterward, press Windows key+E.
6. Follow this path-
C:\Windows\System32

6. Once you are inside the System32 folder, scroll down and look for the ‘Repository‘ folder.
7. Right-click on that folder and then click on “Rename“.
8. Rename the folder to “Repository.old“.
Note: – If you are unable to rename , then try booting ia safe mode and then try renaming it again

Once you have changed the name, close the File Explorer.
9. Maximize the CMD terminal.
10. Finally, the last step is all about to resume the stalled WMI service.
Execute the command.
net start winmgmt

Once you have done all these, close the CMD terminal.
Don’t forget to restart your computer.
Fix 2 – Modify WMI startup
Windows Management Instrumentation (WMI) service provides management information about OS and peripherals.
1. Click on the Windows icon and type “Services“.
2. Once you have done that, hit ‘Enter‘ from your keyboard.

3. Once you see that the Services panel has appeared, scroll down to almost bottom of the panel to find Windows Management Instrumentation (WMI) service.
4. Then, double click on it to modify it.

5. Simply, click on the drop-down icon of ‘Startup type:‘ and set it to “Automatic” from the drop-down.
6. A click on the “Start” button in the same window and the service will be running on your device.

7. Finally, click on the “Apply“, followed by another click on “OK” to save.

This should help the situation.
Fix 3 – Re-register WMI Segments
Re-registering the WMI components may solve this issue.
1. Write “cmd” in the search box beside the Windows icon.
2. What you need to do is to right-click on “Command Prompt” and then click on “Run as administrator“.

3. To navigate to the webm folder, execute this address-code in the terminal.
cd /d %windir%\system32\wbem

4. After that execute this simple command in the CMD terminal.
for %i in (*.dll) do regsvr32 -s %i

5. Finally, paste this command. Once you have done that, paste ‘Enter‘.
for %i in (*.exe) do %i /regserver

Close the CMD window.
Reboot your device.
Fix 4 – Include ‘Service’ in the Admin group
If nothing so far has resolved your issue, the problem may occur.
1. Open the CMD terminal as administrator. Search cmd in windows search box and then right click ands click on run as admin

2. Once you have opened it, copy-paste this code in CMD and hit Enter.
net localgroup "Administrators" "NT Authority\Service" /add

After that, close the CMD window.
The error will be solved for sure.
Fix 5 – using cmd
Restarting WMI service is also an easy resolution to this problem.
1. Press the Windows key along with the ‘R‘ keys together. This will open a Run terminal.
2. Type “cmd” in the Run terminal. Press ‘Ctrl+Shift+Enter‘ keys together.

3. When the Command Prompt appears, write this simple code and hit Enter to execute it.
cd\windows\system32\wbem

4. Once you are in the ‘webm‘ folder, copy-paste this one and press the ‘Enter‘ key. This will re-register the WMI utility dll file.
regsvr32 wmiutils.dll

5. To stop the WMI service, execute this command in the CMD window.
net stop winmgmt
6. After that, click on “Y” to permit the process.

7. All that is left to start the service again on your computer. To do so, type this short command in the CMD terminal and hit Enter.
net start winmgmt

Close the terminal. Restart your machine and the problem will be solved.