While trying to install the latest feature updates, your computer may fall into a BSOD error prompting this Stop Code “PAGE FAULT IN NONPAGED AREA” along with the reason for the failure of the hardlock.sys file. You may assume the hardlock.sys is an external hardware file, but, it isn’t. This third-party-developed file is a valid one. It is located inside the drivers folder of the System32 directory. Follow these easy steps to solve the issue. Usually, a simple registry edit should do the trick. But, if that doesn’t work, deleting the older HASP driver should resolve the issue.
Fix 1 – Tweak the registry
Try modifying the registry on your machine so that this hardlock.sys doesn’t cause this problem.
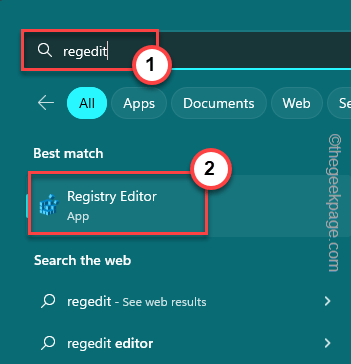
1. You can invoke the search box using the Windows+S keys together and then, write “regedit“.
2. After that, tap “Registry Editor” which appears in the search results.
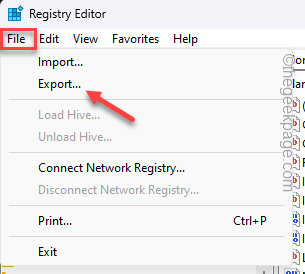
WARNING – The registry is a very sensitive location on your system. Mistakes such as a single wrong value change can cause the system to irreversible failure. So, before stepping on to the main part of the solution, create a registry backup.
a. At first, click on “File” from the menu bar.
b. On the context menu, tap “Export” to create a new registry backup.
Remember to give this backup a catchy name and save it in a secure location.
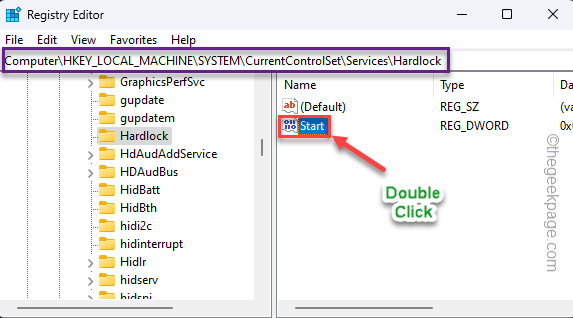
3. Once you are on the Registry Editor page, reach this place –
HKLM\SYSTEM\CurrentControlSet\Services\Hardlock
4. When you have arrived at the specified location, try to find the “Start” DWORD value on the right-hand pane.
5. If you can see it, double-tap to edit it.
6. Now, just input “4” in the Value data box.
7. After this, click “OK” to save this change.
When you have modified the value of the Start, exit the Registry Editor. This modification won’t take place until you restart the system.
After restarting your computer, retry installing the windows updates once more.
Fix 2 – Uninstall the driver
Uninstalling the older HASP License driver is possible only with the haspdinst package extracted in C drive. So, follow these steps to uninstall that –
1. You can extract the haspdinst package into the C: drive.
[
If you can’t find it anywhere, you can find it in this default location-
%ProgramFiles(x86)%\Thales\Sentinel LDK\Redistribute\Runtime Environment\cmd Install
]
You can not extract this into a subdirectory of the C drive.
2. Once you have extracted it, use the search box to type “cmd“.
3. Then, right-click the “Command Prompt” in the search results and tap “Run as administrator“.
4. When the terminal opens up, write these two codes and hit Enter to navigate to the C: drive.
C:
cd\
5. Copy-paste the command and hit Enter to uninstall the HASP driver.
haspdinst.exe -kp -r -fr -v -purge
When the driver is uninstalled from your computer, you will see this Operation successfully completed promptly on your screen.
Restart your computer.
This way, you won’t face the hardlock.sys problem again.
NOTE –
You can easily install the new HASP driver by following these steps –
1. Open an elevated CMD window with administrative rights.
2. Just copy-paste the command and hit Enter to install the latest driver.
haspdinst.exe -i -fi -kp -fss
The latest version of the HASP driver will be installed. You can go to http://localhost:1947 and check the viability of the installation.
Fix 3 – Update the problematic driver
Update the problematic driver from the Device Manager.
1. At first, write “device” in the search box.
2. Then, tap “Device Manager” to open it.
3. When the Device Manager screen, find the Sentinel driver.
4. Then, right-click the driver and tap “Update driver“.
Just proceed through the on-screen steps to install the latest driver.
Check if this works.


