As we all know, OneDrive is in-built cloud storage that comes bundled with Windows 10. We can use it to store our documents, photos, etc. OneDrive provides its user with an option to Sync the Files to the PC. With this option selected, the files in OneDrive are always synced to the PC.
At times, it is seen that there is some issue with the syncing of the files. In that case, check the following before proceeding:
- Restart your System
- Ensure that there is enough Storage left in your OneDrive Account
- Check the size of the file. For larger files, try syncing after compressing the files. The maximum upload size is 250GB
- The filename does not contain any special characters (~ ” # % & * : < > ? / \ { | }.)
- The file does not have a restricted file type( .lock, CON, PRN, AUX, NUL, COM0).
Check if this helps. If not, proceed with the below fixes to resolve the Syncing Issue in OneDrive.
Fix 1: Close and Re-open OpenDrive
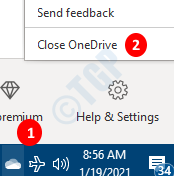
Step 1: Locate the OneDrive Icon on the taskbar. (If you cannot find the icon, check-in the hidden items as well)
Step 2: Right-click on the icon
Step 3: Click on Close OneDrive

Step 4: Restart your PC and check if this helps.
Fix 2: Reset OneDrive
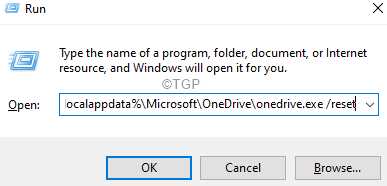
Step 1: Holding the keys Windows+R, open the Run Terminal
Step 2: Enter the following and hit Enter
%localappdata%\Microsoft\OneDrive\onedrive.exe /reset
NOTE: If you see any error, then enter the below command in the Run dialog instead and hit Enter:
C:\Program Files (x86)\Microsoft OneDrive\onedrive.exe /reset
Step 3: Wait for few seconds
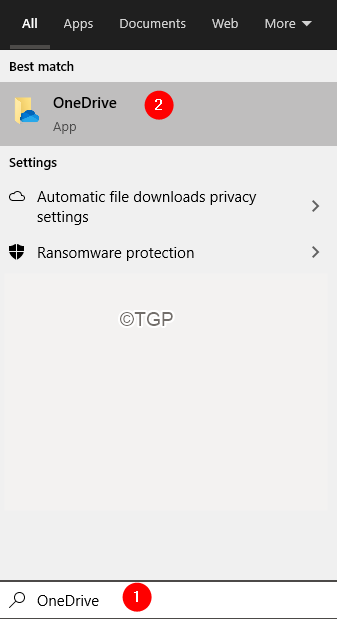
Step 4: In the search box located next to the Windows logo( Start Symbol), type OneDrive
Step 5: Now, click on the OneDrive App that shows up first in the Search Results.
Step 4: Check if the Syncing issue resolves.
Fix 3: Logout and Login to OneDrive
Step 1: Right-click on the OneDrive on the taskbar. (If you cannot find the icon, check-in the hidden items as well)
Step 2: Choose Settings from the context menu

Step 3: In the Settings Window, Go to the Account tab and Choose to Unlink this PC

Step 4: In the confirmation prompt that shows up, click on the Unlink account

Step 5: Now, you can see the OneDrive window opening up.
Step 6: Enter your Sign-in credentials
Check if this helps in resolving the Syncing issue
Fix 4: Turn Off Office 365 Feature
Certain users have reported that the Office 365 automatic saving feature sometimes interferes with the Syncing of Files in OneDrive. This can be resolved by turning off Office 365 Automatic Saving feature.
Step 1: Open any Office 365 application ( Word, Excel, etc)
Step 2: From the top menu options choose File
Step 3: From the left-hand side menu, click on More
Step 4: Then Choose Options
Step 5: From the Excel Options window, from the left-hand side, click on Save
Step 6: From the right-hand side, Under the Saved Documents section, Untick the Autosave OneDrive and SharePoint Online files by default option
Step 7: Click on the Ok button.
That’s All
We hope this article has been informative.
Kindly comment and let us know which of the above fix helped.
Thank you for Reading.

