Many of the Windows 10 users have reported that they are seeing an error while attempting to install a 3rd party application in the system. The complete error message reads as follows –
Unable to make changes to your software
There was a problem applying changes to the software.You can try again. Or, if the problem continues, the information that is shown in the following section can assist your helpdesk in troubleshooting.
Click OK to return to Software Centre
MoreInformation
The software change returned error code 0x643(1603).
This error is usually seen with
- Heavy Adobe Software like Photoshop, Illustrator, Lightroom
- Office products like Powerpoint, Excel, Word
- Click Share Applications like Barco, etc.
- When SCCM(System Centre Configuration Manager) is used to set up several systems.
Potential causes for this error are :
- Missing or Corrupted .NET Framework
- Incorrect Command-line Interpreter path.
- If some Dependencies or pre-requisites required by the Software are not met.
If you are seeing this error, read along. We have listed possible fixes that might help you solve the issue.
Fix 1: Provide the correct Command Interpreter path
Step 1: When you press keys Windows+R, Run Terminal opens
Step 2: Type cmd and press Ctrl+Shift+Enter to open Command Prompt with Admin rights

Step 3: In the UAC window that opens, just click on Yes
Step 4: In the Command Prompt window that opens, enter the below command and hit Enter. The below command specifies the correct path to the Command Interpreter.
COMSPEC="C:\WINDOWS\COMMAND.COM
Step 5: After successfully executing the command, retry and check if the installations go through smoothly.
Fix 2: Repair the .NET Framework
Step 1: Visit the .NET Repair Tool Download Page
Step 2: Scroll down and click on the Download button as shown below

Step 3: You can see that the file starts downloading
Step 4: Once the downloading complete, double click on the Executable file(.exe file)
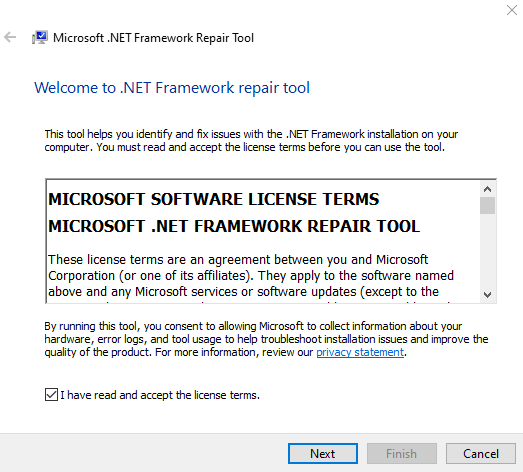
Step 5: Accept the license agreement by ticking on I have read and accept the license terms.

Step 6: Click on the Next button
Step 7: Tool runs and recommends the changes that might help resolve the issue
Step 8: Click on the Next button to apply the fixes

Step 9: Wait till the recommended changes are done and finally click on the Finish button
Step 10: Make sure to Restart the system.
Check if this helps to resolve the error. If not try the next fix.
Fix 3: Enable the .NET Framework 3.5 and 4.8
Step 1: Search Turn Windows Features On or Off in the search box.

Step 2: In the Windows Features window that opens, tick on the .NET Framework 3.5 (this package includes .NET 2.0 and 3.0) and .NET Framework 4.8 Advanced Services.

Step 3: In the prompt that appears asking for permission, click on the Yes button.
Step 4: Wait for some time till the process is complete.
Step 5: Restart the System.
Fix 4: Try running the MSI file manually
If you notice that the error is seen while you are trying to install the Software using MSI file via SCCM. Then, try installing the MSI file manually in the Client System where installation throws an error. To do so,
Step 1: Press the keys Windows and R, Run Terminal opens.
Step 2: Type cmd and press Ctrl+Shift+Enter to open Command Prompt with Admin rights

Step 3: In the UAC window that pops up, just click on Yes
Step 4: In the Command Prompt window that opens, enter the below command and hit Enter.
msiexec /i “<Path To MSI File>“ /<Flags If Any>
For example, if you want to install the Barco Click Share Application with the qn flag, tweak the above command as follows:
msiexec /i "ClickShare_Launcher_01_11_00_0004_Setup_Win.msi" /qn
Check if this helps.
Fix 5: Check the SCCM Logs for specific problems
NOTE: This fix requires some technical knowledge. If you are not confident, take some help.
If you are using SCCM and seeing the error, check the logs to verify what exactly is the issue.
Step 1: Navigate to the below location
C:\Windows\CCM\Logs\
Step 2: Check the log file AppEnforce.log. This log would contain details of Installation
Step 3: Here you can find the Name of the MSI file and the location of the MSI File
Step 4: Log in to the Client System that throws the error
Step 5: Navigate to the location of the MSI File obtained from Step 3.
Step 6: Run the MSI File manually without any flags. Refer to Fix 4.
NOTE: The command specified in the Fix 4 is with Flags. Execute the command without flags as shown below
msiexec /i “<Path To MSI File>“
Step 7: On executing the above command you will be able to know what exactly is causing the issue.
Step 8: Take the necessary steps to solve the issue. It will tell you if some Dependencies are missing from the System. In that case, you might have to Install it.
That’s All
We hope this article has been informative. Thank you for Reading.
It would be great if you could comment and let us know the fix that helped you solve the issue.