Geforce Experience provides a compact experience where you can optimize all the games to run smoothly on your system or you can download and install crucial driver updates. So, if by any chance you can’t access the GeForce Experience irrespective of the reasons, you need to solve the issue as fast as possible.
Workarounds
1. Disable the antivirus on your system and try to access GeForce again.
2. Restart your system and try again.
Fix 1 – End Nvidia GeForce Experience task in task manager
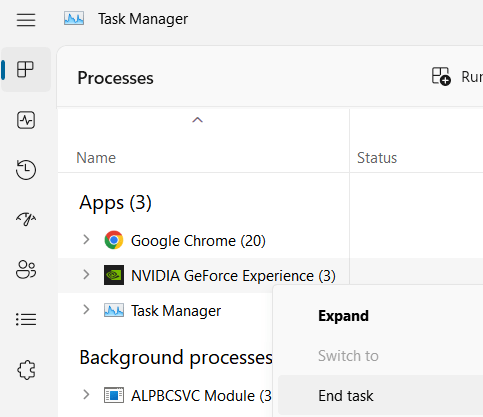
1 – Press CTRL + SHIFT + Esc keys together to open the Task manager app.
2 – Locate Nvidia GeForce Experience from the list of processes.
3 – Do a right click and Choose end task to end the task.

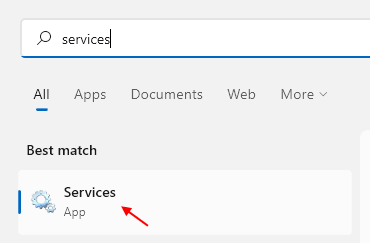
4 -Now, search services in Windows search box and then click on Gear shaped blue icon of services to open service manager

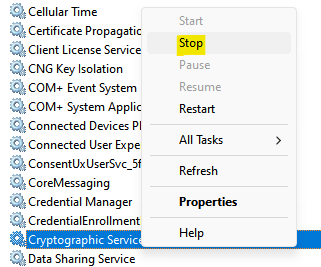
5 -Now, Locate Cryptographics services from the list.
6 – Right click on Cryptographics services and click on stop to stop this service

7 – Now, search Nvidia GeForce Experience on your pc and open it normally
Fix 2 – Check if all the necessary services are running
1. Press Windows key+R.
2. Then, type “services.msc“.

3. When the list of services appears on your screen, find out the list of NVIDIA services available.
4. Check if all the services are ‘Running‘ from the ‘Status‘ tab. Otherwise, right-click on the stalled services and click on “Start” to start the services.

5. Now, check the ‘Startup type‘ for each of those services.
6. If you notice that the startup of any service is either set to ‘Manual’ or ‘Disabled’, double click on it.

7. Then, set the ‘Startup type:’ to “Automatic” from the drop-down.
8. Then, click on “Apply” and “OK“.

Close the Services tab and restart your computer.
Fix 3 – Reinstall GeForce Experience
If Geforce Experience itself is corrupt, try removing the GeForce applications and reinstalling it further.
1. Press the Windows key+R.
2. Type “appwiz.cpl” and then click on “OK“.

3. In the Program & Features window, check out the list of the NVIDIA drivers.
4. Right-click on each of the drivers and then click on “Uninstall“.

Follow the on-screen instructions to uninstall the NVIDIA applications from your computer.
5. Now, you have to go to download the GeForce Experience on your computer.

Install the GeForce from the installer you have just downloaded on your computer.
Restart your computer and check if this fix works.
Fix 4 – Uninstall and further re-install the graphics adapter
1. Press Windows key+X keys together.
2. Then click on the “Device Manager“.

2. Now, you have to expand the “Display adapters“.
3. Simply right-click on the graphics driver your computer is using “Uninstall device“.

4. To uninstall the driver from your computer, click on “Yes“.

Close the Device Manager window.
Now, follow these steps to install the driver again.
Method 1-
Restart your computer and try to access the GeForce Experience.
Method 2–
If rebooting your computer didn’t install the driver then you have to install the driver yourself. Follow to install the driver manually-
1. In the Device Manager window, click on “Action” and then click on “Scan for hardware changes“.

Check if this helps or not.
Method – 3
1. Search “Nvidia drivers“.
2. Click on the “Download Drivers|NVIDIA“.

8. Simply input your graphics driver information (like ‘Product type’, your ‘Operating System’, etc).
9. Now, click on the “Search” to search for the latest driver.

Steps to install the driver manually-
1. Go to the location of the isntaller.
2. To launch it, you have to double click on the offline installer.
![]()
3. When the NVIDIA Graphics Driver window appears, click on “NVIDIA Graphics Driver and GeForce Experience”
4. After that, click on “Agree and continue“.

5. In the next step, click on the “Custom installation“.
6. You have to click on “Next“.

7. Then you need to check the “Perform a clean installation” box.
8. A click on “Next” and the installation process will start.

9. Once the installation has finished, click on “Close” to close the NVIDIA Graphics Driver Installer window.

Restart your computer to complete the installation process.
Your problem should be solved.