If you are a gaming fan and you love to play games on Steam, you may come across sound issues with the Steam games at times. This can be frustrating, especially when you are playing the game and you realize there’s no sound for the game. This issue can either arise after a Windows Update, or immediately after you install the Steam app. While the sound works perfectly fine with other apps like VLC Media player, Google Chrome, etc., the sound problem occurs with Steam Games.
The no sound problem in Steam games issue is known to occur on all types of PCs (from the basic to high-end models). It may arise if any 3rd party audio manager on your system interferes with the default audio manager, when two users log in at the same time, or when the Realtek HD audio driver gets corrupt.
Fortunately, we found out a few ways that may help fix the Steam games have no sound problem on the Windows 10 PC. Here’s how:
Method 1 – Make sure Correct sound devices are selected
*Note – Before you proceed with the below methods, make sure to check if the Sound devices are selected correctly. Here’s how:
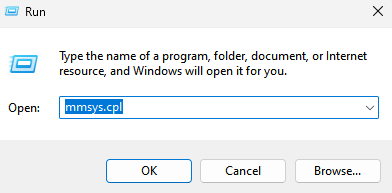
Step 1 – Press Windows key + R to open run.
Now, copy and paste mmsys.cpl in the run command box

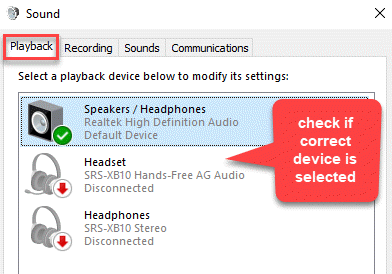
Step 3: In the Sound dialogue box, select the Playback tab and check if the correct device is selected.

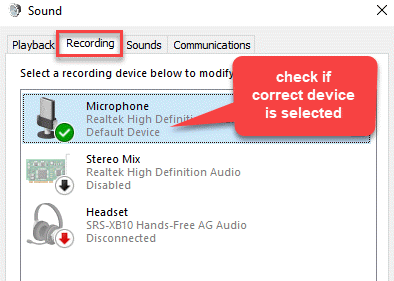
Step 4: Next, go to the Recording tab and check if the right device is selected.

Once you have confirmed that the correct sound devices are selected, move onto try the fixes as shown below.
Method 2: Check Microphone Privacy Settings
According to some users, the latest Windows insider update has been blocking all the apps automatically and hence, you may experience an error with the the Steam games sound. In this case, you must make changes to the microphone’s privacy options to see if it fixes the issue:
Case 1 – For Windows 10
Step 1: Go to Start and type microphone privacy settings in the Windows Search bar.

Step 2: Click on the result Microphone privacy settings to open the Microphone page in the Settings app.

Step 3: Here, under the Allow access to the microphone on this device section, click on the Change button.

Step 3: In the Microphone access for this device pop-up, move the toggle bar to the right to turn it on.

Step 4: Next, under the Allow apps to access your microphone section, move the slider to the right to turn it on.

Exit the Settings app and now try playing games on the Steam app. You should not face the sound issue anymore.
Also, check below if steam is in the list of apps below and its mic access is ON or not.
Case 2 – For Windows 11
1 – Search Microphone Privacy settings in Windows 11 search box.

2 – Now, Make sure Microphone access is turned ON .
3 – Also , make sure Let apps access your Microphone is also turned ON.

Also, check below if steam is in the list of apps below and its mic access is ON or not.
Method 3: Use a Generic Windows Audio Driver
Some Steam users have reported of fixing the issue by switching back to the Generic Windows Audio Driver. Apparently, the original Windows driver can sometimes fix any problems with different audio devices.
Step 1: Press the Win + R shortcut key on your keyboard to launch the Run command window.
Step 2: In the Run command search field, type devmgmt.msc and hit Enter.

Step 3: In the Device Manager window that opens, go to the Sound, video and game controllers section and expand it.
Right-click on the audio device and select Update driver.

Step 4: In the Update Drivers window, click on Browse my computer for driver software.

Step 5: Next, click on Let me pick from a list of available drivers on my computer.

Step 6: In the next window, check the box next to Show compatible hardware.
From the Model list, select Generic software device or High Definition Audio Device.
Click Next to finish installing the device.

Restart your device, launch Steam and you can now play the Steam games without facing the sound issue.
Method 4: Uninstall the Conflicting Programs
If you are running third-party apps like the Asus Sonic Studio 3, Sonic Radar 3, Alienware Sound Center, Nahimic 2, or MSI Audio programs on your PC, then there are chances that you may encounter the Steam games have no sound problem. Therefore, uninstalling these conflicting programs may fix the issue.
Step 1: Right-click on Start and select Run to launch the Run command window.

Step 2: In the Run command window, write appwiz.cpl and press OK to open the Programs and Features window in the Control Panel.

Step 3: Next, navigate to the right side of the window and under the Uninstall or change a program, select the Asus Sonic Studio 3, Sonic Radar 3, Alienware Sound Center, Nahimic 2, or MSI Audio programs.
Now, right-click on the program and select Uninstall.

Once the uninstallation is over, restart your PC and now try playing the game on Steam and it should play with the sound.
Method 5: Set Steam to Run as Administrator Temporarily
Sometimes, you may face the no sound problem in the Steam app, if you run the app without the due privileges. Therefore, running the game app as administrator may help fix the issue. You can choose to Run the game as administrator temporarily as shown below:
Step 1: Go to the Steam app shortcut on desktop and right-click on it.
Step 2: Select Run as administrator from the right-click menu.

This will run the Steam app as administrator, temporarily and the no sound problem should be solved.
Method 6: Set Steam to Run as Administrator Permanently
Step 1: Go to Start and type Steam in the Windows Search bar.
Step 2: Right-click on the result (Steam) and select Open file location.

Step 3: In the file location, right-click on Steam and select Properties.

Step 4: In the Steam Properties window, under the Shortcut tab, click on the Open File Location button below.

Step 5: It will open the Steam.exe file location.
Right-click on it and select Properties.

Step 6: In the Steam.exe Properties window, select the Compatibility tab.
Now, go to the Settings section and check the box next to Run this program as an administrator.
Press Apply and then OK to apply the changes and exit.

Now, when you try to open the Steam app, it will run the Steam app as an administrator permanently and you should not encounter the no sound problem in the Steam app anymore
Method 7: Run Steam Game as Administrator Through the App
If the no sound problem is with a specific game in the Steam app, then you can set it to run as administrator through the app to fix the issue. Let’s see how:
Step 1: Launch the Steam app, click on the Games options at the top and select View Games Library.

Step 2: Right-click on the game that’s having the sound problem and select Properties.

Step 3: In the next window, click on Local Files on the left side.

Step 4: Now, go to the right side of the window and click on Browse.

Step 5: In the game file location, right-click on the game file (.exe) and select Properties.

Step 6: In the Properties dialogue box, go to the Compatibility tab and select the box next to Run this program as an administrator.

Hit Apply and then OK to save the changes and exit.
Method 8: Verify the Integrity of Game Cache
When a specific game shows the no sound error, it can be sometimes due to corrupt or insufficient game cache. In such cases, verifying the integrity of the game cache may help resolve the issue.
Step 1: Open the Steam app, select the LIBRARY tab and click on Home.

Step 2: It will take you to your game library section.
Here, right-click on the game that’s having the no sound problem and select Properties.

Step 3: Now, on the left, click on Local Files.

Step 4: Next, on the right side of the window, click on Verify integrity of tool files.

Wait for the app to finish Validating the Steam files.
Once it says “All files successfully validated“, click on Close to return to the app.
Now, try playing the game and the sound should be working fine.
Method 9: Update the Audio Driver
A lot of times, the sound issue with your game could be due to an outdated audio driver and hence, updating the driver to the latest version may help fix the issue.
Step 1: Right-click on Start and select Device Manager.

Step 2: In the Device Manager window, expand the Sound, video and game controllers section.
Right-click on the default audio device driver and select Update driver.

Step 3: In the next window, click on Search automatically for drivers.
Now, Windows will start looking up for any update and if available, it will update the audio driver to the latest version.

Reboot your PC, launch the Steam app and try playing games. You should not come across the sound issue while playing Steam games anymore.
Method 10: Roll back Windows Update
Sometimes, the sound issue while playing games in Steam may arise due to the latest Windows update that you may have installed. Hence, you can roll back that specific Windows update and see if it resolves the issue.
Step 1: Press the Win + I keys together on your keyboard to open the Settings app.
Step 2: In the Settings window, click on Update & Security.

Step 3: Next, go to the right side of the window and under the Windows Update section, click on the View update history.

Step 4: In the View update history window, click on Recovery options.

Step 5: It takes you to the Recovery page in the Settings app.
Now, under the Go back to the previous version of Windows 10, press the Get started button.

Now, follow the on-screen instructions to roll back the Windows Update to the previous version.
Exit the Settings app and you should not encounter the sound issue with your Steam games now.
*Note – However, if you updated your PC more than 10 days ago, the Get started button will be grayed out. In that case, you can try uninstalling the update instead, as shown in the next method.
Method 11: Uninstall Updates
If you are unable to roll back the last Windows update since it was done 10 days back, you can move on to uninstall the update instead. Let’s see how:
Step 1: Right-click on the Start menu and select Settings to launch the Settings app.

Step 2: In the Settings window, select the Update & Security option.

Step 3: It takes you straight to the Windows Update page in the Settings window.
On the right side, click on the View update history option.

Step 4: In the next window, click on Uninstall updates.

Step 5: It opens the Installed Updates window.
Here, go to the right side of the window and under the Uninstall an update section, right-click on the last update from the list and select Uninstall.

Once the uninstallation process is complete, your Windows OS reverts to the previous version automatically. You may restart your PC and then try to play the Steam games. The sound problem should be resolved now.
Method 12: Reset this PC
If you are unable to uninstall the Windows update and revert to the previous version, you can try resetting your PC. This method mostly helps, however, after your Windows 10 is reset, the Steam app and other games get uninstalled. But, you can choose to retain personal files if you want, during the reset. Since your PC can boot normally, you can try the Recovery process as below:
Step 1: Press the Win + I hotkeys to open the Settings window.
Step 2: In the Settings window, click on the Update & Security option.

Step 3: In the next window, click on the Recovery option on the left side of the pane.

Step 4: Now, on the right side, under Reset this PC section, click on Get started.

Step 5: Next, in the Choose an option window, select from the Keep my files or Remove everything.
Next, follow the on-screen instructions to complete resetting the PC.
*Note – While selecting the first option will remove the apps and settings, keeping your personal files intact, the second option will remove all the data that includes your personal files, apps, and settings.
Once complete, you must reinstall the Steam app and also the games that you want to play. You can now try to play the games and the sound should be working fine.