When installing a new Windows update, we often come across errors that prevent you to complete the installation. Windows 10 is known to get affected with such errors quite often and one such error is the Windows update error 0x8007025d0. You may see a error message that reads “There were some problems installing updates, but we’ll try again later. If you keep seeing this and want to search the web or contact support for information, this may help (0x8007025d0)“.
You usually encounter this error code while installing the KB5001330 update. You may come across this Windows Update error 0x8007025d0 either due to a 3rd part anti-virus software that may be blocking the update, due to corrupt files, or may be due to network issue. In most cases, the 3rd party anti-virus software on your system is the reason behind this 0x8007025d0 error. The software by-default considers the Windows Update as the download as an external threat and thus, blocks the installation while returning the error code – 0x8007025d0. However, you can either disable the antivirus or remove it completely to see if it resolves the issue.
However, if it does not help, then we have listed a few solutions below that may help you fix the Windows update error 0x8007025d0 on your Windows 10 PC.
Method 1: Reset Windows update components
Sometimes, you may see the Windows Update error code 0x8007025d0 due to damaged or corrupt update components. In such cases, the best way to fix this issue is to reset the Windows Update components to their original state. This helps replace the Softwaredistribution and Catroot2 folders with new folders, deletes the temporary files and folders associated with the Windows Update and even re-register the network driver. Here’s how to reset the Windows Update components.
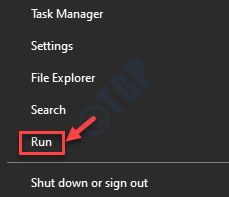
Step 1: Right-click on Start and select Run to open the Run command window.

Step 2: In the Run command search field, type cmd.
Now, press the Ctrl + Shift + Enter keys together on your keyboard to launch the elevated Command Prompt.

Step 3: In the elevated Command Prompt window, run the below commands one after another and hit Enter after each command:
net stop bits
net stop wuauserv
net stop appidsvc
net stop cryptsvc
Del “%ALLUSERSPROFILE%\Application Data\Microsoft\Network\Downloader\*.*”
rmdir %systemroot%\SoftwareDistribution /S /Q
rmdir %systemroot%\system32\catroot2 /S /Q
regsvr32.exe /s atl.dll
regsvr32.exe /s urlmon.dll
regsvr32.exe /s mshtml.dll
netsh winsock reset
netsh winsock reset proxy
net start bits
net start wuauserv
net start appidsvc
net start cryptsvc
Once done, exit Command Prompt and restart your PC. Now, try installing the update and you should not encounter the 0x8007025d0 error anymore.
Method 2: Run Windows Update troubleshooter
The update troubleshooter by Microsoft is a great tool that helps fix an update related issue. It detects the issue and resolves them mostly, automatically. In situations, when it cannot, it offers potential resolutions tat can help fix the 0x8007025d0 error code. Here’s how to run the Windows Update troubleshooter:
Step 1: Press the Win + I shortcut keys to open the Settings app.
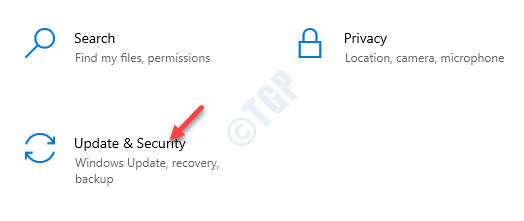
Step 2: In the Settings app, click on the Update & Security option.

Step 3: Next, click on Troubleshoot on the left side of the pane.

Step 4: Now, go to the right side of the window, scroll down and click on the Additional troubleshooters link.

Step 5: In the next window, under the Get up and running section, select Windows Update and click on Run the troubleshooter.

Now, wait for the troubleshooter too detect any issues. If any issues found, it will either fix them automatically or suggest a list of fixes that may help resolve the issue.
Once the process is complete, try installing the update and it should go through without any hassles anymore.
Method 3: Install update manually to get rid of error 0x8007025d0
Windows 10 comes with the default setting where it downloads and installs the updates automatically, however, the process may sometimes get interrupted due to disturbances in the internet connection or power outage. This leads to corrupt or damaged setup files on your system and so, as you try to install the updates with these damaged files, the system is unable to complete the installation and returns the error code 0x8007025d0. So, to possibly fix this issue, you can download the patch from the update catalog in the Microsoft’s official website and finish installing it manually without any errors. Let’s see how to install the update manually:
Step 1: Right-click on Start and select Settings to open the Settings app.

Step 2: In the Settings app, select the Update & Security option.

Step 3: It takes you to the Windows Update page in the Settings window.
Go to the right side of the pane and click on View update history.

Step 4: In the next window, under the Update history section, note down the KB number that failed to install.
Step 5: Now, click on the below link to visit the official Microsoft Update Catalog page:
https://www.catalog.update.microsoft.com/home.aspx
Step 6: Now, in the Microsoft Update Catalog page, enter the copied KB number (as shown in Step 4) and hit the Search button next to it.

Step 7: In the next page, you will see the search results.
From the list, click on the Download button for the version based on your PC architecture (32-bit/64-bit).
*Note – To know how to check your Windows 10 PC is 32-bit or 64-bit, refer to this article.

Step 8: It opens a new window.
Click on the link that ends with .msu.
Step 9: Now, select the Save File option and press OK.
Step 10: Double-click to open the MSU zip file and click on Yes to proceed with the installation procedure.
Follow the on-screen instruction to complete the set up.
Now, go back to the Widows Update page in the Settings window and try installing the failed update, and it should go through smoothly without returning the 0x8007025d0 error.
Method 5: Uninstall Latest Cumulative Update
A lot of times, the error code – 0x8007025d0 may occur immediately after a Patch Tuesday update and hence, it’s advisable to uninstall the update. Let’s see how:
Step 1: Press the Win + R shortcut keys on your keyboard and the Run command window is launched.
Step 2: In the search field, type appwiz.cpl and press Enter to open the Programs and Features window in the Control Panel.

Step 3: In the Programs & Features window that opens, click on View installed updates on the left side of the pane.

Step 4: Next, go to the right side of the pane and under the Uninstall an update section, look for the Patch Tuesday update.
Right-click on it and select Uninstall.

Wait for the uninstallation to complete. Once it’s over, restart your PC and the changes to be effective,
You can now proceed to complete installing the latest Windows Update and you should see no error.
Method 6: Disable Microsoft Defender – Fix Error 0x8007025d0
Many people prefer to use the Microsoft Defender which is the Windows default antivirus instead of a third-party security and that can also prevent you from install certain Windows updates. Therefore, make sure to disable the Windows Defender security to check if it helps you get rid of the 0x8007025d0 error.
Step 1: Go to Start and type Windows Security in the Windows Search bar.

Step 2: Click on the result to open the Windows Security app in the Settings window.

Step 3: On the right side off the app, click on Virus & threat protection.

Step 4: Now, in the Virus & threat protection section on the right, scroll down and under the Virus & threat protection settings, click on the Manage settings link.

Step 5: In the next window, turn off the below options one by one:
Real-time protection

Cloud-Delivered protection

Automatic Sample Submission

Step 6: Click on Yes in the pop-up to confirm the changes made.
This method will help you turn off the Windows Security, temporarily.
*Note – However, keep this in mind, that whenever you restart your system and login again, the Windows Defender gets enabled automatically and may cause the issue again, so you may have to turn it off each time you see the error 0x8007025d0 and you want to finish installing the update.
Method 7: Rename Windows Update Folders
When the folders related to the Windows Update gather too much data, this can also lead to the 0x8007025d0 error and thus, the issue with the update installation. While you can try clearing the Softwaredistribution and Catroot2 folders by resetting the Windows Update components, you can also rename the update folders using .bak extension and make the folders idle. Let’s see how:
Step 1: In this step, you will first need to stop all Windows Update related services.
For that, press the Win + R keys together on your keyboard to launch the Run command.
Step 2: In the Run command window, type cmd in the search field and press the Ctrl + Shift + Enter keys together on your keyboard to launch the elevated Command Prompt.

Step 3: In the elevated Command Prompt window, type the below commands one by one and press Enter after each one:
net stop bits
net stop wuauserv
net stop appidsvc
net stop cryptsvc
Step 4: Now, run the below codes one after another and hit Enter after each code to rename the files with .bat in the end:
rename %windir%\SoftwareDistribution SoftwareDistribution.bak

ren %systemroot%\System32\Catroot2 Catroot2.bak
Step 5: Once you have renamed the files successfully, run the below commands to re-register some of the Windows update registries one after another and hit Enter after each one:
regsvr32.exe /s atl.dll

regsvr32.exe /s urlmon.dll

regsvr32.exe /s mshtml.dll
Step 6: Now, execute the below command and this will reset the network:
netsh winsock reset
Step 7: Finally, restart all the Windows update related services by executing the below commands one after another and hit Enter after each command:
net start bits

net start wuauserv

net start appidsvc

net start cryptsvc
Once the process is over, reboot your Windows 10 PC and you should be now able to download and install the update.