Is the Steam client unable to recognize any games on your computer? This happens when you uninstall the Steam client from your computer. But, as you reinstall the Steam app, it automatically doesn’t recognize the games in the installed folders. But, don’t worry. No, you don’t have to re-download all the games on your computer. There are some basic and some advanced solutions available.
Fix 1 – Try to install the game in the same location
It is the easiest way of resolving this matter. Just open the Steam app and try to install the game in the same location.
Step 1 – Open the Steam client on your system.
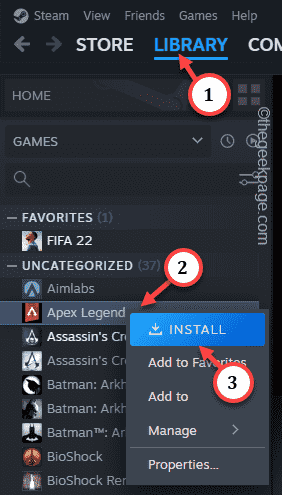
Step 2 – Go directly to the “LIBRARY” to find all your owned games.
Step 3 – Select the game. It will be listed in the Uncategorized section. Don’t worry.
Step 4 – Just right-click the game and tap “INSTALL” to attempt a fresh installation.
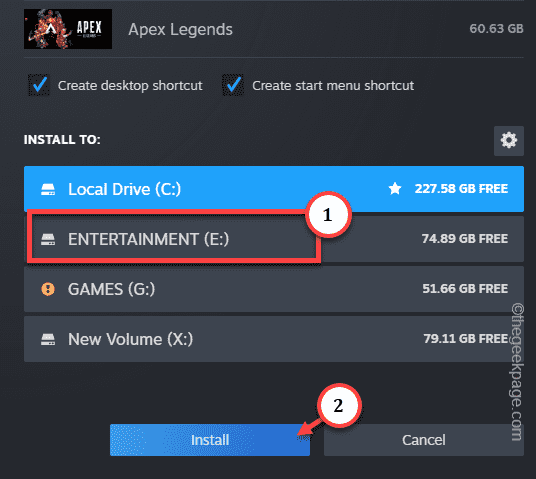
Step 5 – This is very important. Make sure to choose the same installation drive for the game where it is already installed. [Like, if the game is installed in E: drive, attempt to install the game in that drive.]
Step 6 – Finally, click “Install“.
As Steam scans the drive, it will find the game files you were trying to install. So, Steam will run a component check on all the installed game files.
You will see your game highlighted (as all the installed games do) in your Steam Library once again.
Fix 2 – Change the .acf file location
This is a neat trick that you can use to fix the Steam folder issue.
STAGE 1
Step 1 – Open the Steam client on your system.
Step 2 – Open the “LIBRARY” tab to find all of your games.
Step 3 – Now, click the game that is appearing to be uninstalled to select that right away. Then, right-tap the app and click “INSTALL“.
Remember the drive or the installation directory of that app.
Step 4 – After this, place your mouse pointer over the “LIBRARY” tab and you should find the “Downloads” to open the Downloads page.
Step 5 – Tap the Pause icon to pause the downloading process.
Quit the Steam app. But, as you may know, Steam continues to run in the background.
Step 6 – So, click the arrow icon to find the Steam app. Next, right-tap the “Steam” app and hit the “Exit Steam” to exit the Steam application.
STAGE 2
Step 1 – After this, open the File Explorer page.
Step 2 – Navigate to the game installation directory.
Example – Like if you are trying to install the game in the C drive, the default installation path will be –
C:\Program Files (x86)\Steam\steamapps\
Step 3 – Once you are in the steamapps folder, you will see many .acf files here.
Every game that you have installed in this drive contains a .acf file in this folder. You can identify the individual .acf file from the APPID in its name.
You can get the APPID of any Steam game from the main Steam DataBase. Just search with the game title and open the game title to know its APPID.
Like – The “appmanifest_1938090.acf” file is associated with the Call of Duty®: Modern Warfare® II | Warzone™.
Step 4 – Just cut-paste the associated .acf file to your Desktop carefully. Do not delete or lost it as you will need it soon.
STAGE 3
Step 1 – Afterwards, launch the Steam app from your desktop.
Step 2 – Go to “Library” and do check the status of the game on the left pane.
It will be greyed out or appear to be uninstalled.
Quit the Steam client.
Step 3 – Go to your Desktop. Move the .acf file from the Desktop to the directory where you have this game.
Step 4 – Launch the Steam client and go this way –
LIBRARY > Downloads
Step 5 – Resume the game downloading process.
Wait till Steam downloads and install the game on your system. You can easily play it from the Steam Library once more.
Fix 3 – Use an Alternate installation location in Steam
The first solution should fix the issue in Steam. But, if you have moved an installed game folder to another drive, you can choose to create a new Steam folder in the drive.
Step 1 – After launching the Steam app, go to the “Steam” app and open “Settings“.
Step 2 – Head on to the “Storage” in the left pane.
Step 3 – Click the arrow button to scroll sideways between the storage options. Then, tap the add button (⊕) to add the storage button.
Step 4 – Now, add the new drive where you have moved the game files.
Step 5 – Select the drive and use the “Add” to add the drive.
When Steam creates the SteamLibrary in that directory, the game will appear installed.
Tip –
If nothing helps your cause, just uninstall the game and reinstall it on the preferred drive. As all the progress is stored in the Steam cloud, you can do this risk-free. You will save a lot of time this way.


