Adding or removing new Microsoft accounts from Windows 10 machines is a very easy process. There is a dedicated ‘Account’ setting in the Windows Settings page that users can easily use to perform such tasks. But, what if the “Remove” button is greyed out or completely missing from the Settings page? This problem has an excellent set of quick resolutions. We have explained the solutions in detail. Follow those to easily solve the issue.
Fix 1 – Stop signing in process and then remove
If the account you are trying to remove is set to default, then try to stop signing in-process and remove it afterward.
1. First of all, press the Windows key+I keys together.
2. In the Settings page, click on the “Accounts” settings to access it.

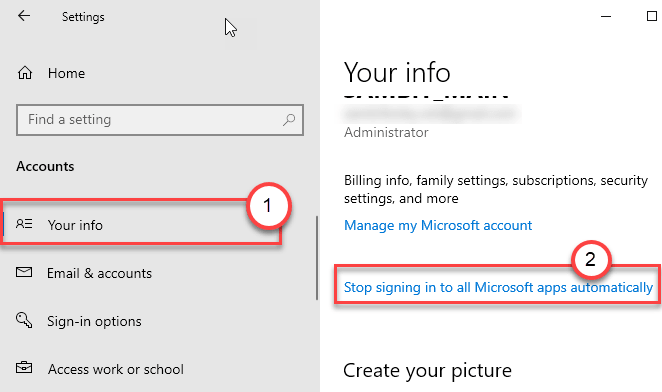
3. When the Account settings open up, click on “Your info” on the left-hand pane.
4. Then, on the left-hand side, scroll down until you notice the “Stop signing in to all Microsoft apps automatically“.

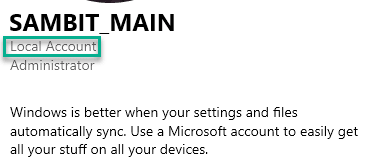
5. Now, you will notice that your account has become a local account.
So you can easily remove this account following the next steps.

6. Next, on the left-hand pane, click on the “Email & accounts“.
7. After that, on the right-hand side, you will notice all the connected accounts.
8. Then, click on the account you are trying to remove and click on “Remove” to finally detach it from this machine.

This should solve your problem.
Fix 2 – Try to Disconnect from Access work or school
If you are facing this issue while removing a school account or work account, try this solution.
1. Open the Settings screen again.
2. After that, open the “Accounts” settings.

3. Then, on the left-hand side, click on the “Access work or school” account.
4. After that, on the right-hand side, select the account from the right-hand pane.
5. Finally, click on “Disconnect” to disconnect the account from your computer.
Click on “Yes” to confirm the removal.

Close the Settings window.
This should remove the specified account from your machine.
Fix 3 – Create a local account and remove the first one
You can create a new local account and then remove the account from your computer.
Step – 1 Create a new local account
1. Open the Settings window.
2. When the Settings window opens up, click on “Accounts“.

3. In the Settings screen, click on “Family & other users“.
4. You have to click on the “Add a family member” to start the process of creating a new account.

5. Then, enter an Email address.
6. After that, click on “Next” to proceed to the next step.

Now, follow on-screen instructions to complete the account creation process.
Step 2 – ALTER THE ACCOUNT TYPE
Now, you have to alter the account type you have just created.
1. Press the Windows key+R keys together.
2. Then, type “control” in the terminal and hit “OK“.

3. Then, tap on the ‘View by:’. After that, choose “Category“.
4. Next, click on “Change account type” under ‘User Accounts‘ to alter the account type.

5. Now, click on the account that you have just created.
(In this case, it is the “Administrator” account.)

6. To change the account type, click on “Change the account type” on the left-hand side.

7. Now, select the “Administrator” type to set this account as an administrator of this computer.
8. Next, just tap on the “Change Account Type” to alter this setting.

Once you have set this account as a new administrator, now you can remove the first account.
Step 3 – Remove the account
Now, you can easily remove the account from your computer.
1. Open the Settings screen again.
2. Then, click on the “Accounts” settings to access it.

3. Now, on the left-hand pane, click on the “Email & accounts“.
4. Select the account you were trying to remove.
5. Finally, click on “Remove” to finally remove it from this device.

Close the Settings window.
Fix 4 – Manage the device settings from Edge
You can manage the devices that are connected to your Microsoft account from a browser.
1. First of all, open the Settings.
2. Then, tap on the “Accounts” settings.

3. Once the Accounts opens up, click on the “Your Info” on the left-hand pane.
4. On the right-hand side you will see your account. Scroll down and then click on the “Manage my Microsoft account“.

Google Chrome (or Edge browser) will open.
5. Type in your Email address associated with your Microsoft account.
6. Then, click on “Next“.
Type in the password and complete the sign-in process.

7. Now, go to the “Devices” tab.
Here you will see the list of devices connected with your Microsoft account.
8. Simply, click on the three-bar on the device you want to remove and then tap on “Remove device“.

This will remove the device from your Microsoft account.
Open the Settings screen and check it out yourself.
Fix 5 – Change the account type and remove
If you are trying to remove an administrator-level account from your computer, you can’t. You have to change it first.
Step 1 – Alter the account
1. Just click once in the Window search box and type “Control Panel“.
2. Then, click on “Control Panel” in the search box.

3. After that, click on ‘View by:’ and then choose “Category“.
4. Then, click on “Change account type” under ‘User Accounts‘to alter the account type.

5. Here you will notice all the accounts associated with this system. Just click on the account you are currently using.

6. After that, click on the “Change the account type” on the left-hand side.

7. Click on the radio button beside, “Standard” to set this account as a normal user of this computer.
8. After doing these, click on the “Change Account Type” to save this change.

Close Control Panel window.
Step 2 – Remove the standard account
Now, follow these steps to remove the account.
1. Open the Settings screen again.
2. After that, open the “Accounts” settings.

3. Next, on the left-hand pane, click on the “Email & accounts“.
4. Then, select the account that you have just turned into a Standard account
5. Finally, click on “Remove” to finally disconnect it.

Close the Settings window.
This should work out and solve the problem.