A lot of your computer’s performance depends on its power usage and that’s why the power plans/power schemes are in place. The power plans allow you to configure and manage its settings that helps the computer to use and save power in its own way. Along with it, it also comes with the option to reset power plans to default in your Windows 10 PC. So, how does it work?
You can customize the power plans based on the system type, configure power usage and even allows you to edit the power saving options for the display, hardware and system settings. The Windows 10 comes with three different types of built-in power-plans that includes Balanced, Power Saver and High Performance. You can customize these plans, for instance, you can create new plans based on these basic plans or even create a new power plan altogether. Moreover, some specific computer brands may include additional power plans with customizable settings.
However, if you have made changes to the power plan settings recently and you want to revert to the default settings, you can reset power plans to default in Windows 10. Let’s see how:
Method 1: Reset Power Plans to Default using Command Prompt
This method uses the Command Prompt with administrator rights to delete all custom power plans and reset power plans to default. Best of all, this method can also help fix the error “Your power plan information isn’t available” for any of the built-in power plans (Balanced, Power Saver, or High Performance). Follow he the below steps to rest the power plans to default settings using Command Prompt:
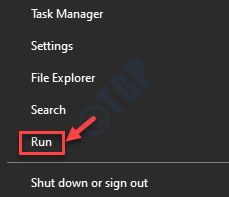
Step 1: Right-click on Start menu and select Run to launch the Run command window.

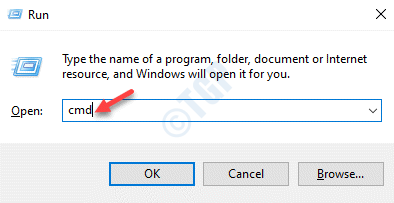
Step 2: In the Run command search box, type cmd and press the Ctrl + Shift + Enter shortcut keys to launch the Command Prompt window in admin mode.

Step 3: In the Command Prompt (admin) window, run the below command and hit Enter:
powercfg -restoredefaultschemeshe

Once done, close the Command prompt window. It has successfully reset the power plans to default.
Method 2: Restore default settings for Power Plans Through Advanced Settings
For all power plans
This method allows you to restore default settings for Power Plans using the Control Panel. Follow the below instructions to revert to the original default power settings for all power plans:
Step 1: Go to Start and type Edit Power Plan in the Windows search bar.

Step 2: Click on the result (Edit power plan) to open the settings in the Control Panel window.

Step 3: In the Edit Plan Settings window, click on the Change advanced power settings link at the bottom.

Step 4: It opens the Power Options dialogue box.
Here, under the Advanced settings tab, click on the Restore plan defaults button below.

Step 5: In the prompt that appears, click on Yes to confirm the action.
The changes are effective immediately, so, once you are done, your power plans are changed to default.
For a single power plan
Alternatively, you can also reset to default settings for a single power plan. Here’s how:
Step 1: Press the Win + I keys together on your keyboard to open the Settings app.
Step 2: In the Settings window, click on System.

Step 3: In the next window, click on Power & sleep on the left side of the pane.

Step 4: Now, go to the right side, scroll down and click on Additional power settings.

Step 5: It opens the Power Options window (Control Panel).
On the right side of the window, under the Plans shown on the battery meter section, click on Change plan settings for the active power plan.

Step 6: Next, in the Edit Plan Settings window, click on Change advanced power settings link below.

Step 7: In the Power Options > Advanced settings window, select the power plan from the drop-down.
For instance, we selected High Performance.

Step 8: Now, press the Restore plan defaults button at the bottom.

Step 9: Press Yes in the confirmation prompt.
You are done. You have successfully reset the power plan to default and the changes are effective immediately.
Method 4: Reset & restore Power Plans using Edit Plan Settings
Step 1: Go to the right side of the Taskbar and right-click on the battery icon.
Now, select Power Options from the window.

Step 2: This will open the Power Options window in the Control Panel.
Here, on the right side of the pane, under the Choose or customize a power plan section, click on the Change plan settings link on the right side of the selected Power Plan.

Step 3: It will take you to the Edit Plan Settings window.
Click on the Restore default settings for this plan.

You have now successfully reset and restored the power plans to original defaults in your Windows 10 system.