The search feature is very useful when you have to find a file or folder from the long list. However, sometimes due to some errors many users can’t find the file they search for and get no results even if the file is there on the computer. It is not an uncommon issue in windows file explorer and can be solved easily. We have found some solutions below that can help you out.
Solution 1- Delete StructuredQuerySchema file
1. Go to file explorer
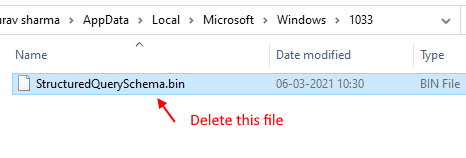
2. Now, copy and paste the path given below in address bar and hit enter
C:\Users\%username%\AppData\Local\Microsoft\Windows33
3. Now, delete StructuredQuerySchema.bin file.

Solution 2 – Check index locations
It might be possible that the file or folder you are looking for has not indexed in the file explorer. To fix that you have to check the indexed location of your file explorer. Follow this process to do the same.
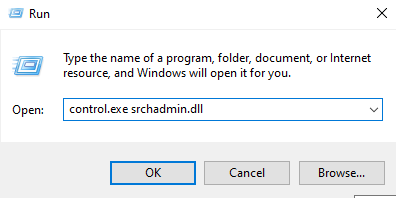
STEP 1: Press Windows key + R key together to open run.
Step 2 : write control.exe srchadmin.dll in it and click OK.

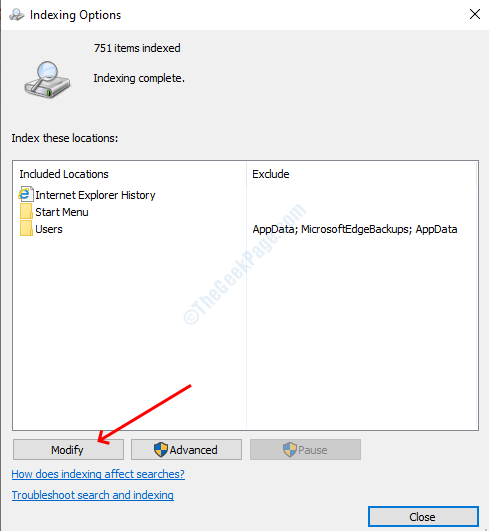
STEP 3: Click on the modify button, it will open the indexed location window.

STEP 4: Check in the checkbox of all the drives and then click OK.

STEP 5: Now, again in the indexing options window click on Advanced

Step 6: – Now, click on rebuild to rebuild search index.

Step 7 – Click on OK and close all the windows.
Solution 3 – Run the Search and Indexing troubleshooter
Windows Troubleshooter program is the easiest way to solve the issues in the Windows system, you just need to run the program and it will automatically detect the error. Also, it will fix the error after detection.
STEP 1: Open settings from the Start menu, select Update and security, and then Troubleshoot from the left pane.

STEP 3: Scroll down in the troubleshoot menu and locate the search and indexing option. Select it and click on Run the troubleshooter.

STEP 4: On the next window, check the box that says files don’t appear in search results. Click the Next button.

Wait till the process completes and then close the window. Check that if you can search your files.
Solution 4 – Restart Cortana
Cortana is responsible for the searches on the Windows 10. Some users have solved this issue by just restarting the Cortana from the task manager.
STEP 1: Press Windows + X and click on the Task Manager option. Press yes on the user access control prompt.

STEP 2: In the processes tab, locate for the Cortana. Select it and then click on the End task button. Close the task manager window now and search for the file to restart the Cortana.

Solution 5 – Rebuild the search index
This method is one step ahead of the last method, in this solution we will rebuild the whole index instead of adding the index directories. Rebuilding the index have solved search issues for most of the users.
STEP 1: Open the indexing options window by following the first two steps of the last method.
STEP 2: Click on the advanced button.

STEP 3: Select Yes on the user access control prompt.
STEP 4: In the advanced options window, you will find the troubleshooting option. Click on the Rebuild button to delete the existing index and rebuild it.

STEP 5: Click OK on the prompt and it will start building the new index.
Solution 6 – Check Windows service
Windows search service is responsible for the search operations in the file explorer, it might be possible that it has stopped working. To start it again you have to manually start it from the Windows services. Follow these steps to start it again.
STEP 1: Hit the Windows + R key to open the Run window, type services.msc and click the OK button.

STEP 2: Scroll all the way down to find the Windows search service. Double click on it to open properties. Select automatic in the startup type option, If the status says stopped then press the start button otherwise do nothing.

STEP 3: Select the Ok button to apply the settings.
STEP 4: Right-click on the Windows search service and select restart the service.

Solution 7 – Enable the Always Search File Names and Contents Option
Windows file explorer has this option always search file names and contents which is disabled by default in some computer, due to that you might now get your desired search results. Enabling the always search file name and contents will ensure that the search action happens in every folder of your disks.
STEP 1: Open the File explorer Program.
STEP 2: Head over to the view tab. select the options button, it will open up the folder options window.

STEP 3: Go to the search tab and check the checkbox that says always search file name and contents.

STEP 4: Click Ok to save your settings.
Solution 8 – Enable the Allow Indexing Service Option
By default Windows file explorer does not index files on the External drives so you won’t be able to search it from them. Although, you can turn on its indexing and you can search from external drivers after enabling their indexing. So, if you want that your file explorer can search external USB and other drives follow this process to enable it.
First, make sure that you have inserted that external drive to your computer.
STEP 1: Open This PC from file explorer or the Desktop.
STEP 2: Right-click on the external drive and select properties.

STEP 3: In the general tab, check the checkbox that says Allow files on this drive to have content indexed.

That’s all, your files from that drive are indexed for the File Explorer search.