A few Windows users are facing the issue “No Audio Input Device Found”. There will be a cross mark on the speaker symbol which is on the taskbar and when the user clicks on it there is a pop-up saying No Audio Input Device Found. Are you one among them? It could be due to the latest installed updates or outdated drivers etc. This article explains the different methods to solve the problem. Try these and get rid of the issue.
Method 1: Use Windows Troubleshoot
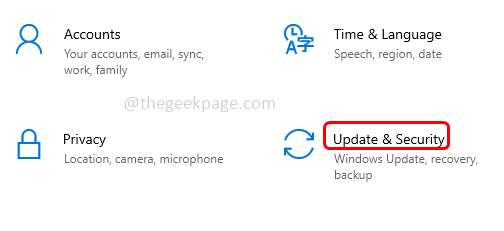
Step 1: Open the Windows settings using Windows + I keys together and click on Update & Security
Step 2: On the left side, click on Troubleshoot option
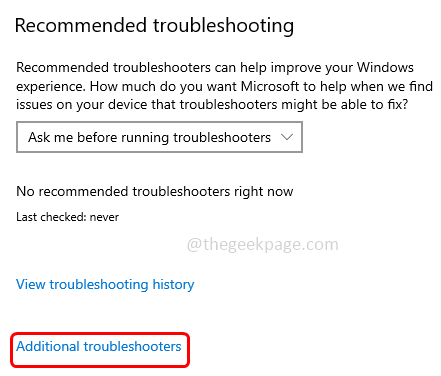
Step 3: Then at the right click on Additional troubleshooter
Step 4: Select the Playing Audio option and click on Run the troubleshooter
Step 5: It will take a while to detect if there are any problems, follow the onscreen instructions to resolve the issue.
Step 6: Once the process is complete, close the window and check if the issue is resolved.
Method 2: Update The Audio Driver
Step 1: Open the run prompt using Windows + R keys together. Type devmgmt.msc and hit enter.
Step 2: This opens the device manager window. Click on the dropdown beside Audio inputs and outputs to expand it.
Step 3: Find the audio device from the dropdown and right-click on it and select update driver.
Step 4: You can either select search automatically for drivers or browse my computer for the drivers option and follow the onscreen instructions to complete the process.
Step 5: Here I will select browse my computer for drivers, then click on Let me pick from a list of available drivers on my computer.
Step 6: Click on Let me pick from a list of available drivers on my computer.
Step 7: Make sure the checkbox beside show compatible hardware is ticked. From the model select generic software device and click on Next
Step 8: Once the driver is updated close the window. Repeat the same steps to update the other audio devices present under the Audio inputs and outputs option.
Step 9: Restart the computer and check if the error is resolved.
Step 10: If the issue is still present then roll back to the previously installed driver and then try the next method.
Step 11: To roll back, expand Audio inputs and outputs, and right-click on the audio device which was updated then click on properties.
Step 12: Under the Driver tab, click on the Roll back driver option.
Step 13: Back on the Device Manager window, expand the system devices
Step 14: Double-click on High definition audio controller and select the driver tab
Step 15: If the roll back driver button is enabled click on it to roll back to the previously installed driver. Else, click on the update driver option.
Step 16: Select Browse my computer for drivers.
Step 17: Then click on Let me pick from a list of available drivers on my computer.
Step 18: Under model select High definition audio controller then click on Next and the driver will be updated.
Step 19: Restart the system and check for the issue to be solved.
Method 3: Re-start The Application Using Windows Services
Step 1: Open the run prompt using Windows + R keys together. Type services.msc and hit enter.
Step 2: Find your audio device and double-click on it to open. My system audio device is conexant hence I have chosen that particular service.
Step 3: Click on the Stop button to stop the service and from the startup type dropdown select Automatic
Step 4: Now click on the Start button to start the service
Step 5: To save the changes click on apply and then click on ok.
Method 4: Modify The Speaker Properties And Update The Driver
Step 1: Open the run prompt using Windows + R keys together. Type control and hit enter.
Step 2: Control panel will be opened, from the view by dropdown option select Large icons
Step 3: Click on Sound
Step 4: Right-click on the audio device and click on enable. If it is already enabled you cannot see the enable option. Here in the image below you can see the disable option and cannot see the enable option since the device is already enabled.
Step 5: Go back to your device name and double-click on it to open the speaker properties.
Step 6: Click on the Advanced tab and make sure the allow applications to take exclusive control of this device is unchecked. If it is checked, click on the checkbox to disable it.
Step 7: If changes are made, click Apply and Ok to save the changes.
Step 8: Now select the Levels tab and increase the speakers/headphone level by dragging the slide bar on the right. The maximum is 100 you can balance the level as per your need. Click on OK.
Step 9: Now back in the sound properties, go to the general tab, and then click on properties
Step 10: In the appeared window click on change settings
Step 11: Go to the Driver tab. If the roll back driver option is available click on it to roll back to the previously installed driver.
Step 12: Else click on the update driver
Step 13: Select Browse my computer for drivers, then click on Let me pick from a list of available drivers on my computer.
Step 14: Select the drivers of your device manufacturer from the model section and click on next to install the manufacturer driver on the system.
Step 15: Once it is finished close the window and restart the system. Check if the issue is resolved.
That’s it! I hope this article is helpful. Do comment and let us know which of the above method you applied to solve the issue. Thank you!!


