SSDs have revolutionized the technological world. With their blazing-fast and unparalleled read/write speed, these data storage solutions have created a craving for every user to install the system OS in them. But what if your new SSD is not showing up on your Windows device? This is one typical issue that you may face with a brand new SSD plugged into your system. Don’t worry. We just got the correct solution and all you have to do is to follow these steps and the SSD will be right back to your File Explorer.
Workarounds –
1. Check the connection of the SSD. If you are using a USB hub, directly connect the SSD to your system. Look at the connector of the SSD for any physical defect.
2. Try connecting the SSD to another system. If it is still not being recognized, perhaps the SSD has gone out of order.
Fix 1 – Create a new simple volume
It is possible that your new SSD is still unallocated.
1. You have to create a new simple volume using the unallocated space.
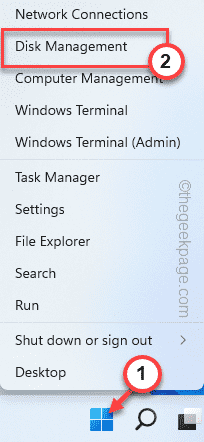
2. So, after pressing the Windows key+X keys together, tap “Disk Management“.
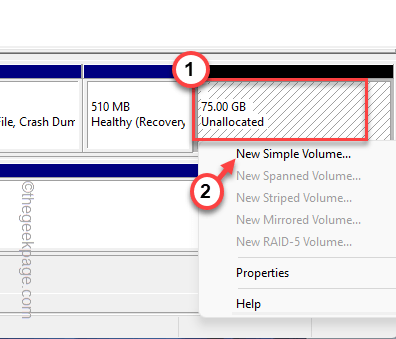
3. When Disk Management appears on your screen, look for any unallocated storage you can find here.
4. Once you have found it, right-click on that unallocated space and tap “New Simple Volume“.
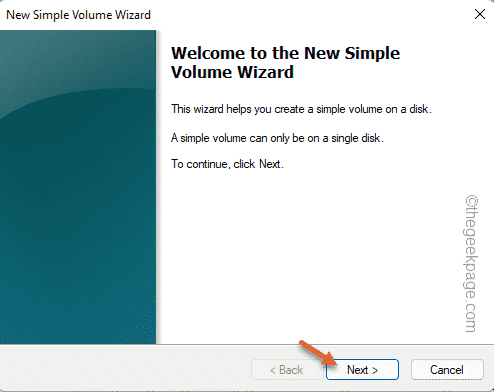
5. This will lead you to the New Simple Volume Wizard.
6. Just tap “Next” to proceed.
7. Now, if you want, you can select which drive letter you prefer for this drive.
Otherwise, you can leave it be.
8. Now, tap “Next” to proceed to the next step.
8. At the next step, choose “NTFS” and set the ‘Allocation unit size’ to “Default“.
[Or, you can modify these settings according to your own requirements.]
9. Finally, tap “Next” to proceed.
10. Next, tap “Finish” to complete the new simple volume wizard.
After this, you will see the SSD has appeared in the Disk Management. Additionally, you can head on to the File Explorer to look at whether the new SSD has appeared or not.
Fix 2 – Format the RAW drive
If the SSD is showing up in Disk Management but is in RAW format, you have manually formatted the drive to retrieve it.
1. Again you have to access the Disk Management. So, this time press the Windows key+ R key.
2. Then, type this in there and hit Enter.
diskmgmt.msc
3. In the Disk Management window, look for the
4. If there is a drive that shows “RAW” in the File System.
5. Now, just right-tap that drive and tap “Format…” to format the drive on your computer,
5. Before you format the drive, you can name it as you prefer like – ” New SSD“.
6. You can also alter the type (NTFS or FAT32) and tap “OK“.
7. You will be warned once before the formatting process starts.
8. Just tap “OK“.
Just wait for the formatting process to be complete.
Fix 3 – Change the drive letter
SSD may not appear in the File Explorer if it doesn’t have a drive letter associated with it.
1. Launch the Disk Management.
2. Now just right-click on the new formatted drive and tap on “Change Drive Letter and Paths…“.
3. Just, click “Add…” to add a new drive letter to this drive.
4. Choose the “Assign the following drive letter:“.
5. Select the drive letter from the drop-down menu.
6. Next, tap on “OK“.
Just check whether the new SSD is appearing on our screen.
Fix 4 – Initialize the disk
There’s a chance that the SSD drive isn’t initialized yet.
1. Click on the Windows icon and start to “create and format hard disk partitions” in the search box.
2. Then, tap “Create and format hard disk partition“.
3. This will directly open up the Initialize Disk window in Disk Management.
4. Now, choose the “GPT (GUID Partition Table)” and tap “OK” to proceed.
This will now initialize the disk on your system. But now you have to create a new simple volume with this.
1. So, right-tap the drive and tap “New Simple Volume“.
2. When the New Simple Volume Wizard window appears on your system, tap “Next“.
7. Now, if you want, you can select which drive letter you prefer for this drive.
Otherwise, you can leave it be.
8. Now, tap “Next” to proceed to the next step.
8. At the next step, choose “NTFS” and set the ‘Allocation unit size’ to “Default“.
[Or, you can modify these settings according to your own requirements.]
9. Finally, tap “Next” to proceed and complete the process.
After this, close the Disk Management screen. This way, SSD will be visible again in the File Explorer.
Alternative Tip –
If none of the above-mentioned fixes doesn’t solve your problem, SSD you are using may be of the wrong file type. Just format it from the Disk Management.


