Windows Update service is one of the most complex systems present on your Windows device. It requires some essential services to function properly to work. When one of these services, Background Intelligence Transfer Services or, BITS fails, the “NET HELPMSG 2182” error message shows up on the user’s screen. If you are facing this issue, enact these quick fixes on your system to solve the problem quickly.
Fix 1 – Run a simple SFC,DISM scan
Running an SFC scan and a DISM scan may resolve this issue.
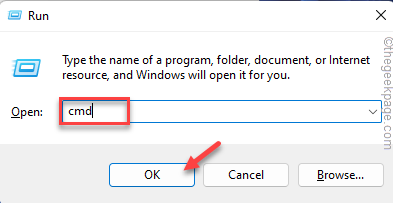
1. At first, right-click on the Windows key and tap on the “Run“.
2. Then, write “cmd” and press Ctrl+Shift+Enter keys together.

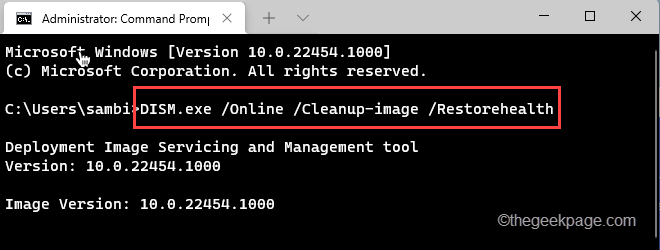
3. Now, copy-paste this command and hit Enter.
DISM.exe /Online /Cleanup-image /Restorehealth

Windows will run a DISM check.
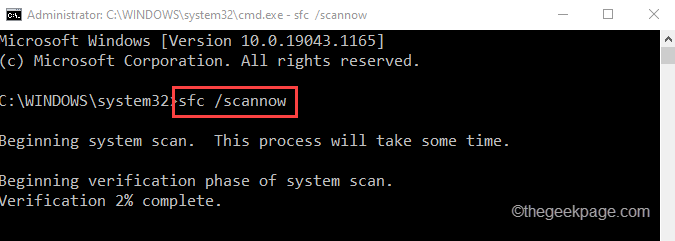
4. Once you have done, paste this command and hit Enter to run an SFC scan.
sfc /scannow

After successfully running two scans, close the Command Prompt. Restart your computer.
This should help you resolve the issue.
Fix 2 – Run the BITS troubleshooter
As this problem is directly associated with the BITS on your system, you should run the BITS troubleshooter.
1. At first, press the Windows key+R keys together.
2. Then, type “control” in the Run and hit Enter to open the Control Panel.

3. Once you are in the Control Panel, tap on the ‘View by:‘ drop-down and choose the “Small icons” option.

4. You will see all the control panel items.
5. Tap on the “Troubleshooting“.

6. Tap on “View all” on the left-hand side.

7. Next, click on the “Background Intelligent Transfer Service” troubleshooter.

8. Now, tap on “Advanced“.

9. Next, check the “Apply repairs automatically” box.
10. Then, tap on “Next” to proceed further.

Let Windows find out the issue and fix it for you. After applying this fix, we recommend you restart the machine once.
Then, try to run the Windows Update again.
Fix 3 – Restart the BITS
If troubleshooting doesn’t sort things out, try directly restarting the BITS from Services.
1. At first, press the Windows key and type “Services“.
2. Then, tap on the “Services” to open it.

3. When the Services window opens up, scroll down to the “Background Intelligent Transfer Service“.
4. Just, double-click on the service to open it.

5. Set the “Startup type:” to “Manual” mode.
6. If the service is stopped, tap on “Start” to start the service.
7. Otherwise, if you see the service is already ‘Running’, tap on “Stop” to stop the service first and then click on “Start” to restart the service.

8. Finally, tap on “Apply” and “OK” to save these changes.

After altering the BITS, close the Services. Check whether this works out.
Fix 4 – Run the Update troubleshooter
Try running the Update troubleshooter on your system.
1. At first, press the Windows key + I keys together.
2. Then, tap on the “System” on the left-hand side.
3. Next, click on “Troubleshoot” on the right pane.

4. Now, tap on the “Other troubleshooters” to access additional troubleshooting options.

5. You will notice the “Windows Update” troubleshooter in the list.
6. Then, tap on “Run” to run the troubleshooter.

Follow the on-screen instructions to fix the Windows Update.
Fix 5 – Reset the Store cache
Resetting the Store cache should fix the issue.
1 – Search cmd in Windows search box. Right click and choose run as administrator

2 – Type wsreset in command prompt window and hit Enter key

This way, you can reset the Store cache on your system. Now, try to update your system again.
Fix 6- Start-stop the Windows Update components
If the Windows Update components are not working well, this fix should help.
1. At first, press the Windows key and type “cmd“.
2. Then, right-click on the “Command Prompt” and tap on “Run as administrator“.

3. Just copy-paste these four commands one-by-one and hit Enter to execute these sequentially.
This will temporarily pause these four services.
net stop wuauserv
net stop cryptSvc
net stop bits
net stop msiserver

4. Now, paste this command and hit Enter to rename the folders.
ren C:\Windows\SoftwareDistribution SoftwareDistribution.old
ren C:\Windows\System32\catroot2 catroot2.old

5. Type these commands one at a time and press Enter.
This will start the paused services again on your system.
net start wuauserv
net start cryptSvc
net start bits
net start msiserver

After executing all the above-mentioned commands, close the Command Prompt.
Try to update your system once again.