What if you could change the color, design and the size of the mundane mouse pointer that you use everyday while working on your PC or laptop? Interesting idea isn’t it? Well, Windows 11 offers that option too and the changes you can make are pretty interesting. Windows 11 allows to change the entire mouse pointer scheme, that includes the option to change the colour, size and style of the mouse pointer on your Windows 11 PC.
Best of all, you can also add a shadow to the pointer and add custom pointers, and make things more interesting. So, you can change the style from the normal cursor to a pencil icon or arrow icon , magnify the size and even the color of the pointer. But, if you are perplexed on how to change the mouse pointer scheme or add a custom cursor icon, we will guide you through the process. Let’s see how:
How to Change the Mouse Pointer Scheme on Windows 11
Follow the below instructions to change the style, colour and size of the mouse cursor on your Windows 11 PC:
Step 1: Go to Start, right-click on it and select Settings from the context menu.
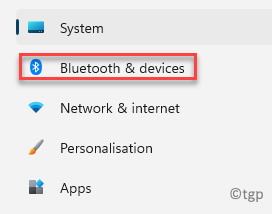
Step 2: In the Settings window, click on the Bluetooth & devices option on the left.
Step 3: Now, travel to the right side of the window scroll down a bit and click on Mouse.
Step 4: Next, in the Mouse settings window, on the right side, scroll down and under the Related settings section, click on Additional mouse settings option.
Step 5: It will open the Mouse Properties dialogue box.
Here, select the Pointers tab and go to the Scheme section.
Select a scheme of your choice from the drop-down below it.
Step 6: You can also select a custom cursor from the Customise section.
If you want to further enhance the cursor, you can check the box next to Enable pointer shadow at the bottom.
Press Apply and then OK to save the changes and exit.
You should now have a cursor based on your preference.
How to Change the Color and Size of the Mouse Pinter in Windows 11
In addition, you may also want to further customize the mouse cursor based on your preference and enhance its looks using a different color apart from black or white, or make it bigger or smaller in size. Let’s see how to change the color and size of the cursor:
Step 1: Press the Win + I keys together on your PC to open the Settings window.
Step 2: In the Settings app, on the left side of the pane, click on Bluetooth & devices option.
Step 3: Now, on the right side of the pane, select Mouse.
Step 4: In the next window, navigate to he right side and under the Related settings section, click on Mouse pointer.
Step 5: You can also select a different style for the cursor from the Mouse pointer style section.
Step 6: Go to the Size field and move the slider to the right to increase the mouse cursor size or to the left to decrease the mouse cursor size.
So, from here, you can modify the style, size and other settings for the mouse pointer on your Windows 11 PC.
How to Create a Custom Mouse Pointer on Windows 11
However, if you are not happy with the mouse pointer schemes available in the Mouse settings, you can also browse from the Windows built-in mouse pointers or add a totally new custom mouse pointer of your choice. Let’s see how:
Step 1: Right-click on Start and select Settings from the menu.
Step 2: In the Settings app, go to the left side of the pane and select the Bluetooth & devices option.
Step 3: Now, navigate to the right side and click on the Mouse option.
Step 4: In the Mouse settings window, go to the right side, scroll down towards the bottom and select Additional mouse settings below the Related settings section.
Step 5: In the Mouse Properties dialogue box that opens, go to the Pointers tab.
Now, select a scheme from the drop-down in the Scheme section.
Step 6: Next, click on the Browse button on the bottom right side of the window.
Step 7: It will open the Browse window with a list of all the available cursors in the File Explorer.
Select a cursor of your choice and press Open.
*Note – You can also select animated cursors like the aero_busy or aero_working.
Also, to change to more cursor icons, repeat the Steps 5 through 7.
Step 8: Now, as you return to the Mouse Properties window, click on the Save As button below the Scheme field.
Step 9: You will now see the Save Scheme prompt.
In the Save this cursor scheme as field, type the desired name for your selected scheme and then press OK.
Step 10: Press Apply and then OK to apply the changes and exit.
You will now have a totally new mouse cursor of your choice and thus, how you can create a custom mouse cursor on your Windows 11 PC.

