Msvcr71.dll is a DLL file that comes built-in since the first version of Windows XP. However, sometimes the file may go corrupt, or may simply go missing, forcing it to throw an error. It can be a game file or any other app or program that runs on the Msvcr71.dll file. Fortunately, the Msvcr71.dll file missing in Windows 10 or windows 11 issue can be fixed. Let’s see how.
Method 1: Replace the MSVCR71.DLL File
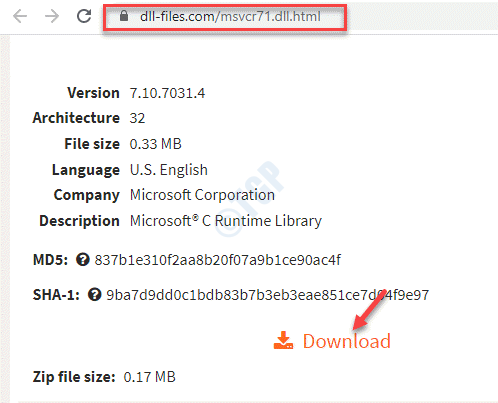
Step 1: Launch your browser and visit the below link to download the MSVCR71.DLL file:
https://www.dll-files.com/msvcr71.dll.html

Look for the latest version and click on Download.
*Note – You may find all the downloads for 32-bit architecture and may not see a download specifically for 64-bit. But, that’s fine. Even the 32-bit download will work on a 64-bit system. So, just download the highest version available.
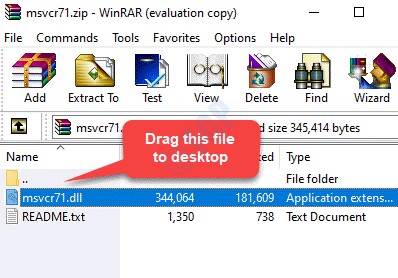
Step 2: Now, open the zip folder you downloaded and drag the msvcr71.dll file to your desktop.

Step 3: Now, check if your system architecture (if it’s 32-bit or 64-bit).
Once you have confirmed if your system architecture is 32-bit or 64-bit, press the Win + E shortcut key on your keyboard to open the File Explorer.
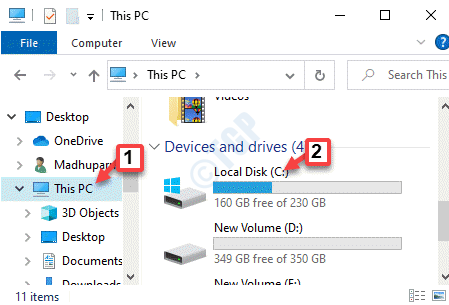
In the File Explorer window, click on This PC shortcut on the left pane and then select C drive from the right side of the window.

Step 4: Here, select the Windows folder and then open the System32 folder (for those having 64-bit system architecture).
Now, go to desktop and copy the msvcr71.dll file and paste it in the System32 folder.

Step 5: Next, press the Continue button in the pop up to grant administrator access.

Step 6: Now, go back and try opening the program. It should open now.
But, if the program still doesn’t open, open the File Explorer again, repeat Step 3 to open the C Drive.
Now, open the Windows folder and look for the SysWOW64 folder.

Step 7: Open the SysWOW64 folder and paste the copied msvcr71.dll file from the desktop.
Then, click on Continue in the pop up to grant administrator permission.

Now, exit File Explorer and try opening the program. It should open now, normally.
Method 2: Download and Install the VC++ Redistributable Package
Solution 1: By Installing the Microsoft Visual C++ 2010 Redistributable Package (x86)
Step 1: Launch your browser and visit the Microsoft official website as shown below to download the Microsoft Visual C++ 2010 Redistributable Package (x86):
https://www.microsoft.com/en-us/download/details.aspx?id=5555
Click on the red Download button to start downloading the package.

Step 2: Now, click on the setup file and follow the on-screen instructions to finish installing the package.
Once done, restart your PC and try starting the problem program and it should start normally without showing any error.
Solution 2: By Re-installing Microsoft Visual C++ 2010 Redistributable Package (x86)
If the above solution does not work, you can try uninstalling Microsoft Visual C++ 2010 Redistributable Package (x86) and then re-installing it. Let’s see how:
Step 1: Right-click on Start and select Run to open the Run command box.

Step 2: In the Run command search field, type appwiz.cpl and hit Enter to open the Programs and Features window in Control Panel.

Step 3: In the Programs and Features window, go to the right side of the pane. Under Uninstall or change a program, look for Microsoft Visual C++ 2010 Redistributable Package – x86.
Right-click on it and click on Uninstall.

Step 4: Once, the package is uninstalled, exit the Control Panel and visit the below link in your browser to download the Microsoft Visual C++ 2010 Redistributable Package (x86) file again:
https://www.microsoft.com/en-us/download/details.aspx?id=5555
Once downloaded, finish re-installing the package. Now, restart your PC and the program should open normally.
Method 3: Re-register the DLL File
Step 1: Press the Win + E keys together on your keyboard to open the File Explorer.
Step 2: In the File Explorer window, navigate to the below folder:
c:\Windows\System32
Simply copy and paste the above path in the File Explorer address bar and hit Enter.

Step 3: Now, look for the MSVCR71.DLL file in the System32 folder.
If that file exists, then you would need to re-register it.
For that, right-click on the Start menu and select Run.

Step 4: In the Run command window that opens, write cmd and press the Ctrl + Shift + Enter keys together on your keyboard to open the Command Prompt window in elevated mode.

Step 5: Now, run the below command in the Command Prompt (admin) window and press Enter:
regsvr32 msvcr71.dll

This will re-register the MSVCR71.DLL file. Shut down the Command Prompt window, and reboot your PC to check if you can open the program now.
Method 4: Run SFC Scan
Step 1: Press the Win + X keys together on your keyboard and select Run to open the Run command window.

Step 2: In the Run command search box, type cmd and press CTRL + Shift + Enter hotkey together on your keyboard to open Command Prompt in Admin mode.

Step 3: In the Command Prompt (admin) window, execute the below command:
DISM.exe /Online /Cleanup-image /Restorehealth

Step 4: the process takes a while, so wait patiently till its over.
Now, run the below command and hit Enter:
SFC /Scannow

Step 5: This process also takes a while, so wait till the scan is complete. It will automatically detect any issues and fix them in real-time.
Restart your PC for the fix to be effective and now try opening the program which was having the issue. It should work fine.