Hosts files are the files that map the actual hostnames of the systems to respective IP addresses. It is a normal text file containing the mapping of the before-mentioned items. If the hosts files are missing from your computer and you are trying to manually restore the file on your own, you are at the right place. We are going to showcase how to create the host file step by step.
How to create hosts file manually in Windows PC
Follow these steps to create the hosts file manually on your own.
1. At first, you need to type “Notepad” in the search box.
2. After that, right-click on the “Notepad” and then click on “Run as administrator“.

3. Once the Notepad screen opens up, copy-paste this code on the blank Notepad page.
# Copyright (c) 1993-2006 Microsoft Corp.
#
# This is a sample HOSTS file used by Microsoft TCP/IP for Windows.
#
# This file contains the mappings of IP addresses to host names. Each
# entry should be kept on an individual line. The IP address should
# be placed in the first column followed by the corresponding host name.
# The IP address and the host name should be separated by at least one
# space.
#
# Additionally, comments (such as these) may be inserted on individual
# lines or following the machine name denoted by a '#' symbol.
#
# For example:
#
# 102.54.94.97 rhino.acme.com # source server
# 38.25.63.10 x.acme.com # x client host
# localhost name resolution is handle within DNS itself.
# 127.0.0.1 localhost
# ::1 localhost
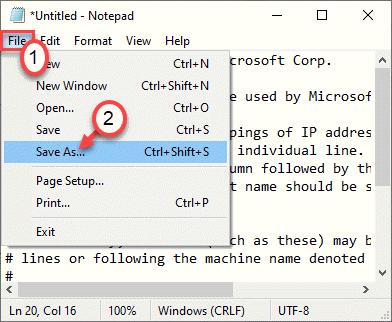
4. Once you have pasted the text, click on the “File” on the menu-bar and then click on “Save as“.

5. Choose a location to save the file (preferably, on your desktop).
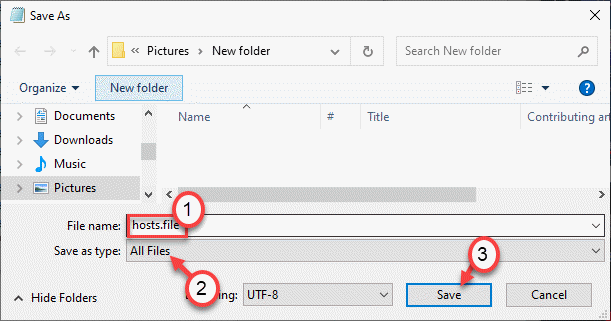
6. Name the file as “hosts.file“.
7. Click on “Save As“.
In Save as Type , Just choose All files as option.

Once you have saved the host file, you can close the Notepad window.
8. Go to the location where you have just saved the file.
9. Right-click on the “hosts.file” and click on “Rename“.

10. Name the file as “hosts“. (Just remove .file from the end)
You may see a prompt warning about the file type change, just click on ‘Yes’ to confirm the change.

11. After that, select the file and right-click and, click on the “Cut” to cut it.

12. Go to this folder location on your system –
C:\Windows\System32\drivers\etc
13. Paste the ‘hosts’ file here and your task is done.
Click Yes the prompt to replace the file.

That’s it! You have successfully restored the host file on your computer.

You may restart your computer once to let this change take effect.
Alternate method
If the above steps are looking too much for you, don’t worry! We have something stored just for you. Just download this file and paste it in the right directory to achieve the same results.
1. Simply, click on this link.
2. Then, click on “Download” to download the hosts.zip file on your system.

3. After that, unzip the ‘hosts.zip‘ file in a location of your choice.

4. Go to the location where you have extracted the file.
5. Copy the ‘hosts’ file from the location.

6. Go to this folder location on your system –
C:\Windows\System32\drivers\etc
7. Paste the ‘hosts’ file in the folder.

This should do the job. This is the way to restore the host file on your computer.