Default Program or JPG/JPEG is set to the Photos app on Windows 11 or 10 devices. But, if you have set the default program for JPG/JPEG files and facing some problems with it, don’t worry. This is a problem of file association and you can fix it following these fixes.
Fix 1 – Choose the default program for JPG/JPEG
Make sure you are using the correct program as the default app for handling the JPG and JPEG.
Step 1 – Open Settings.
Step 2 – Then, go directly to the “Apps” pane.
Step 3 – After this, you have to open the “Default apps“.
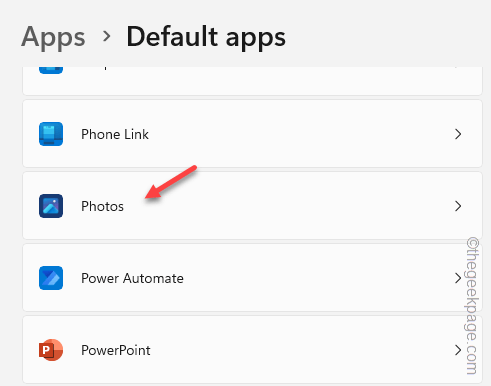
Step 4 – Go down to find the “Photos” app in there.
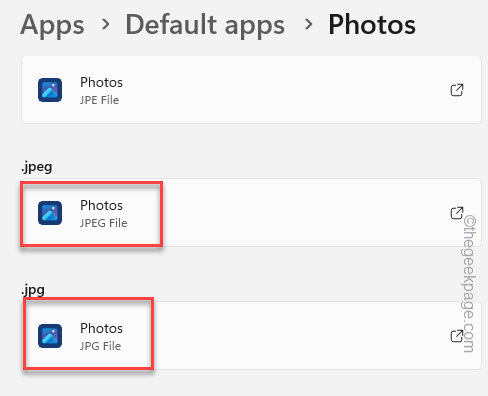
Step 5 – You will see many extensions here. Find out the “.JPG” or “.JPEG” both the extensions.
Step 6 – Make sure both of them are set to the “Photos” app.
Exit Settings. Then, try to open a random JPG or JPEG file to test if they are opening in Photos.
Fix 2 – Set the file type to the Photos
You can set the Photos app to open the particular JPG or JPEG file on your computer.
Step 1 – Open Settings.
Step 2 – After this, go to “Apps“.
Step 3 – Now, locate and open “Default apps“.
Step 4 – Go to the right-hand pane. Scroll down to the bottom and open the “Choose defaults by file type” option.
Step 5 – Input “.jp” in the search box.
Step 6 – Click the “.jpe” extension.
Step 7 – Choose “Photos” among all other apps (You can set it to another app if you want).
Step 8 – Tap “Set default“.
Step 9 – This way, make sure to set the “Photos” app for the “.JPEG” files as well.
After doing all these, try opening the JPG or JPEG files again. See if this helps.
Fix 3 – Use the Open With option
If you are opening a few files, there is an alternative arrangement that you may try.
Step 1 – Just right-click the JPG/JPEG image that you are trying to open.
If you want, you can select multiple images at once to open them all up at once.
Step 2 – Then, right-click on the selected image and tap “Open with>“.
Step 3 – Select “Choose another app” from the context menu.
Step 4 – Now, select the app that you want to use from the list of apps.
If you can’t see the app, click “Browse” to navigate to the installation directory of the photo-viewer app and select it from there.
Step 5 – Make sure to hit the “Always” button.
This way, you will see the images have opened up in the specified app of your choice.
Fix 4 – Reset the Photos app
Opening with the specific app is a temporary solution. If you are trying to open the JPG/ JPEG files in the Photos app and facing this error, follow these steps –
Step 1 – Start to type “Photos” in the search box.
Step 2 – Next, you have to right-click the “Photos” app and tap “App settings“.
Step 3 – Upon getting there, head on to the Reset section.
Step 4 – At first, we are going to repair the app. So, use the “Repair” option.
After repairing the Photos app, try to open a random JPG or JPEG image. Check if this is working.
Step 5 – Otherwise, find the “Reset” option on the Photos app page.
After resetting Photos, try to open a random image and test.
Fix 5 – Reset the file associations
If nothing has solved it, this solution should be the one where you reset all the default file associations.
Step 1 – You can reset the file associations. Type “default apps” in the search box.
Step 2 – Open “Default apps” from the search results.
Step 3 – Go all the way down until you see “Reset all app default apps” to reset all the bindings with apps.
Step 4 – Tap “OK“.
After this, try to open a JPG file. Windows will ask your permission to open the file using which default app.
You can easily set the app from there.
Fix 6 – Update the Windows system
It can well be caused by a new glitch in Windows. So, you should update the system.
Step 1 – Open the Settings window. Just, right-click the Windows key and tap “Settings“.
Step 2 – Go to the “Windows Update” which you shall find on the left pane.
Step 3 – Then, tap “Check for updates” so that Windows searches for the latest updates.
Windows will automatically download and install the updates. Usually, it just takes a few minutes.
Step 4 – Windows will now send you the prompt to restart the system and complete the process.
Step 5 – Click “Restart now“.
When Windows restarts, it will bring up the latest version.


